Using Nginx as a proxy for Node.js

Config file should look like this:

upstream api_domainname {
    server 127.0.0.1:5000;
}
server {
        listen   80;
        server_name  api.domainname.com;

        access_log  /var/log/nginx/api_domainname_access.log;

        location / {
                proxy_pass      http://api_domainname;
                include         /etc/nginx/proxy.conf;
        }
}

Any requests coming in on port 80 for the server name specified will be routed to your NodeJS server.

Vim Tips: Map key to shell command

When using Vim, I want to keep keystrokes to a minimum and my focus on the current terminal window.  While using Ruby I found that saving a file, flipping to a different terminal window, executing specs and flipping back was taking too much effort.

All the above steps can be solved by simply mapping a keystroke. For example, when in Normal mode I can now save the file and execute RSpec by hitting the comma key.

   :nmap , :w | !rspec --colour %

The format is fairly straight forward.
:nmap == Map a key for normal mode
, == key you want to map
:w == save file
| == join multiple commands forward
!rspec == execute RSpec
% == current file
% == cr is a carriage return meaning the command gets executed straight away

With it being this fast to map keys, if you find yourself typing too much then you can speed up your productivity with a few simply mappings based on your current context.

Resizing an EC2 Instance Volume

Diaster. You login and the first thing you see is that you only have 11.1% of space left

System load:  0.0               Processes:           68
  Usage of /:   89.9% of 7.87GB   Users logged in:     0
  Memory usage: 8%                IP address for eth0: 10.220.117.134
  Swap usage:   0%

  => / is using 89.9% of 7.87GB

  $: sudo resize2fs /dev/xvda1
     resize2fs 1.41.14 (22-Dec-2010)
     Filesystem at /dev/xvda1 is mounted on /; on-line resizing required
     old desc_blocks = 1, new_desc_blocks = 4
     Performing an on-line resize of /dev/xvda1 to 13107200 (4k) blocks.

  $: df -h
    Filesystem            Size  Used Avail Use% Mounted on
    /dev/xvda1             50G  7.1G   40G  16% /
    none                  293M  108K  293M   1% /dev
    none                  298M     0  298M   0% /dev/shm
    none                  298M   48K  298M   1% /var/run
    none                  298M     0  298M   0% /var/lock

How missing a ‘>’ killed my EC2 machine and how I brought it back to life

After spending a number of hours configuring an EC2 machine

id_rsa.pub > authorised_keys

id_rsa.pub >> authorised_keys

Panic!

Just lost all the configuration. To make matters worse, I hadn’t done a push to github. Was I just about to lose all my effort?

Thankfully, with some black magic I got the box back. One of the beautys of EC2 is the AMI. Exact machine images, yet modified with your own private key at create – exactly what I needed.

Stop machine

Create Image

Update with private key

Start.

IT WORKED LIKE A DREAM!

Couple of things like the hostname had been changed, but apart from that it was back and with all the configuration as I felt it – yet I could login. Wonderful.

Increase size of AWS instance without recreating the AMI

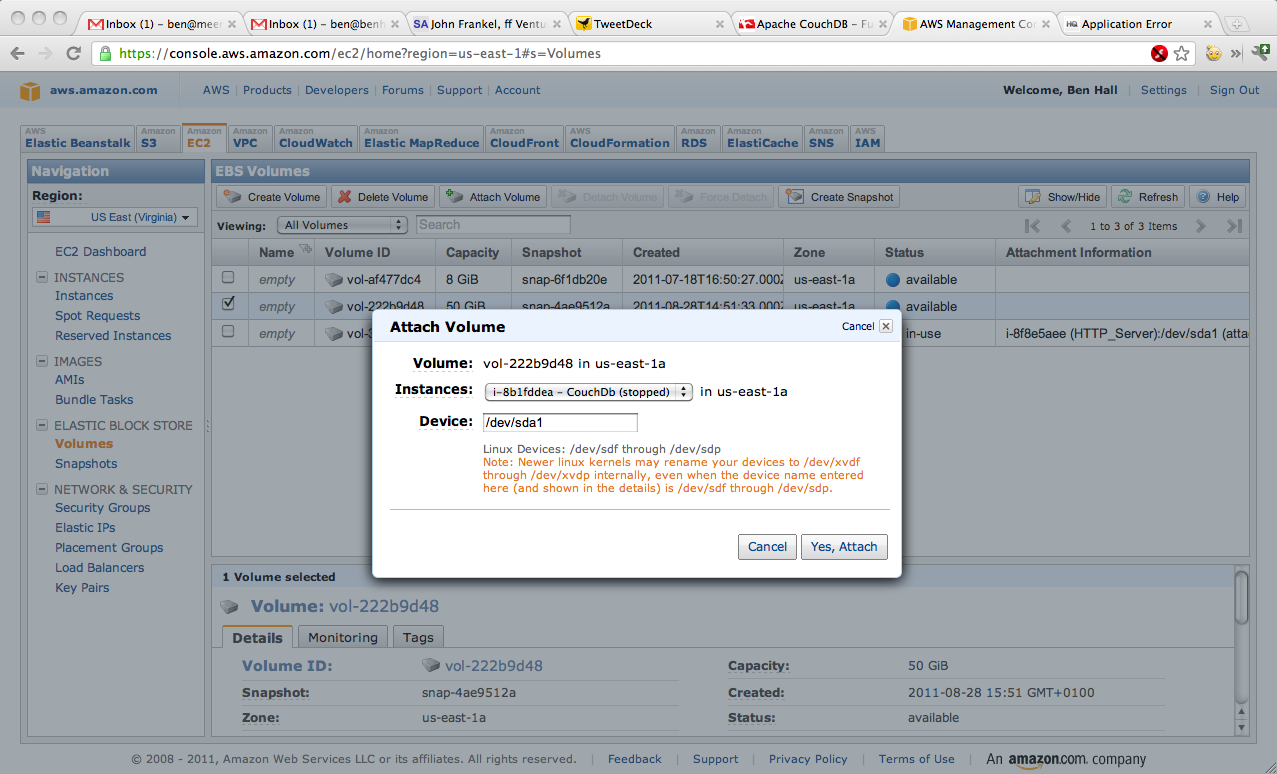
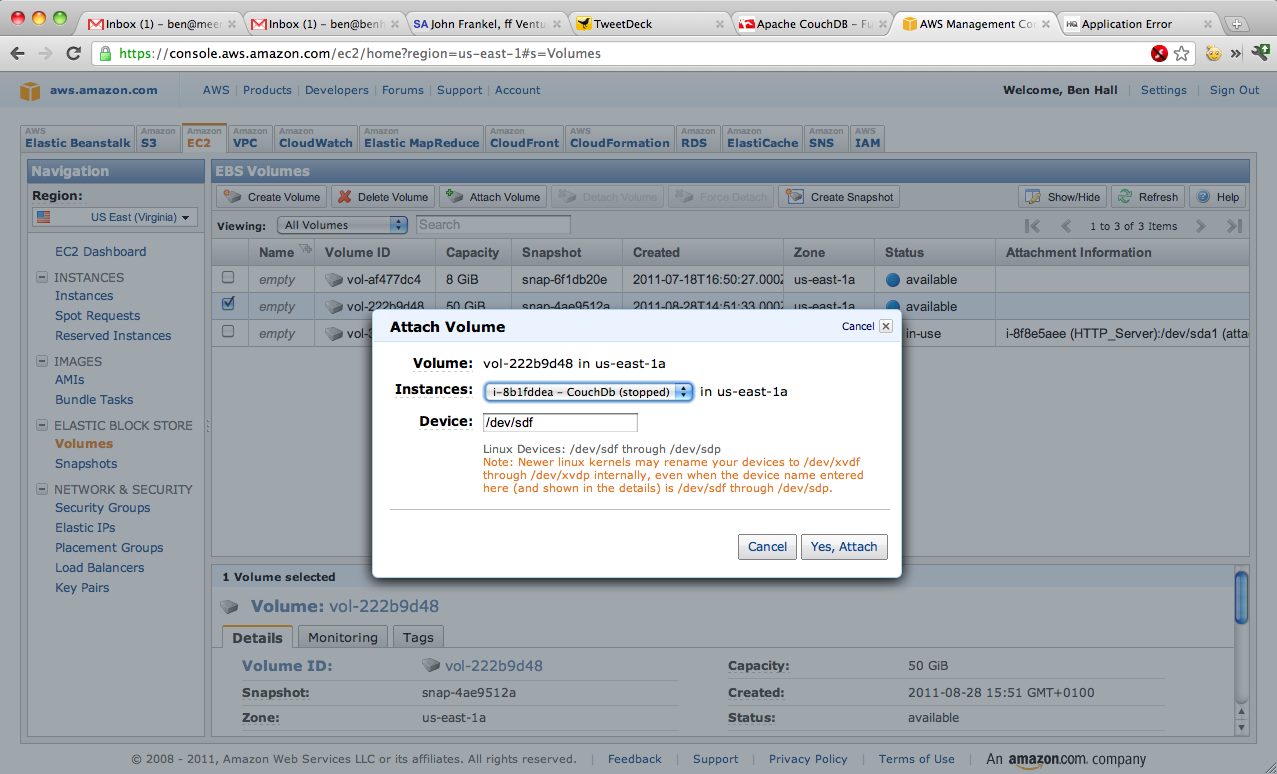
Today I started wondering, how could you move an existing Amazon Web Services machine to a bigger instance without having to recreate the machine. For example, moving from a t1.micro to m1.small.

With the help of the command line tools, it’s a fairly simply process.

First, you need to find the instanceId for the machine you want to upgrade. The command “ec2-describe-instances” will list your running instances, with the instanceId being the number starting with a i-, for example “i-0000000”.

To make the change, you need to stop the machine using “ec2-stop-instances i-0000000”

ec2-modify-instance-attribute –instance-type m1.small i-0000000

INSTANCE i-8b1fddea running stopping

Client.IncorrectInstanceState: The instance ‘i-8b1fddea’ is not in the ‘stopped’ state.

instanceType i-8b1fddea m1.small

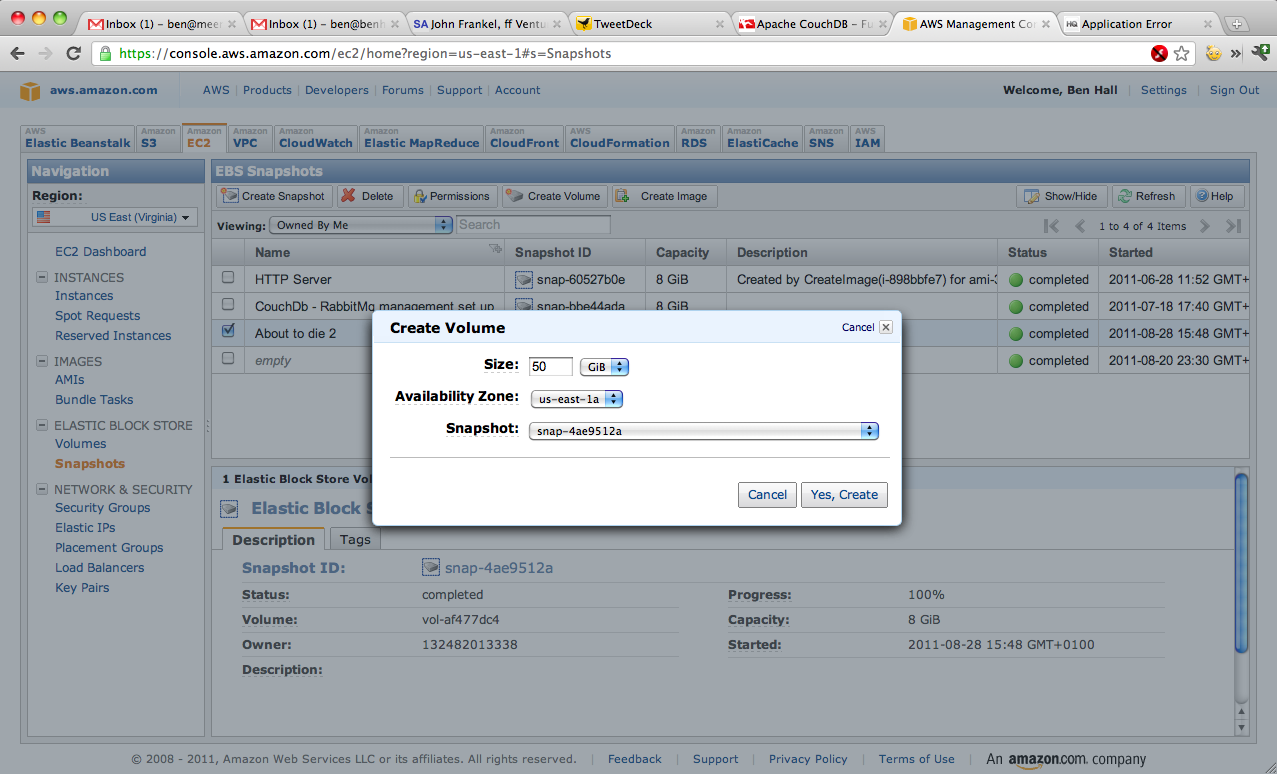
ec2-create-snapshot vol-af477dc4 –description “Moved to small 20/Aug/2011”

SNAPSHOT snap-020cce62 vol-af477dc4 pending 2011-08-20T22:30:05+0000 132482013338 8 Moved to small 20/Aug/2011

ec2-start-instances i-0000000

First play with the Cloud-Based Amazon Reader

In the last few hours Amazon announced their “Cloud Reader”, enabling you to read your Kindle collection from a browser. Sounds great, but what’s the implementation like?
Webkit based means no Firefox
Firstly they’re promoting it as a web-based reader, however with their use of WebSQL database they only support Chrome and Safari. Attempting to use the service using the FireFox 8 Nightly builds results in the message “Your web browser isn’t supported yet. Download Chrome or Safari below.”.
Initially I was surprised they didn’t use an abstraction layer allowing them to support IndexDB (Firefox IE) and WebSQL (Webkit). From reading articles, it looks like their target market is tablet devices meaning Webkit based browsers, making supporting only WebSQL an obvious choice. This is an important point for developers – understand your user-base when developing products. Release a product that works for your target audience, only add additional time and complexity if there is demand.
When I jumped into the product, there were a few more interesting surprises. I was shown was an option to setup Offline Reading. From a users point of view this was very surprising – most people would assume offline reading would be enabled by default.
Instead, it expects me to install a Chrome Extension. Amazon knows they will always have HTML5 and WebSQL available so I’m guessing this allows them to get around DNS lookups when no wi-fi is found.


Sadly, after clicking Install I was shown a blank tab with no explanations and nothing listed under my browser extensions. Not a great experience. I do have an Amazon Reader WebApp icon, however this process feels confusing and unnecessary mainly because of the time within the journey they asked me but also the lack of indication from Chrome about if it’s an App or Extension.
Explicit Offline Mode
Within the reader the offline mode becomes even more confusing. They have made a separation between Cloud and Downloaded which makes sense with a large library but if your currently reading a book is that classed as cloud based or downloaded? From what I could tell it was cloud based which could become annoying. Having the separation of Cloud vs Available Offline would have made more sense based on other terms and phasing used in the application.

However, the reader is impressive. It shows how HTML5 and Javascript based applications can create compelling experiences, reaching beyond the web browser.


Yet, with functionality such as reading preferences not being used across different browsersdevices the reader still has a long way to go.
No wifi but still works
As proof of the potential, what actually happens when you don’t have wifi? The first attempt was a complete failure.

After closing and reopening browsers it worked as expected and I was shown my offline book which was pretty impressive.
This is the start of an interesting future for HTML5 readers with fellow Springboard team Publification creating BrowserBooks which works without having to download extensions and where offline reading is implicit – just like you would have expected.

I’m a pirate – let’s make change – @PromoteJS

Ian Cooper posted a link to a talk from JSConf about Pirate vs Privateers. This an inspirational talk for anyone who’s passionate about their craft. It discusses many of the issues faced by the JavaScript community today with calls to action for improving the life of everyone – one being better documentation, hence the link below. I highly recommend you watch the video, or read the transcript for the talk.

Alt.Net tried this but was held back by “Sex, Lies, and Comparing Sizes”. C# and the .Net platform is becoming a ghetto with many leaving the neighbourhood – like Javascript, now is the time to change it.

I’m a pirate. Let’s make change.

JS Array reverse

Adding IronRuby and JRuby to your OSX path

After downloading IronRuby and JRuby to do some hacking over the Christmas period, I wanted to add them to my PATH variable on OSX. In Windows, this is fairly easy to find but is hidden a few dialogs down.

In OSX, you need to edit the .bash_login file in your user directory. A simple nano ~/.bash_login will allow you to edit the file (replacing nano is your own favourite editor).

To add IronRuby to your path add:

export PATH=/Users/Ben/Library/ironruby-0.9.3/bin:$PATH

Import points:
1) The path to your IronRuby bin folder.
2) Ensure you add the existing $PATH to the end
3) Export the result to the current PATH variable. Note, this is case sensitive.

To add jRuby you do it in a very similar fashion. However, because of priorities and how jRuby works, unless you want jRuby to be the default, add it to the end of the path export

export PATH=/Users/Ben/Library/ironruby-0.9.3/bin:$PATH:/Users/Ben/Library/jruby-1.4.0/bin

You should now be able to see all your ruby interpreters.

Ruby_OSX.png