Using MSBuild to create a deployment zip

Automated builds are one of the core fundamental musts for software development. However, your build doesn’t just have to build the solution and execute your unit tests. For IronEditor, my build also creates two zip files. One zip is the output from the build for archiving purposes, the second is my deployment zip – the zip which actually gets pushed up to CodePlex containing only the files required by the application. In this post, I will cover how you can get MSBuild to zip your build output.

To use zipping functionality within your build scripts, you need to use the MSBuild Community Tasks which is a great collection of MSBuild extensions and a must if you are using MSBuild.

In order to zip your files, you need to specify which files you want to zip. In the script below, I create an ItemGroup called ZipFiles, this includes all the subdirectories (**) and files (*.*) from my Release directory which is my build output folder. I also specify that this group should not include any other zip files. I then create a Builds directory if it doesn’t already exist. Finally, I use the Zip task, passing in my ZipFiles ItemGroup which the task uses to know which files to include.


         WorkingDirectory=”$(BuildDir)Release”
       ZipFileName=”$(BuildDir)BuildsIronEditor-Build-$(Version).zip”
       ZipLevel=”9″ />

The most important property is the WorkingDirectory, this is the root directory where all the files you want to exist live. If you don’t have this set correctly, you will have the additional directories in your zip file which are navigated in order to get to your actual files and just looks rubbish.

My deployment zip also looks very similar and is executed after the above target. The only different is that I individually specify which files and directories to include. For some directories, such as Config, I still include all sub-directories and files it contains as they will all be relevant and required.


         WorkingDirectory=”$(BuildDir)Release”
       ZipFileName=”$(BuildDir)BuildsIronEditor-$(Version).zip”
       ZipLevel=”9″ />

One thing which tripped me up was that while my ItemGroup was created within a target, it actually has global scope. As such, you need to call the two groups within the two different targets something different.

Once my script has executed, I have two zip files created – one containing everything, the other ready to be released on CodePlex.

image

Technorati Tags: ,

Continuous Integration Builds for CodePlex Projects

As many of you might be aware, I maintain the IronEditor project on CodePlex.  I like CodePlex, I find the wiki and issue tracking to be useful, but I find the directory structure and searchablity of projects on the site to be most useful. However, the one thing which I wish it could offer, and this goes for Google Project Hosting as well, is a continuous integration server. I would like to know that after I have pushed my changes to CodePlex, that it does actually compile.

As I’ve posted before, I run TeamCity on my home machine as it is free and easy to configure. As TeamCity can connect to Team Foundation Server (what CodePlex runs under the covers), I decided I would just be able to connect to the CodePlex servers and threat it like any normal source control system.

Sadly, I was wrong. When I tried to connect, I found the following (extremely helpful) error:

image

If anyone knows the reason why this failed, please leave a comment.

However, all is not lost! CodePlex have created the SVNBridge, a small application which runs on your local machine, or in this case your CC server. This translates all SVN commands into TFS commands, the result is that you can connect to CodePlex using SVN clients, one of which is TeamCity!

Connecting TeamCity via SVNBridge to CodePlex

SVNBridge is a single executable. It lives in the system tray and listens for communications on a particular port, in my case 8081.

image

In order to connect to SVNBridge, and as such your CodePlex project you must use a particular URL.  The URL is your SVNBridgeAddress/YourCodePlexServer/YourProject

For example, IronEditor lives on tfs03.codeplex.com and in order for me to connect via the bridge my URL would be:

http://localhost:8081/tfs03.codeplex.com/IronEditor

With my setup, I simple wanted to be able to click run and TeamCity go off, download the latest code from TFS, build my solution and execute my unit tests again just to be sure I haven’t broken anything (or in my case simply forgot to upload the latest code changes).

In order to connect TeamCity to CodePlex, you simply need to use the Subversion VCS settings and point it at your SVNBridge. Below, are my settings for IronEditor. The username and password you need to use to connect are your website login details.

image

On TeamCity’s dashboard, I now have my new CodePlex build along with my local IronEditor build, both run the IronEditor.build MSBuild script, they just pull the sources from different locations. After I have pushed my changes to CodePlex, I manually click run, and off it goes. The reason I don’t have it manually checking is because it’s rare I push changes to codeplex and as such I’m happy to be in control of when it happens.

image

TeamCity is now happily talking to my CodePlex repository, building as and when asked. If you happen to have a spare server, or a windows home server, then you could run this setup from there, have it automatically check for modifications with all the developers on your project benefiting.

Technorati Tags: , , ,

Announcing IronEditor – An Editor for IronRuby, IronPython and other DLR languages

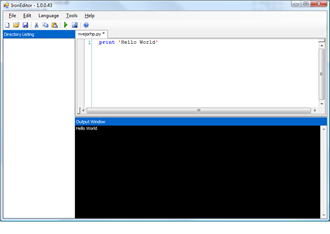
IronEditor 1.0.0.44For a while now I have been working on an application called IronEditor, this is a simple application designed to make it easier to pick up and start coding against the DLR based languages. By taking advantage of the DLR’s Hosting API, the application can execute code for any language built on top of the DLR platform.

The project is hosted at CodePlex, along with all of the source code.

Download: http://www.codeplex.com/IronEditor

Build: 1.0.0.46

Out of the box, the application works with IronRuby and IronPython, however one of the main aims of the application is to allow other languages to be easily embedded into the application.

The reason why I decided to build this is because Visual Studio Integration for the languages is a long way off and while playing around and creating code to use the languages is painful via the provided console applications. As such, the aim of the application is to provide a very lightweight way to edit and execute code, great while learning the languages and giving demos (I used this application for my NxtGenUG Oxford DLR session).

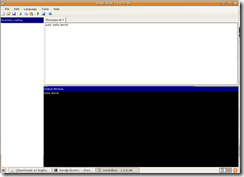
One of the items I’m really pleased about is the fact that the application works on Mono (Tested only on Ubuntu 8.04 and Mono 1.9.1), something which will definitely not be possible with the Visual Studio integration.

To run the application, you will need to ensure you have Mono installed on your machine. Download the application and extract the zip into a directory. Then enter the command:

mono IronEditor.exe

You will then have the same application, same binaries everything working on Mono.  The only difference is that syntax highlighting for IronPython doesn’t work at the moment.

IronEditor running on Mono 

I admit, at the moment the application is very basic. However, over the next few weeks and months I will build new features into the application to make it easier to start playing around with the DLR languages.

Executing IronRuby and IronPython Code

1) Start the application

2) File > New Project

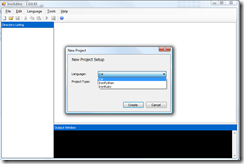
3) From the drop down, select your language

NewProject

4) Type some code (print ‘Hello World’ is always good)

5) Press the green arrow, or hit F5.  Code is executed and the output is wrote to the Output Window.

Very quick and easy I think!

There are some very big limitations and bugs within the application, but I’m going for the ‘Release Early, Release Often’ approach. Various items could be improved, for example Ruby doesn’t have any syntax highlighting but this will come in time. There are some other much larger features I want to implement, keep an eye on the blog for more information as and when. Over the next few weeks I will also be blogging about the implementation of IronEditor and how it uses the DLR Hosting API. 

Any feedback is most welcome!

NOTE: As I mentioned this is a very early, it hasn’t had a great deal of testing.  Please don’t use it on your production code base just yet! I wanted to get a release out for some initial feedback, if it causes everything to go wrong – I’m very sorry!

Download: http://www.codeplex.com/IronEditor

Build: 1.0.0.46