Identify the location of your SQL Server databases using T-SQL

While creating a series of test databases, I was required to hardcode a location to store the files. This caused me a problem as I wanted the script to be reusable on different machines platforms while also being consistent. I couldn’t enter the path for the SQL Server data files as this can be different, and I couldn’t enter a different path because it might not exist and I wasn’t keen on creating directories via T-SQL and xp_cmdshell.

While, it turns out you can find the location of your default SQL Server store simply by querying the system tables –sysaltfiles and getting the path for a particular database such as master.

DECLARE @device_directory NVARCHAR(MAX)
SELECT @device_directory = SUBSTRING(filename, 1, CHARINDEX(N’master.mdf’, LOWER(filename)) – 1) FROM master.dbo.sysaltfiles WHERE dbid = 1 AND fileid = 1

After executing the query, on my local machine the value of @device_directory is ‘C:Program FilesMicrosoft SQL ServerMSSQL.3MSSQLDATA’

The variable can then be used when creating the files, for example filegroups for your database.

EXECUTE (N’CREATE DATABASE Northwind
  ON PRIMARY (NAME = N”Northwind”, FILENAME = N”’ + @device_directory + N’northwnd.mdf”)
  LOG ON (NAME = N”Northwind_log”,  FILENAME = N”’ + @device_directory + N’northwnd.ldf”)’)
go

Using SQLCmd to output results

SQL Management Studio is a great application, however there are times when SQL Server Management Studio (SSMS) is unavailable (either too slow to start, or simply not installed). However, there is a really useful application called sqlcmd which is installed with SQL Server. This is a command line application, located in C:Program FilesMicrosoft SQL Server90ToolsBinn (SQL Server 2005), you should find that this location has been set in your %PATH% environment variable meaning you can execute it from anywhere, which allows you to connect to a server, execute SQL commands and for the results to be outputted in the console window.

Below, I am connecting to my local SQL Express instance, and querying the Customers table in the Northwind database.  The results of the query, in this case the amount of rows in the table is displayed.

Z:>sqlcmd -S .SQLEXPRESS
1> USE Northwind
2> SELECT count(*) FROM Customers
3> GO
Changed database context to ‘Northwind’.

———–
       1000

(1 rows affected)
1>

It’s really quick and it’s great if you just want to execute a simple command and don’t want to wait 5 minutes for SSMS to load. A word of guidance, to execute the query you need to execute the GO statement, this will then execute everything in the batch.

Technorati Tags:

SQL Server Reporting Services – rsReportServerDisabled error

A while ago I had to test a report created with SQL Server 2000 Reporting Services.  After installing Reporting Services and uploading the reports, went I attempted to access them I was shown the following error message.

Error rsReportServerDisabled : The report server cannot decrypt the symmetric key used to access sensitive or encrypted data in a report server database. You must either restore a backup key or delete all encrypted content and then restart the service

A little bit scary as I had no backup! After a bit of searching, I worked out I had to execute this command:

C:Program FilesMicrosoft SQL Server80ToolsBinn> rsactivate -r -c”C:Program FilesMicrosoft SQL ServerMSSQLReporting ServicesReportServerRSReportServer.config”

After which, everything worked just fine.

Technorati Tags:

Using SQL Data Generator with your Unit Tests

Last month we released SQL Data Generator which is a great tool for generating your devtest data. One of the decisions we made for 1.0 was not to include an API. I wanted to be able to incorporate the data generation into my automated tests, so I have created an extension to SQL Data Generator as a side project which allows you to incorporate the generation process into your unit (well Integration) tests. You can now generate data as part of your unit tests.

I have wrote an article on my approach and how to use the framework over at Simple Talk – http://www.simple-talk.com/sql/sql-tools/using-sql-data-generator-with-your-unit-tests/

For the extension, I took two approaches. One approach was just a POCO (Plain Old CLR Object) which would execute the command line application for a given project file. This could be placed anywhere in your code, ideally I was thinking in the TestFixtureSetup.

[TestFixtureSetUp]
public void TestFixtureSetup()
{
    SDGConsoleWrapper sdgConsoleWrapper = new SDGConsoleWrapper(@”DatabaseNorthwindEmployees_Orders.sqlgen”);
    sdgConsoleWrapper.Execute();
}

As a parameter, you pass in the filename for the project file created via the UI.

The second approach is using custom attributes. By adding an attribute ‘SDG’ to the TestFixture and inheriting from ‘SDGContext’, we hooked into the calls for each method.  At the top of your test method, you can add the ‘SDGExecute’ with the project file name, this will then be executed before that test started.

[TestFixture]
[SDG]
public class DataAccessTests : SDGContext
{
   [Test]
   [SDGExecute(“DatabaseNorthwindCustomers_Orders.sqlgen”)]
   public void GetCustomerByID_SDGProject_1000Rows()
   {
      DataTable dt = DataAccess.GetCustomerByID(“00040”);

      Assert.AreEqual(“00040”, dt.Rows[0][“CustomerID”]);
      Assert.AreEqual(“Suppebentor Holdings “, dt.Rows[0][“CompanyName”]);
      Assert.AreEqual(“Bobbi Yates”, dt.Rows[0][“ContactName”]);
      Assert.AreEqual(“Web”, dt.Rows[0][“ContactTitle”]);
      Assert.AreEqual(“564 White Old Freeway”, dt.Rows[0][“Address”]);
   }
}

Best of all – this works with all of the unit testing frameworks! NUnit, MbUnit, XUnit, MSTest! They all can take advantage.  Feel free to download (from our CodePlex project) and start using it, I suggest you read the article for more of an in-depth overview of what is going on and the possible ways you can take advantage of it.

Finally, we would love to hear your feedback on this. I created this in my free time and is not a supported solution. However, do you think the application should have a fully supported API? Are you happy with the approach I have taken or do you think there are better ways of doing this?  Maybe your comments will help shape SQL Data Generator 2.0.

Article Link: http://www.simple-talk.com/sql/sql-tools/using-sql-data-generator-with-your-unit-tests/

Application Download Link: Red Gate SQL Data Generator

Download and Source: http://www.codeplex.com/SDGGenerators

Creating partition tables in SQL Server 2005

Partition Tables is a feature of SQL Server 2005 which allows you to separate your data into blocks (partitions) of data to improve performance and manageability as each partition can be stored in its own filegroup, which in turn can be on a separate disk array. In this post, I will cover how to partition your table, the table will contain a series of orders which I want to partition based on their order date.

The first thing I want to do is create a database.

CREATE DATABASE PartitionTest
GO

USE PartitionTest
GO

Next, I want to create a table which will contain all of my ‘orders’.

CREATE TABLE Orders (ID INT NOT NULL, OrderDate DATETIME NOT NULL)

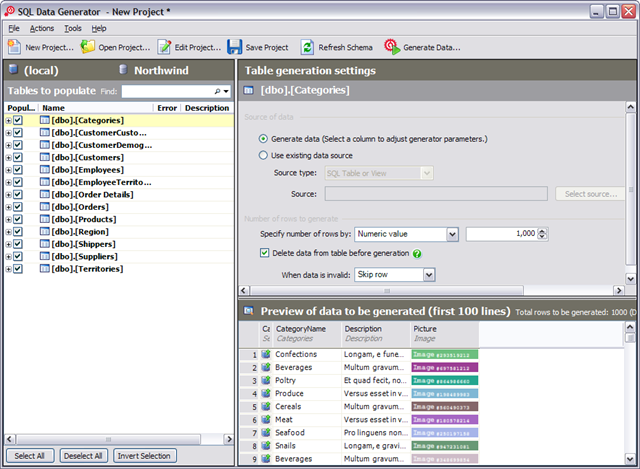
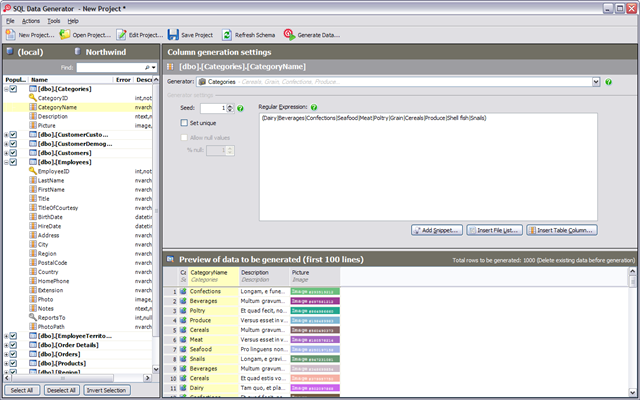
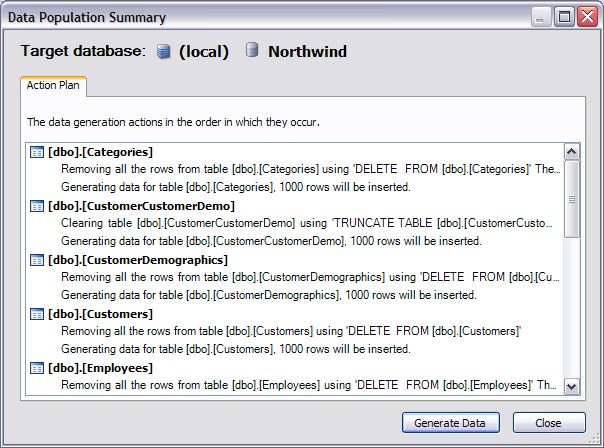
Next, I got SQL Data Generator to generate me 10 million ‘Orders’ for the table.  This gave me a large number of dates between 01/01/1953 and 30/12/2010 (values I had set) – so a nice big table which really needs to be partitioned. With that in place, we can create our partition. 

First, we need to create a partition function, give it a name and the data type we are partitioning based on – in this case DateTime. We need say RANGE LEFT (anything on the left hand side goes into the partition), we then list the series of values we want to split the data based on.  In this case, anything below 31/12/1950 goes into partition 1, between 1/1/1951 and 31/12/1960 into partition 2 etc

CREATE PARTITION FUNCTION OrderDateRangePFN(datetime)
AS
RANGE LEFT FOR VALUES (‘19501231 23:59:59.997’, –YYYYMMDD
                        ‘19601231 23:59:59.997’,
                        ‘19701231 23:59:59.997’,
                        ‘19801231 23:59:59.997’,
                        ‘19901231 23:59:59.997’,
                        ‘20101231 23:59:59.997’,
                        ‘20201231 23:59:59.997’)

At this point, we create a partition schema.  In this case, I’m using saying all the partitions should be stored in the primary filegroup, however this is where we would allocate the partitions to separate filegroups.

CREATE PARTITION SCHEME OrderDateRangeScheme AS
PARTITION OrderDateRangePFN
ALL TO ([PRIMARY])

At this point, we have a table with 10 millions rows, a partition function and a partition schema. However, nothing links the partition to the table.  What we need to do is create a new Primary Key which we can set the partition schema on. If you have any existing keys, they will need to be dropped and re-created with the partition schema included.

ALTER TABLE Orders
ADD CONSTRAINT OrdersPK
   PRIMARY KEY CLUSTERED (OrderDate, ID)
  ON OrderDateRangeScheme(OrderDate)
GO

If the table wasn’t already created, we could include the partition schema in the create table script.

CREATE TABLE Orders (ID int, OrderDate DATETIME) ON OrderDateRangeScheme(OrderDate)
GO

In the above function, the year 2000 partition was missing. If we wanted to include this we would alter the function and include a split range

ALTER PARTITION FUNCTION OrderDateRangePFN () split RANGE (‘20001231 23:59:59.997’)

After executing all of this, your table will successfully be partitioned. To verify the details of the partition, there are a few queries we can execute.

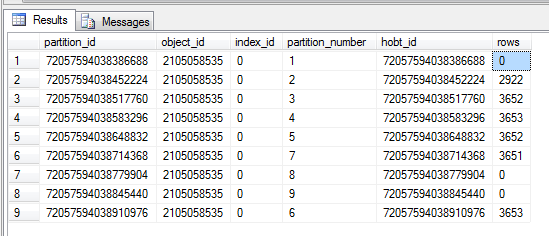
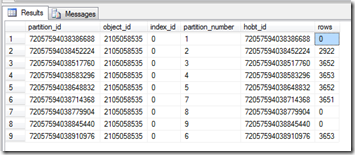
The system view partitons contains all of the information, we can query this to return all the partition information for a table.

SELECT * FROM sys.partitions
WHERE OBJECT_ID = OBJECT_ID(‘Orders’)

This returns the partition number and how many rows are in each partition.  This is useful for identifying if your partitions are split correctly or if one partition needs to be split down more.

image

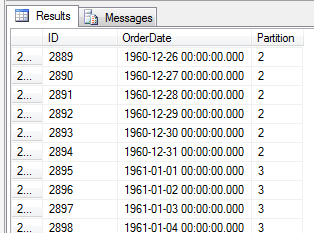
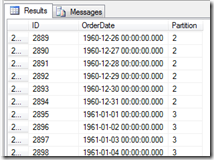
The other way is to use a $Partition, this gives the partition number for the row of data. This allows you to see what data is in what partiton

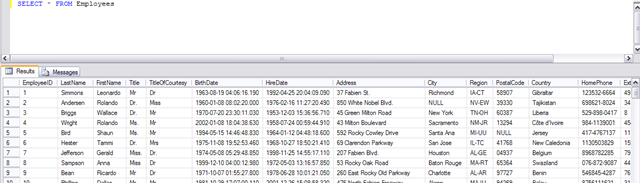
SELECT *, $Partition.OrderDateRangePFN(OrderDate) AS [Partition] FROM [Orders] ORDER BY [Partition]

image

More information visit http://www.simple-talk.com/sql/sql-server-2005/partitioned-tables-in-sql-server-2005/

Technorati Tags:

Red Gate SQL Data Generator 1.0 – Generating data for Northwind

Red Gate SQL Data Generator1022 builds later, today, we (Red Gate) released SQL Data Generator which is available to download as a 14 day trail. SQL Data Generator intelligently creates meaningful test data by automatically taking the table and column names in to account, along with field length and any existing constraints. We feel it’s a great tool and is really useful during test and development, it’s just a great tool to have in order to quickly fill your database. From a DBA’s point of view, the tool is great for performance and scalability when huge amounts (millions of rows) is required to test against.  To prove this, see below for how I used the application to generate data for the Northwind database.

We are really looking forward to hearing what you think in order to make the best possible product.  If you have any comments or questions, please let us know via the forums.

On a side note, we have created a CodePlex site to host all any generators created by the community.  We already have a few online for you to download and use so I strongly recommend you take a look.  My favourite generator is the C# Code Generator created by Lionel, allowing you to write and compile C# code directly within the UI to use as the column generator.

Generating data for Northwind

Northwind is one of the sample Microsoft databases originally shipped with SQL Server 2000 and is used in a very large number of articles, as such it seemed logical to use it for this post. Below demonstrates how you can very quickly generate data for the Northwind database.

After loading the application, you will be presented with a Project Configuration dialog.  This allows you to specify which server and database you want to produce data for.  At this point you can configure project options, such as prepost scripts to execute and if triggers should be fired when generating data.  I’m just going to connect to my local server and the Northwind database.

image

At this point, the application will load the schema and automatically attempt to match our built-in generators to columns within your table. The screenshot below has three main areas, the list on the left specifies which tables will be populated. The top middle panel provides all of the generation settings for the table or column (based on what is selected).  In this example, I have the Categories table selected and I wish to generate 1,000 rows.  In the lower middle panel, you have a preview table of how the data might look.  The CategoryName column has been populated with some possible categories, while Description has some latin text with the Picture column being populated with a valid image. This is straight out of the box, I haven’t done anything yet apart from connect to the database.

 image

Selecting a column in the preview table displays the column generation settings.  Each generator has its own set of properties allowing you to adapt the data to your own requirements, you can also select different generators by using the dropdown at the top. I’m happy with the pre-defined data so I will leave it as it is.

image

Clicking the Generate Data… button on the toolbar will display the Data Population Summary, this just simply says what is going to be done against the database. In this case, DELETE FROM and TRUNCATE TABLE commands will be executed with 1000 rows being inserted for each table. 

image

Clicking Generate Data will populate the table. After which a report will be displayed detailing what happened and if any errors occurred. The data looks to have been inserted successfully, It’s amazing how quickly data can actually be generated using this application. 

image

That’s it – very direct and simple. We can select data from the table using SQL Management Studio.  This data is all the default settings, I haven’t modified anything.

image

If your happy with the data produced then you can save generation settings as a project file to use later, or you can tweak the settings to tailor the data generated for your own database.

However, the application has really loads of cool features which I haven’t even touched on here, hopefully I will be able to cover them in later posts and articles.  Until then, why don’t you download the free 14 day trail from the website and see what features you really like. The team and I would love to hear your feedback!

More information at http://www.red-gate.com/products/SQL_Data_Generator/index.htm

Product forums at http://www.red-gate.com/sqldatagenerator/forum/v1

CodePlex website at http://www.codeplex.com/SDGGenerators

What is OBJECT_ID in SQL Server?

If you ever looked at the dynamic management views or one of the system catalogs in SQL Server a column called Object ID will be associated, from the looks of it this number doesn’t actually relate to anything – but there is actually a lot more to it than that. Object_ID is a unique id number for an object within the database, this is used internally by SQL Server.  It should be noted, not all objects have an object_id.  DDL triggers for example do not as they are not schema-scoped.

If we run a query against sys.columns, lots of information will be returned about all the columns in the database.

SELECT * FROM sys.columns

However, the result set will look something like this:

object_id | name | column_id ….
4    rowsetid    1
4    rowsetcolid    2

151671588    MiddleName    4

While the column name is in readable text, the object_id isn’t actually anything useful (to a human).  In fact, this is the ID of the table which the column belongs to. In order to get the name of the object from the object_id there is a function called Object_Name(). This will take the object_id and return a readable name. If we re-run the query but including the object_name

SELECT OBJECT_NAME(object_id) as TableName, * FROM sys.columns

Then the table name is returned in a helpful manner.

TableName | object_id | name | column_id ….
sysrowsetcolumns    4    rowsetid    1
sysrowsetcolumns    4    rowsetcolid    2
vEmployee    151671588    MiddleName    4

We could also use the Object_ID() function to obtain the object_id for an object in database.  For example, the query below asks for the object_id for the Customers table in Northwind.  This returns 21575115 

USE Northwind
GO
SELECT OBJECT_ID(‘Customers’)

Of course, flipping this around will return us Customers again.

USE Northwind
GO
SELECT OBJECT_NAME(21575115)

There is also a similar function when you are given a schema_id. Schema_Name() works in the same fashion but returns the schema name based on the Schema_Id.

SELECT OBJECT_NAME(object_id), SCHEMA_NAME(schema_id), * FROM sys.tables

Hopefully this will clear up what Object_ID is. I know next time I query one of SQL Server tables I will be able to return at least some more meaningful information.

Technorati Tags:

Finding a databases size in SQL Server 2005

While reading my SQL Server 2005 MCTS book, I came across sp_helpdb.  This is a database engine stored procedure which can provide you with information about the databases in your system. You can execute the stored procedure within management studio using:

sp_helpdb

This will return the following results set.

image

As you can see, it has given information about each database – including db_size of the database.  The status containing more information about the database, the status for AdventureWorks is:

Status=ONLINE, Updateability=READ_WRITE, UserAccess=MULTI_USER, Recovery=SIMPLE, Version=611, Collation=Latin1_General_CS_AS, SQLSortOrder=0, IsAnsiNullsEnabled, IsAnsiPaddingEnabled, IsAnsiWarningsEnabled, IsArithmeticAbortEnabled, IsAutoCreateStatistics, IsAutoUpdateStatistics, IsFullTextEnabled, IsNullConcat, IsQuotedIdentifiersEnabled

We cam also execute it for just a single database.

sp_helpdb @dbname = ‘AdventureWorks’

This will return the same information as above for the table, but we also get information about the actual filegroups for the database, for AdventureWorks we just have the primary filegroup for the data and the transaction log.  This can also be obtained by executing sp_helpfile.

image

This can also be obtained by using the Report button on the Summary tab for a database within SQL Management Studio.  The report we are interested in is the Disk Usage report.

image

This will display the information in a nice table view, however takes a lot longer to execute and process than the raw queries.

image

The above report also gives information about Disk space used by tables (along with a few other items).  This can be obtained by executing sp_spaceused which will return the information on a database as a whole. If you are interested in a particular table, then you can set it as a parameter.

EXEC sp_spaceused @objname = ‘HumanResources.Employee’.

image 

Technorati Tags:

SQL Server – Bulk Copy Program (BCP) Export

Within SQL Server, there is an application called Bulk Copy Program (BCP) which is generally used for importing data very quickly into SQL Server.  However, the application also has the functionality to export data from a table or query into an external file.

Below is the command to export all of the data from Northwind.dbo.Customers into a NorthwindCustomers.csv file.  I then use the -t, to say the column separator should be a comma.

“C:Program FilesMicrosoft SQL Server90ToolsBinnbcp.exe” Northwind.dbo.Customers out “C:NorthwindCustomers.csv” -c -T -t,

If we wanted some more control, we could write a SQL query and use the queryout option to export the results returned.

“C:Program FilesMicrosoft SQL Server90ToolsBinnbcp.exe” “SELECT * FROM Northwind.dbo.Customers” queryout “C:NorthwindCustomers.csv” -c -T -t,

Combine this with xp_cmdshell, and all of it can be done from a stored procedure. Great way for getting data very quickly out of a table and into a flat file.

Technorati Tags:

SQL Express Error – “Failed to generate a user instance of SQL Server”

Having lots of fun with SQL Express tonight, attempting to load another sample I hit another error:

—————————
Microsoft Visual Studio
—————————
Failed to generate a user instance of SQL Server due to a failure in copying database files. The connection will be closed.
—————————
OK  
—————————

In the connection string, I changed it from creating a user instance each time to using a single instance and it appeared to solve my problem.

This is done by modifying the connection string to be “User Instance=False;” instead of “User Instance=True;”

Technorati Tags: