Setting a cookie in Javascript shouldn’t be THAT difficult

With Javascript becoming increasingly popular, I’m still shocked at how bad the online documentation and examples are.  Let’s take the search phase “setting a cookie in javascript“, a fairly common problem which I always forget the correct syntax for.

The first four results are as follows:
http://www.w3schools.com/js/js_cookies.asp
http://www.quirksmode.org/js/cookies.html
http://techpatterns.com/downloads/javascript_cookies.php
http://www.javascripter.net/faq/settinga.htm

Sorry to the original authors, but each one of them IS AWFUL!

Let’s take W3Schools as an example. It defines a variable called ARRCookies are could be for Pirate Cookies (via @Blowdart) or ARRay (via @AndrewVos) – both of which are great examples of creating Clean Code. To make matters even worse, this example has spread like a virus with Google returning 288,000 results and GitHub returning 398.

The best link which describes handling cookies, and generally any Javascript documentation, can be found on the Mozilla Developer Network (MDN).

https://developer.mozilla.org/en/DOM/document.cookie

While I’m not an SEO expert, this looks to be light on SEO (Search Engine Optimisation) related to phases people search for. As a result the link was found in the lonely spot on page 3 which is should be number 1.

Wouldn’t it be great if MDN had SEO focused content to support the excellent reference material it already has available? The PromoteJS movement has made a start but I think it needs a kick-start.

Who’s with me?

UPDATE (20/1/12):

In a moment of great timing, the Mozilla WebDev team started a AMA (Ask Me Anything) thread on Reddit. I pointed out the above comments and had some great responses from the team.

It turns out that MDN is a wiki so it’s in the community (and my hands) to make a difference.

You can read the comments here:

http://www.reddit.com/r/IAmA/comments/oonrg/iama_member_of_the_mozilla_webdev_team_ama/c3iup1b

How to deploy Mono projects with Heroku

Last week I mentioned how I had successfully deployed Nancy / Mono (C# frameworks) onto Heroku.  This post covers how you can deploy your own Mono projects onto Heroku.

As before, this approach is completely unsupported by Heroku and I’m not 100% sure if it’s production ready. I would love to hear your experiences.

0) Prerequisites 
There are a few requirements before deploying a project.
    – The solution can compile using Mono on Linux (Ubuntu 10.04 – Lucid Lynx)
    – The launch application must be a self-hosted executable.
    – The self-hosted executable must stay alive and not exit. Example: https://github.com/BenHall/nancy-demo-hosting-self/blob/master/src/Program.cs#L20-23

1) Update heroku gem
Before you continue, make sure your running the latest heroku gem as you need the buildpack option which is only supported in later versions. Thanks Andy Pike for pointing this out.

$ gem update heroku

2) Listening to Heroku requests
This is the only part which I’m not too happy with. In order for Mono to accept Heroku requests, you need to bind the listener to the full hostname provided by Heroku – for example http://deep-moon-1452.herokuapp.com.

The application also needs to listen on a particular port randomly defined by Heroku. This is provided via an environment variable. 

Example:
https://github.com/BenHall/nancy-demo-hosting-self/blob/master/src/Program.cs#L12

Ironically this is the part which blocked me and after multiple combinations I was left with hard-coding the name as my last resort – see the commit https://github.com/BenHall/nancy-demo-hosting-self/commit/4d9e07bed92559a53b1463c37e837045d59c3a9a

3) How projects are built during deployment
Projects are built on Heroku during the git push process.  To find a solution to build, the command “ls $BUILD_DIR/*.sln | head -1” is used. This will return the name of the first solution file found.
Once the name has been determined, xbuild is called with the output streamed back. If the build fails, the deployment is stopped.

4) How the application is launched – Procfile
Once the project has been built, the self-hosted executable needs to be executed via a Procfile.

An example can be found here:
https://github.com/BenHall/nancy-demo-hosting-self/blob/master/Procfile

The web property specifies the command used by Heroku. The first part is the path to mono which is defined in the buildpack and shouldn’t be change. The second part is the relative path to your compiled executable.

In the example I also defined a local environment command allowing me to replicate the hosted environment locally via “foreman start local”. 

5) Creating the Heroku environment – Cedar and buildpacks
When creating your Heroku application to host your project, it’s important to specify the stack as cedar along with the buildpack for Mono. The buildpack defines the steps required to download Mono from my S3 account, configure the environment and build your solution.

$ heroku create --stack cedar --buildpack http://github.com/BenHall/heroku-buildpack-mono 

Remember to change the hostname your exe listens on otherwise you’ll received a Bad Request (Invalid Host) response.

If you receive the error “!Name must start with a letter and can only contain lowercase letters, numbers, and dashes” then make sure your using the latest Heroku gem (currently 2.18.1).

6) Push
A simple push should now be all you need.

$ git push heroku master

Done!  Technical details about how the buildpack works in a future post.

Important links:
Buildpack:  https://github.com/BenHall/heroku-buildpack-mono
Example: https://github.com/BenHall/nancy-demo-hosting-self

tl;dr: The main steps are
0) $ gem update heroku
1) $ git clone https://github.com/BenHall/nancy-demo-hosting-self
2) $ cd nancy-demo-hosting-self
3) $ heroku create --stack cedar --buildpack http://github.com/BenHall/heroku-buildpack-mono
4) Replace deep-moon-1452 in src/Program.cs to the application name created above
5) $ git commit -am "Changed application name"
6) $ git push heroku master
7) Tweet to say how amazing it is.
Experiment: Deploying C# / Mono on Heroku

Over the past couple of days I’ve been trying to get Mono running on top of Heroku.

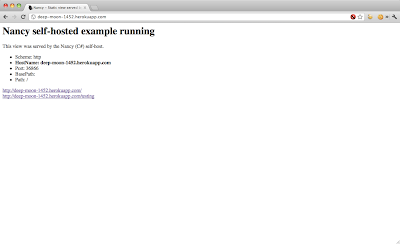
I’m pleased to report that I have successfully deployed Nancy (a C# web framework) on top of Heroku.

It’s far from a production ready solution and is completely unsupported by Heroku but it’s an interesting experiment. More technical details in future posts but here’s some proof.

Server response headers:
$ curl -i http://deep-moon-1452.herokuapp.com/
HTTP/1.1 200 OK
Content-Type: text/html
Date: Tue, 03 Jan 2012 16:33:02 GMT
Nancy-Version: 0.9.0.0
Server: Mono-HTTPAPI/1.0

Screenshot:

This is the output when you push your git repository to Heroku. The source code is built on Heroku.

$ git push heroku master
Counting objects: 9, done.
Delta compression using up to 2 threads.
Compressing objects: 100% (4/4), done.
Writing objects: 100% (5/5), 514 bytes, done.
Total 5 (delta 3), reused 0 (delta 0)


—–> Heroku receiving push
—–> Fetching custom buildpack… done
—–> Mono app detected
—–> Fetching Mono binaries
tar: Ignoring unknown extended header keyword `SCHILY.dev’
tar: Ignoring unknown extended header keyword `SCHILY.ino’
tar: Ignoring unknown extended header keyword `SCHILY.nlink’
tar: Ignoring unknown extended header keyword `SCHILY.dev’
tar: Ignoring unknown extended header keyword `SCHILY.ino’
tar: Ignoring unknown extended header keyword `SCHILY.nlink’
tar: Ignoring unknown extended header keyword `SCHILY.dev’
tar: Ignoring unknown extended header keyword `SCHILY.ino’
tar: Ignoring unknown extended header keyword `SCHILY.nlink’
tar: Ignoring unknown extended header keyword `SCHILY.dev’
tar: Ignoring unknown extended header keyword `SCHILY.ino’
tar: Ignoring unknown extended header keyword `SCHILY.nlink’
tar: Ignoring unknown extended header keyword `SCHILY.dev’
tar: Ignoring unknown extended header keyword `SCHILY.ino’
tar: Ignoring unknown extended header keyword `SCHILY.nlink’
tar: Ignoring unknown extended header keyword `SCHILY.dev’
tar: Ignoring unknown extended header keyword `SCHILY.ino’
tar: Ignoring unknown extended header keyword `SCHILY.nlink’
tar: Ignoring unknown extended header keyword `SCHILY.dev’
tar: Ignoring unknown extended header keyword `SCHILY.ino’
tar: Ignoring unknown extended header keyword `SCHILY.nlink’
tar: Ignoring unknown extended header keyword `SCHILY.dev’
tar: Ignoring unknown extended header keyword `SCHILY.ino’
tar: Ignoring unknown extended header keyword `SCHILY.nlink’
tar: Ignoring unknown extended header keyword `SCHILY.dev’
tar: Ignoring unknown extended header keyword `SCHILY.ino’
tar: Ignoring unknown extended header keyword `SCHILY.nlink’
—–> Vendoring mono 2.10.8
—–> building via /tmp/mono-GssQ/bin/mono /tmp/mono-GssQ/lib/mono/4.0/xbuild.exe /tmp/build_19y6xv4nr43ic/Nancy.Demo.Hosting.Self.sln
XBuild Engine Version 2.10.8.0
Mono, Version 2.10.8.0
Copyright (C) Marek Sieradzki 2005-2008, Novell 2008-2011.


Build started 01/03/2012 16:28:24.
__________________________________________________
Project “/tmp/build_19y6xv4nr43ic/Nancy.Demo.Hosting.Self.sln” (default target(s)):
Target ValidateSolutionConfiguration:
Building solution configuration “Debug|Mixed Platforms”.
Target Build:
Project “/tmp/build_19y6xv4nr43ic/src/Nancy.Demo.Hosting.Self.csproj” (default target(s)):
Target PrepareForBuild:
Configuration: Debug Platform: x86
Created directory “bin/”
Created directory “obj/x86/Debug/”
Target CopyFilesMarkedCopyLocal:
Copying file from ‘/tmp/build_19y6xv4nr43ic/lib/Nancy.dll’ to ‘/tmp/build_19y6xv4nr43ic/src/bin/Nancy.dll’
Copying file from ‘/tmp/build_19y6xv4nr43ic/lib/Nancy.Hosting.Self.dll’ to ‘/tmp/build_19y6xv4nr43ic/src/bin/Nancy.Hosting.Self.dll’
Target GenerateSatelliteAssemblies:
No input files were specified for target GenerateSatelliteAssemblies, skipping.
Target CoreCompile:
Tool /tmp/mono-GssQ/bin/dmcs execution started with arguments: /noconfig /debug:full /debug+ /optimize- /out:obj/x86/Debug/Nancy.Demo.Hosting.Self.exe Program.cs TestModule.cs /target:exe /define:”DEBUG;TRACE” /main:Nancy.Demo.Hosting.Self.Program /platform:x86 /reference:/tmp/mono-GssQ/lib/mono/4.0/System.dll /reference:../lib/Nancy.dll /reference:../lib/Nancy.Hosting.Self.dll /reference:/tmp/mono-GssQ/lib/mono/4.0/System.Xml.Linq.dll /reference:/tmp/mono-GssQ/lib/mono/4.0/System.Data.DataSetExtensions.dll /reference:/tmp/mono-GssQ/lib/mono/4.0/Microsoft.CSharp.dll /reference:/tmp/mono-GssQ/lib/mono/4.0/System.Data.dll /reference:/tmp/mono-GssQ/lib/mono/4.0/System.Xml.dll /reference:/tmp/mono-GssQ/lib/mono/4.0/System.Core.dll /reference:/tmp/mono-GssQ/lib/mono/4.0/mscorlib.dll /warn:4
Target _CopyDeployFilesToOutputDirectoryAlways:
Creating directory ‘/tmp/build_19y6xv4nr43ic/src/bin/Views’
Copying file from ‘/tmp/build_19y6xv4nr43ic/src/Views/staticview.html’ to ‘/tmp/build_19y6xv4nr43ic/src/bin/Views/staticview.html’
Target _CopyAppConfigFile:
Copying file from ‘/tmp/build_19y6xv4nr43ic/src/app.config’ to ‘/tmp/build_19y6xv4nr43ic/src/bin/Nancy.Demo.Hosting.Self.exe.config’
Target DeployOutputFiles:
Copying file from ‘/tmp/build_19y6xv4nr43ic/src/obj/x86/Debug/Nancy.Demo.Hosting.Self.exe.mdb’ to ‘/tmp/build_19y6xv4nr43ic/src/bin/Nancy.Demo.Hosting.Self.exe.mdb’
Copying file from ‘/tmp/build_19y6xv4nr43ic/src/obj/x86/Debug/Nancy.Demo.Hosting.Self.exe’ to ‘/tmp/build_19y6xv4nr43ic/src/bin/Nancy.Demo.Hosting.Self.exe’
Done building project “/tmp/build_19y6xv4nr43ic/src/Nancy.Demo.Hosting.Self.csproj”.
Done building project “/tmp/build_19y6xv4nr43ic/Nancy.Demo.Hosting.Self.sln”.


Build succeeded.
0 Warning(s)
0 Error(s)


Time Elapsed 00:00:01.0730530
—–> Discovering process types
Procfile declares types -> local, web
—–> Compiled slug size is 78.3MB
—–> Launching… done, v18
http://deep-moon-1452.herokuapp.com deployed to Heroku


To [email protected]:deep-moon-1452.git
4d9e07b..6ce44e4 master -> master

2011 – An Unexpected Journey

When I started this post I wanted to reflect on the interesting year I’ve had. I wanted to talk about how launching a start-up had taught me so much about business, technology and myself. I wanted to go on and cover how it has also meant making sacrifices, such as missing Glastonbury even when I had a ticket and cutting back on spending, blogging, open source and conference speaking – the things I really enjoy. Finally, I wanted to end with how start-up life has sometimes meant working in isolation and at times being demotivated and stressed with how everything was going.

However, while it’s important for me to look back I also want to focus on looking forward which can be summed up by this tweet:

#2012 Release more. Blog more. Drink more. Earn more.
— Ben Hall (@Ben_Hall) January 1, 2012

To get the ball rolling, interested in hiring me? Send me an email at [email protected]

Using Nginx to server static files instead of Node.js

With NodeJS becoming popular with standard websites, a performance impact which is often overlooked is using the built-in NodeJS server to serve static files.  While NodeJS is self-hosting, it’s wise to place an Nginx server in-front and proxy requests. You can then use this to serve your static files allowing your node process to only handle dynamic content.

An example of how to configure Nginx to serve static files on a separate domain:

server {
        listen   80;
        server_name  static.domain.com;

        access_log  /var/log/nginx/static_domain_access.log;
        #access_log off; #Save disk space and IO

       location ~* ^.+.(jpg|jpeg|gif|png|ico|css|zip|tgz|gz|rar|bz2|pdf|txt|tar|wav|bmp|rtf|js|flv|swf|html|htm)$
       {
            root  /website/path/to/static/files/in/node/repository/public/;
       }
}

If your using Nginx as a node proxy then specifying multiple location configurations (untested) in your main domain config will mean you can make the infrastructure change without affecting the code.

       location ~* ^/images/.+.(jpg|jpeg|gif|png|ico|css)$
       {
            root  /website/path/to/static/files/in/node/repository/public/images/;
       }
        location ~* ^/stylesheets/.+.(css)$
       {
            root  /website/path/to/static/files/in/node/repository/public/stylesheets/;
       }
       location ~* ^/javascript/.+.(js)$
       {
            root  /website/path/to/static/files/in/node/repository/public/javascript/;
       }

More details at http://wiki.nginx.org/NginxHttpCoreModule#location

Few other points not covered:
1) Consider using a CDN and a separate domain to improve performance. The separate domain means cookies won’t be sent and allowing browsers to download artifacts in parallel which both improve performance. As an example, Facebook has www.fbcdn.com with Google using www.gstatic.com
2) Consider GZipping contents
3) Consider your caching strategy

Using Nginx as a proxy for Node.js

Config file should look like this:

upstream api_domainname {
    server 127.0.0.1:5000;
}
server {
        listen   80;
        server_name  api.domainname.com;

        access_log  /var/log/nginx/api_domainname_access.log;

        location / {
                proxy_pass      http://api_domainname;
                include         /etc/nginx/proxy.conf;
        }
}

Any requests coming in on port 80 for the server name specified will be routed to your NodeJS server.

Vim Tips: Map key to shell command

When using Vim, I want to keep keystrokes to a minimum and my focus on the current terminal window.  While using Ruby I found that saving a file, flipping to a different terminal window, executing specs and flipping back was taking too much effort.

All the above steps can be solved by simply mapping a keystroke. For example, when in Normal mode I can now save the file and execute RSpec by hitting the comma key.

   :nmap , :w | !rspec --colour %

The format is fairly straight forward.
:nmap == Map a key for normal mode
, == key you want to map
:w == save file
| == join multiple commands forward
!rspec == execute RSpec
% == current file
% == cr is a carriage return meaning the command gets executed straight away

With it being this fast to map keys, if you find yourself typing too much then you can speed up your productivity with a few simply mappings based on your current context.