MVC Html.Resolve() – Resolve URLs to your page

For the current MVC application I’m developing, I needed to host the site under a IIS Virtual Directory.  This caused a problem as I can’t use the following code:

<%=Html.Image("~/Content/icon_green.gif") %>

This would ignore the fact that I was under a Virtual Directory and point to the root site – http://mysite/ instead of http://mysite/myvirtual/ like I want.

Rob Conery mentioned a Html.ResolveUrl method, however I couldn’t find the method on the HtmlHelper so I wrote my own.  The method is called Resolve and is an extension to the HtmlHelper within MVC. Here is one of the unit tests for it.

[Fact]
public void Resolve_With_IIS_Virtual_Directory_Returns_Full_Path()
{
    HtmlHelper html = CreateHtmlHelper(“
http://localhost/TestProject”);

    string result = html.Resolve(“~/Content/t.jpg”);
    Assert.Equal(“
http://localhost/TestProject/Content/t.jpg”, result);
}

Implementation is very simple, we prefix the virtual directory with the application path if required.

public static string Resolve(this HtmlHelper helper, string virtualUrl)
{
    if (!virtualUrl.StartsWith(“~/”))
        return virtualUrl;

    virtualUrl = virtualUrl.Remove(0, 2);

    string applicationPath = helper.ViewContext.HttpContext.Request.ApplicationPath;
    if(string.IsNullOrEmpty(applicationPath) || !applicationPath.EndsWith(“/”))
    {
        applicationPath = applicationPath  + “/”;
    }

    return applicationPath + virtualUrl;
}

However, this brought up an interesting point. How do you test extension methods? It turns out, you can easily test the methods, you just need to create the object they are extending and call the method – obviously.

The problem with this is, HtmlHelper (the object I’m extending) has a number of dependencies, for example in my Resolve method I’m calling HttpContext in order to get the ApplicationPath.

In order to create the HtmlHelper object, I added myself a little helper method. I’m using Rhino Mocks 3.5 in order to generate the stubs, sadly ViewContext requires a number of different parameters (the only one I care about is httpContext), as a result I had to generate a number of different stubs.

private HtmlHelper CreateHtmlHelper(string appPath)
{
    HttpContextBase httpContext = MockRepository.GenerateStub();
    HttpRequestBase httpRequestBase = MockRepository.GenerateStub();
    httpRequestBase.Stub(h => h.ApplicationPath).Return(appPath);
    httpContext.Stub(h => h.Request).Return(httpRequestBase);

    ViewContext viewContext = MockRepository.GenerateStub(httpContext,
                                                                    new RouteData(),
                                                                    MockRepository.GenerateStub(),
                                                                    “Test”, “MasterTest”, new ViewDataDictionary(),
                                                                    new TempDataDictionary(httpContext));

    return new HtmlHelper(viewContext, MockRepository.GenerateStub());
}

The end result is that I have my HtmlHelper object created which returns a known ApplicationPath, this allows me to fully test my extension method. However, I have had put in some additional effort due to requiring ViewContext.

Download Tests: HtmlExtensionTests.txt
Download Implementation: Html.txt

Technorati Tags:

Using ‘Where’ command to find location of file

When using the command line, your $PATH variable holds different paths to search when you enter a command. Today, I was using the Visual Studio 2008 command prompt, which has setup my $PATH variable to point at known locations relating to .Net and Visual Studio.

I could happily type in ‘sn’ in order to execute the program, however I had no idea where that exe lived and I needed the full path. I thought I would have to search using Windows, however I found that there is a ‘where’ command which will return you the full path for a command.

C:Program FilesMicrosoft Visual Studio 9.0VC>where sn
C:Program FilesMicrosoft SDKsWindowsv6.0ABinsn.exe

Surprisingly useful!!

Taking a look at NUnit 2.5 Alpha 3

image 
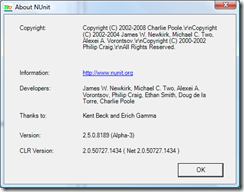
It’s always interesting to see how the different unit testing frameworks approach automated testing, each framework has it’s own style, approach and feature set with everyone having their own view on which framework everyone should use. One of the more (you could say most) popular .Net framework is NUnit and over the past few months Charlie has been working on v2.5 so I thought it was about time I took a look.

Parameterised Tests (Documentation can be found here Parameterized Tests)

Similar to XUnit and MbUnit, NUnit 2.5 includes the concept of parameterised tests. RowTest was included in 2.4.7, however additional attributes have now been included.

ValuesAttribute

The first new attribute allows for combinational style testing, this is where two sets of inputs are combined to create each possible test combination. In certain situations useful – always good to have in the toolbox, however generally I wouldn’t need to use this on a day-to-day basis. MbUnit has had this for a while, however I prefer the syntax of this approach, which I think is a similar syntax to MbUnit V3.

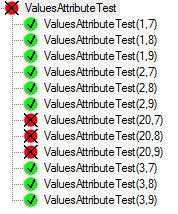
To implement this, you add the ValuesAttribute, which takes an object array for the test values, before the method parameter.

[Test]
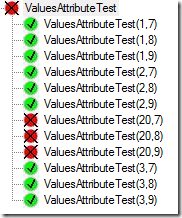
public void ValuesAttributeTest([Values(1,2,3, 20)] int v, [Values(9,8,7)] int v2)
{
    Assert.IsTrue(v < v2);
}

When NUnit loads this up, they create a combination of the test values, as a result we have 12 tests created. If we had another parameter of the test, for example with 3 possible values, then we would have another possible combination and we would have 36 tests. As a result, you can very quickly build up a good selection of test cases.

image

RangeAttribute

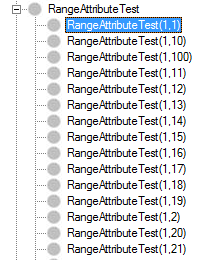
Similar to the ValuesAttribute, however instead of you defining the values, you define the range of possible values which NUnit then creates tests for. You define the range (min, max) and NUnit does the rest. The values are then combined in a combinational style.

[Test]
public void RangeAttributeTest([Range(1,100)] int v, [Range(1,100)] int v2)
{
    Assert.IsTrue(v < v2);
}

The test creates produces then looks something like this:

image

RandomAttribute

Similar to the two previous attributes, Random produces a set of random input. You can either give it a count of the inputs to use, as I have done with the first attribute which produces 10 random values, while in the second parameter I provide the min and max range for the random values together with the amount of data to produce.

[Test]
public void RandomAttributeTest([Random(10)] int v, [Random(1, 50, 10)] int v2)
{
    Assert.IsTrue(v < v2);
}

However, I’m not sure how useful testing against random data would actually be?

TestCaseAttribute

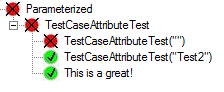
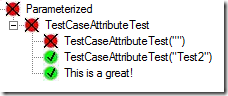
This attribute is similar to RowTest, however as part of the TestCase you can set your own TestName which I think is actually really useful.

[TestCase(“Test1”, TestName = “This is a great!”, Description = “My first test”)]
[TestCase(“Test2”)]
[TestCase(“”)]
public void TestCaseAttributeTest(string test)
{
    Console.WriteLine(test);
    Assert.IsNotEmpty(test);
}

The TestCase is then reflected In the GUI and report. The first two tests use the test method name plus their parameter inputs, while the third uses the TestName property we set on the TestCaseAttribute.

image 

Also as part of the TestCaseAtribute, you are able to provide the Result.  Generally, the expected result is passed in as a parameter and verified within the test itself. With this approach you have the result as part of the TestCase itself, with the test returning it’s result which NUnit then compares to decide if the test has passed. This does make more sense as the parameters of the test as then really test inputs with the test output being verified as an output, a small difference however it is more logical.

[TestCase(“Test1”, TestName = “This is a great!”, Description = “My first test”, Result = 5)]
public int TestCaseAttributeTest(string test)
{
     Console.WriteLine(test);
     return test.Length;
}

This approach to testing has a lot of potential use cases and opportunities as it really increases test case (code) reuse and test maintenance.

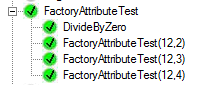
TestCaseFactoryAttribute

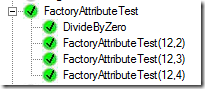
Similar to MbUnit’s FactoryAttribute, you define a class which yield returns each TestCaseData object. It has the advantage of using a fluent interface to define all the different properties, such as results and the test name.  While I have hardcoded the 4 test cases here, there is nothing stopping you dynamically creating these.

[Test,Factory(typeof(MyFactoryClass))]
public int FactoryAttributeTest(int a, int b)
{
    Console.WriteLine(a / b);
    return a/b;
}

public class MyFactoryClass
{
    [TestCaseFactory(typeof(int), typeof(int))]
    public static IEnumerable TestCases
    {
        get
        {
            yield return new TestCaseData(12, 3).Returns(4);
            yield return new TestCaseData(12, 2).Returns(6);
            yield return new TestCaseData(12, 4).Returns(3);
            yield return new TestCaseData(0, 0)
                              .Throws(typeof(DivideByZeroException))
                              .WithName(“DivideByZero”)
                              .WithDescription(“An exception is expected”);
        }
    }
}

The TestCases then look like this:

image 

New Assertions

Assert.Throws

Simple, straight forward. Does the method call throw can exception?

[Test]
public void ThrowException()
{
    Assert.Throws(throwEx);
}

public void throwEx()
{
    throw new Exception(“Test”);
}

Assert.DoesNotThrow

Simpler approach, Assert that the method does not throw any exceptions when it is called.

[Test]
public void doesNotThrowExTest()
{
    Assert.DoesNotThrow(doesNotThrowEx);
}

public void doesNotThrowEx()
{}

Others

RequiredAddinAttribute

This is extremely useful if you are writing your own NUnit addins, as it is very important that the addin is available before you attempt to execute your tests. After adding attributes about the addins you require,

[assembly: RequiredAddin(“MyTestFixtureAddin”)]
[assembly: RequiredAddin(“MyTestAddin”)]
[assembly: RequiredAddin(“MyDecoratorAddin”)]

If they are not available and you execute the test, it will fail but will actually tell you the reason why.
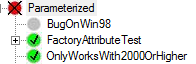
image

PlatformAttribute

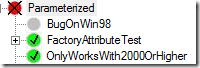
Finally, there is a new PlatformAttribute. This attribute defines which platforms the test is allowed to run on, really useful if you have issues with a certain target platform, or if you have a set of tests only targeting a platform, such as mono.

[Test]
[Platform(Exclude=”Win98,WinME”, Reason = “This only works on Windows 2000 and above”)]
public void OnlyWorksWith2000OrHigher()
{
    Assert.IsTrue(Environment.OSVersion.Version.Major > 5);
}

[Test]
[Platform(Include = “Win98,WinME”)]
public void BugOnWin98()
{
    Assert.IsTrue(Environment.OSVersion.Version.Major > 5);
}

The list of possible platforms can be found here: http://nunit.org/index.php?p=platform&r=2.5

When the test is executed on an invalid platform, the test is skipped.

image

This post has summarised all of the interesting bits of the new Alpha release. In future releases, I expect to see some changes going forward before the final 2.5 release. It’s nice to see NUnit taking the different approaches from the different frameworks and incorporating them with their own approach, hopefully v3 will have some really interesting concepts. The main feature missing at the moment are data driven test attributes, such as pulling test cases from CSV or SQL Server, but a framework has an additional extension point to make this attribute easier to write.  After this I think most of the missing features would be more suitable in NUnit 3.0.

Release Notes: http://nunit.com/index.php?p=releaseNotes&r=2.5
Download: http://nunit.com/index.php?p=download

Technorati Tags: , ,

Mono and File Paths

The joy of developing cross platform applications!!

When dealing with files and paths on a windows based platform you always use a backslash () as the path separator, for example ‘ConfigSettings.xml’. Append the full path onto the beginning and you would be able to load the settings.  However, if your application needs to run on top Linux or Mac OS X (Mono) then file paths are slightly different. Instead of ‘ConfigSettings.xml’ you need to use ‘Config/Settings.xml’. Notice the all important forward slash (/)! It’s a simple mistake to make and it can take a few moments to realise what the problem is. 

If you wanted to be really hard core (and correct), you would use Path.DirectorySeparatorChar property to define your separator. Alternatively, you might want to look at IOMap which should solve this mismatch problem for you.

Variations like this is a great reason why you should run your unitintegration tests on both platforms as part of your build.

Technorati Tags:

Deploying ASP.net MVC to IIS 6 still returns 404

This morning I was checking my deployment instructions for an ASP.net MVC application, ideally this would be automated but that is my next task.

I was following Option 1 Steve Sanderson wrote on his blog, where you use Wildcard mapping for aspnet_isapi.dll. After setting up this while card mapping, you should be able to use the same pretty URLs without any modifications or additional mappings.

Unfortunately I didn’t read the post correctly and forgot to untick ‘Verify that file exists’,

image

As a result, I kept receiving 404 error messages – yet I knew that the path was correct.

image

It took me a while to figure out that I had forgot to untick the verify that file exists box.  Once the box had been set correctly, my content was serving again.

image

This raised an interesting question – why does ‘Verify that file exists’ need to be unticked? The executable is a ‘Win32 DLL (ISAPI extension)’, but not sure why this needs to be unticked – answers on a postcard (or a comment)!

Technorati Tags: , ,

How To: Script a SQL Database Schema and Data to a single file

At the moment I’m working on a web application, using ASP.net MVC connected to SQL Server 2005. As part of this work, I wanted to script out my current database schema into a flat file. I had created my SQL Database using SQL Management Studio on my laptop, but I wanted to reliability deploy this onto a machine in the office. 

Luckily, I had Red Gate SQL Compare to hand (Surprising as I work for Red Gate :))! This allows for a number of different approaches, such as connecting to the office via VPN and syncing my two databases or syncing to a scripts folder, but I found SQL Compare could create a single SQL file containing my database schema just using the command line tool.

The command below will sync my local Northwind database schema into a file called Schema.sql. If the file already exists, I override it.

SQLCompare.exe /database1:Northwind /scriptfile:”C:NorthwindSchema.sql” /force

Perfect!! I can now use SQL Cmd or SSMS to execute the file to produce my schema.

The same command works for SQL Data Compare, allowing me to script all the data in the database to a single sql file.

SQLDataCompare.exe /database1:Northwind /scriptfile:”C:NorthwindData.sql” /force

NOTE: These scripts do not include the USE statement, as such they will run under the database your connected on. You just need to be aware of what database your connected to or which database you use in your connection string

How Did I Get Started In Software Development?

It turns out both Scott Cowan and Barry Dorrans have tagged me with the latest meme.  I guess I should respond 🙂

How old were you when you first started in programming?

I guess I was a late starter compared to others. I got my first PC when I was 12 and I think I started with web development when I was 15.  I started desktop development when I was 18, but I had played around a bit with VB6 before then.

What was your first programming language?

While everyone else is saying assembly or some low level language, my first programming experience was with ASP 3.0 where I developed a commercial website but I guess that doesn’t count as a real language. After that I guess Eiffel was my first real language I knew to a good level while at University.

What was the first real program you wrote?

As I mentioned, I started with web development.  My webpage took user input and emailed it via CGI FormMail.  My next larger project was the ASP 3.0 website which took user input and stored it in an access database.  It also had a few admin sections, some interactions with CDO etc.

I then left development alone for a while while I worked as Tech Support SysAdmin.

My first real program was a web server using Eiffel in my first 3 months at University – told you I was a late starter for software development.

What languages have you used since you started programming?

From memory, the languages I have used in a commercial real project sense are:

VBScript, Java, VB6, C#, Ruby

I’ve then played around with:

Python, VB.net, Eiffel, C++, Scheme, Prolog

What was your first professional programming gig?

The ASP website was semi-professional (I got paid), and I did this when I was 15 at school.  First full-time position was at a transaction handling company during my year in industry at University. This was a mix of VB6 and C# 1.1 with a SQL Server 2000 backend where I worked on a lot of bug fixes and maintenance work.  During this time I attempt to introduce some improved ways of working, more automation and its where I found my interests in TDD (but we wasn’t doing it there).

If you knew then what you know now, would you have started programming?

Definitively! I just would have started earlier. I think I would also have started to release software sooner – just small applications which solve real problems.

If there is one thing you learned along the way that you would tell new developers, what would it be?

Don’t do it for the money, do it because you love it. Community matters! Talk to people, it is the best way to learn. 

What’s the most fun you’ve ever had programming?

weLearn was good fun, if not a little stressful. This is the application we produced for the Imagine Cup while I was at University.  Two friends and myself created the application, promoted it internally at University and finally presenting it at MS UK Imagine Cup final.

Some of the work I did at my first company was very good fun as it was great to create something which solved real problems. The work I did was mainly around automating various day-to-day tasks, it was all done at home and nothing got implemented (management…) – but I know it would have worked 🙂

MbUnit was also fun when I first started, it was good to have some technical discussions with people. Sadly, I haven’t done much work on this for a while.

Who am I calling out?

John Lam

Ian Cooper

Richard Fennel

Colin Jack

Mike Hadlow

MSBuild – Build Visual Studio 2008 solution and execute Unit Tests

Previously, I have spoke about how you can update your AssemblyInfo file using MSBuild. However, I haven’t spoken about the very basics – how to build a Visual Studio solution and execute your unit tests.

MSBuild is a very interesting build scripting language, out of the box it includes a set of standard tasks which you can use based on your requirements, such as creating a directory or copying a file in order to correctly build your project. I also take advantage of the MSBuild community task project, while it hasn’t been updated in a while, the tasks work perfectly.

Below is the basic MSBuild script.


DefaultTargets=”Test” xmlns=”
http://schemas.microsoft.com/developer/msbuild/2003″>


        <MSBuild Projects=”TeamCityBlogExample.sln” Properties=”Configuration=Release” />
   

    DependsOnTargets=”Build”>
       
        <NUnit Assemblies=”TeamCityBlogExample.TestsbinReleaseTeamCityBlogExample.Tests.dll”
               ContinueOnError=”false”
               ToolPath=”C:Program FilesTestDriven.NET 2.0NUnit2.4″ 
               OutputXmlFile=”NUnitResults.xml” />
   

Within the project section at the top, I set the default target to Test. This is the target which will be executed first, the Test target then has a DependsOnTarget attribute which enforces that the build must be done before we test.

On line 3, I import a reference to the MSBuild community tasks so I can access all of the custom tasks included – such as NUnit.  Next I define my build target, within this I define the solution I want to build and the configuration. To execute my unit tests, I use the NUnit task from the community task project, this takes a list of all the assemblies which we need to run, define if a test fails wether it should fail the build and finally tell it where NUnit lives on the local machine.

Now, the script can be executed by a build system, such as CCNet or TeamCity, or from the command line using the msbuild.exe command and build your solution and execute your unit tests.

Download script: http://blog.benhall.me.uk/Code/Build/BaseMSBuildScript.txt

Technorati Tags: ,

TeamCity – Creating a project step by step

On Tuesday I gave a 10 minute nugget at NxtGenUG Cambridge on how to setup a project using JetBrain’s TeamCity. TeamCity is a continuous integration server, similar to CruiseControl.NET, however I find it much more useful, easy to use and more importantly easy to manage. In this post, I thought I would explain how easy it is to setup a new TeamCity project.

Installing TeamCity is an easy process, you simply download the installer from the site and click next a few times.  This will install both the server and a build agent, TeamCity allows for multiple build agents on different machines to allow you to share the load of building and running tests.

Once it has been installed, visit the webpage (for me this was localhost:8080). You will need to accept the license agreement and create an admin account.  You will then be shown with the homepage for the server. Click the nice big Create project link.

image

You will then need to enter a friendly name for your project.

image

Your project has now been created. The next stage is to add a build configuration, this will be how the project monitors source control and what is executes to build the project.

image

After clicking Create build configuration, you will be shown the first build configuration page.  Give this a friendly name, you can then enter a build number which can be used in your build scripts and on TeamCity’s UI as I described in a previous post.

Next, you can enter some artifacts, these are the files which are saved and stored on the build server.  These files could be your binaries or an installer. For example, to copy everything to a buildrelease directory the syntax would be:

“**/*.* => builds/Release/”

image

Next stage is setup the source control which TeamCity should monitor.

image

Click Create and Attach new VCS root. Given this a friendly name, and select the type for example Subversion. Enter the url of the SVN server, this is the directory which will be monitored. For example, it could be https://Newbie:8443/svn/TeamCityDemo/trunk

image

You VCS is now setup.

image

The next stage is to configure the build runner. This defines how to build the project. Below, I’m using MSBuild, which when it needs to build it will execute msbuild with the script srcbuild.msbuild.

image

That is now your project created. The final stage is to use build triggering by ticking the enable box. This is what will cause the project to be built when you commit an item.

image

Your now ready to go – everything is setup.  The project and builds now appear on the main homepage.

image

Let the automated builds begin!

Technorati Tags:

Improving test code readability using delegates

During the development lifecycle, there are many different automated tests which should be wrote, each style of test has different priorities and different levels of maintenance required. For example, TDD helps with designing the code your just about to write, they are small and focused. As such, when your code changes, your tests change too. Where as acceptance tests have a much longer life-time, there role is to ensure the application works and nothing is regressed as developers continue to make changes. These tests need to be maintainable enough to cope with application changes, readable enough to identity the story feature they are testing with reusableflexible sections to help readability and maintainability.

In an attempt for my tests to meet these goals, recently I’ve been using delegates in certain scenarios to improve my test code. Delegates are great for reusing sections of code, it allows you to have static sections of code but be flexible to cope with minor changes and different scenarios the tests might cover.

For example, below is an acceptance test which must connect to a server based on a project file which has been saved to disk.  Remember, acceptance tests should cover the system in an end-to-end fashion.

In order to test the application, the code needs to do a lot.  It needs to create and configure a project, save it to disk, create the service and finally it gets to the point of what it is testing – connecting to the service. This code, while it is flexible it is not very maintainable. If we need to change something related to the project or how we connect to the service we would have to change a lot of code to take this into account.

public class Project_Execute_Tests_Standard
{
    [Fact]
    public void Project_Can_Login_And_Can_Connect()
    {
        string path = System.IO.Path.GetRandomFileName();

        Service service = null;
        try
        {
            Project project = new Project();
            project.Server = “Test”;
            project.Username = “Admin”;
            project.Password = “Password”;
            project.Save(path);

            service = new Service();
            service.Start();

            service.LoadProject(path);

            bool connect = service.Connect();
            Assert.True(connect);
        }
        finally
        {
            if(service != null && service.Started)
                service.Stop();
            File.Delete(path);
        }
    }
}

The first logical step would be to use helper methods.  We can extract the creation of the project and gaining access to the service into separate methods which we can reuse throughout our test code. However, these methods aren’t very flexible, if we need to add some more configuration to the project we would have to create a different method and as such losing some of our maintainability.

[Fact]
public void Project_Can_Login_And_Can_Connect()
{
    string path = string.Empty;
    Service service = null;
    try
    {
        path = CreateProject();

        service = GetService(path);
        bool connect = service.Connect();
        Assert.True(connect);
    }
    finally
    {
        if (service != null && service.Started)
            service.Stop();
        File.Delete(path);
    }
}

This is why I like delegates. You have the advantage of helper methods, but the flexibility of having the code inline. Below I’ve created a helper class, this abstracts away from my actual implementation and manages the state, such as the file path for the project. Within the delegate for the project, I’m setting all the details based on the requirements of the test and different configurations, however the rest is abstracted away.

public class Project_Execute_Tests_Delegate
{
    [Fact]
    public void Project_Can_Login_And_Can_Connect()
    {
        ServiceTester tester = new ServiceTester();
        tester.CreateProject(delegate(Project project)
                                        {
                                            project.Server = “Test”;
                                            project.Username = “Admin”;
                                            project.Password = “Password”;
                                        });

        bool connect = tester.ConnectToService();
        Assert.True(connect);
    }
}

While I was writing this example, DevExpress popped up and told me it can shorten my delegate to a lambda expression. As a result, the delegate could be this.

tester.CreateProject(p =>
                            {
                                p.Server = “Test”;
                                p.Username = “Admin”;
                                p.Password = “Password”;
                            });

Within my ServiceTester helper class, my CreateProject method looks like this:

public delegate void ProjectDelegate (Project project);
public void CreateProject(ProjectDelegate ProjectSettings)
{
     ProjectPath = System.IO.Path.GetRandomFileName();
     Project project = new Project();

     ProjectSettings(project);
     project.Save(ProjectPath);
}

Given the right scenario, I think this could really improve your test code.

Download complete code sample: http://blog.benhall.me.uk/Code/Test/TestCodeDelegates.txt

Technorati Tags: ,