Attached are my slides on TDD Painkillers from DDD Dublin. Thank you to everyone who came to the session, I hope you gained some value and tips you can apply on Monday.
One thing I did mention during the presentation was with regard to pairing. I know some people want to learn, but sadly are environments which make it difficult. As such, if people want to pair with me (over skype or in a bar) on a coding kata then please give me a shout! Alternatively, if you fancy a test review or feedback on your current approach then just let me know. Twitter is always the best way to contact me.
Frequently when reviewing code I see one of my pet hates appear and that’s a direct dependency on the ConfigurationManager. The ConfigurationManager provides a way to access values in the WebApp.config. Yet, like any dependency, they generally bite you at some point – generally when you attempt to write the test.
Let’s imagine that our web.config has a value like below:
EnableNewsletterSignup = “false”
This value defines if we should hit the live web service. During developmentsystest we don’t want this to happen, however we do in UAT and Live. As a result, our code will generally look like this:
public bool Signup(string email) { if (!Boolean.Parse(ConfigurationManager.AppSettings[“EnableNewsletterSignup”])) return false;
return true; // technically this would go off to an external web service }
Simple, yet with multiple problems
Firstly, we have a magic string value which relates to the key in the config. If we wanted to change this value we would have to perform an error-prone SearchReplace. Secondly, we have to manually parse the string value to a boolean – again, this is error prone as we’ll need to protect against bad data. This additional logic hides the true intent of what the method is meant to be doing which increases complexity. To make matters worse, we have a major problem when it comes to testability.
The configuration manager will automatically detect the config file based on the executing assembly, this means that your test assembly’s App.config needs to match your implementation’s (web.)config with all the values pre-configured for testing purposes. Having pre-configured values offers you very limited flexibility and in the example above we would be unable to test both paths (without our tests changing the value directly)? If we had multiple possible paths, this would cause us a very real problem.
This week I came across the issue were I required an AppSetting value. Not wanting to face the issues above I looked for help.
Thankfully, help’s available
The Castle Dictionary Adapter removes these problem for us. Given an interface and a dictionary of values, the adapter will create an object with all the properties populated for us. Our interface will match the settings in our config file.
The same implementation mentioned before becomes this, with a dependency on the above interface instead of the concrete ConfigurationManager. Notice our ‘if’ statement now uses a strongly typed property without all the noise associated.
class NewsletterSignupService { private readonly IApplicationConfiguration _configuration;
public NewsletterSignupService(IApplicationConfiguration configuration) { _configuration = configuration; }
public bool Signup(string email) { if (!_configuration.EnableNewsletterSignup) return false;
return true; // technically this would go off to an external web service } }
Testing!
The real advantage arrives when you look at the problem from the testing point of view. Because it’s an interface, we can use Rhino.Mocks to produce a stub, allowing us to test using any possible value.
var stubConfig = MockRepository.GenerateStub(); stubConfig.EnableNewsletterSignup = true;
We also no-longer need to maintain the App.Config as everything is driven by stub config objects, making life easier all round.
The next level comes when you use it with an IoC framework such as Castle Windsor. When an object defines a dependency on IApplicationConfiguration, they will be provided with an object created via the DictionaryAdapterFactory with the values coming from our actual AppSettings.
WindsorContainer container = new WindsorContainer(); container.AddFacility();
container.Register( Component.For().UsingFactoryMethod( () => new DictionaryAdapterFactory().GetAdapter(ConfigurationManager.AppSettings)));
As a result of implementing the adapter together with it’s use in Windsor we have more control, less complexity and a more maintainable solution going forward.
But it’s not only for AppSettings, the Castle Dictionary Adapter works on a number of different directories and collections meaning you no longer need to index into them using strings. If you want to know more, then CastleCasts has a great screencast on this at http://castlecasts.com/Episodes/3/Show/dictionary-adapter
In order to implement this in your own codebase, Castle Dictionary Adapter is currently a separate single assembly with no external dependencies that you can download from http://www.castleproject.org/castle/download.html
It’s always interesting to see how the different unit testing frameworks approach automated testing, each framework has it’s own style, approach and feature set with everyone having their own view on which framework everyone should use. One of the more (you could say most) popular .Net framework is NUnit and over the past few months Charlie has been working on v2.5 so I thought it was about time I took a look.
Similar to XUnit and MbUnit, NUnit 2.5 includes the concept of parameterised tests. RowTest was included in 2.4.7, however additional attributes have now been included.
ValuesAttribute
The first new attribute allows for combinational style testing, this is where two sets of inputs are combined to create each possible test combination. In certain situations useful – always good to have in the toolbox, however generally I wouldn’t need to use this on a day-to-day basis. MbUnit has had this for a while, however I prefer the syntax of this approach, which I think is a similar syntax to MbUnit V3.
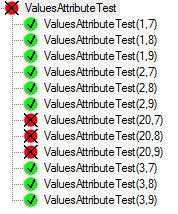
To implement this, you add the ValuesAttribute, which takes an object array for the test values, before the method parameter.
[Test] public void ValuesAttributeTest([Values(1,2,3, 20)] int v, [Values(9,8,7)] int v2) { Assert.IsTrue(v < v2); }
When NUnit loads this up, they create a combination of the test values, as a result we have 12 tests created. If we had another parameter of the test, for example with 3 possible values, then we would have another possible combination and we would have 36 tests. As a result, you can very quickly build up a good selection of test cases.
RangeAttribute
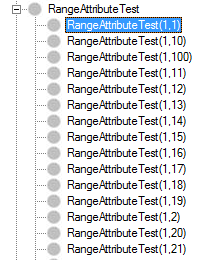
Similar to the ValuesAttribute, however instead of you defining the values, you define the range of possible values which NUnit then creates tests for. You define the range (min, max) and NUnit does the rest. The values are then combined in a combinational style.
[Test] public void RangeAttributeTest([Range(1,100)] int v, [Range(1,100)] int v2) { Assert.IsTrue(v < v2); }
The test creates produces then looks something like this:
RandomAttribute
Similar to the two previous attributes, Random produces a set of random input. You can either give it a count of the inputs to use, as I have done with the first attribute which produces 10 random values, while in the second parameter I provide the min and max range for the random values together with the amount of data to produce.
[Test] public void RandomAttributeTest([Random(10)] int v, [Random(1, 50, 10)] int v2) { Assert.IsTrue(v < v2); }
However, I’m not sure how useful testing against random data would actually be?
TestCaseAttribute
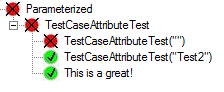
This attribute is similar to RowTest, however as part of the TestCase you can set your own TestName which I think is actually really useful.
[TestCase(“Test1”, TestName = “This is a great!”, Description = “My first test”)] [TestCase(“Test2”)] [TestCase(“”)] public void TestCaseAttributeTest(string test) { Console.WriteLine(test); Assert.IsNotEmpty(test); }
The TestCase is then reflected In the GUI and report. The first two tests use the test method name plus their parameter inputs, while the third uses the TestName property we set on the TestCaseAttribute.
Also as part of the TestCaseAtribute, you are able to provide the Result. Generally, the expected result is passed in as a parameter and verified within the test itself. With this approach you have the result as part of the TestCase itself, with the test returning it’s result which NUnit then compares to decide if the test has passed. This does make more sense as the parameters of the test as then really test inputs with the test output being verified as an output, a small difference however it is more logical.
[TestCase(“Test1”, TestName = “This is a great!”, Description = “My first test”, Result = 5)] public int TestCaseAttributeTest(string test) { Console.WriteLine(test); return test.Length; }
This approach to testing has a lot of potential use cases and opportunities as it really increases test case (code) reuse and test maintenance.
TestCaseFactoryAttribute
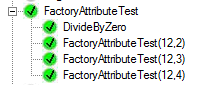
Similar to MbUnit’s FactoryAttribute, you define a class which yield returns each TestCaseData object. It has the advantage of using a fluent interface to define all the different properties, such as results and the test name. While I have hardcoded the 4 test cases here, there is nothing stopping you dynamically creating these.
[Test,Factory(typeof(MyFactoryClass))] public int FactoryAttributeTest(int a, int b) { Console.WriteLine(a / b); return a/b; }
public class MyFactoryClass { [TestCaseFactory(typeof(int), typeof(int))] public static IEnumerable TestCases { get { yield return new TestCaseData(12, 3).Returns(4); yield return new TestCaseData(12, 2).Returns(6); yield return new TestCaseData(12, 4).Returns(3); yield return new TestCaseData(0, 0) .Throws(typeof(DivideByZeroException)) .WithName(“DivideByZero”) .WithDescription(“An exception is expected”); } } }
The TestCases then look like this:
New Assertions
Assert.Throws
Simple, straight forward. Does the method call throw can exception?
[Test] public void ThrowException() { Assert.Throws(throwEx); }
public void throwEx() { throw new Exception(“Test”); }
Assert.DoesNotThrow
Simpler approach, Assert that the method does not throw any exceptions when it is called.
[Test] public void doesNotThrowExTest() { Assert.DoesNotThrow(doesNotThrowEx); }
public void doesNotThrowEx() {}
Others
RequiredAddinAttribute
This is extremely useful if you are writing your own NUnit addins, as it is very important that the addin is available before you attempt to execute your tests. After adding attributes about the addins you require,
If they are not available and you execute the test, it will fail but will actually tell you the reason why.
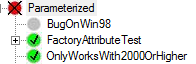
PlatformAttribute
Finally, there is a new PlatformAttribute. This attribute defines which platforms the test is allowed to run on, really useful if you have issues with a certain target platform, or if you have a set of tests only targeting a platform, such as mono.
[Test] [Platform(Exclude=”Win98,WinME”, Reason = “This only works on Windows 2000 and above”)] public void OnlyWorksWith2000OrHigher() { Assert.IsTrue(Environment.OSVersion.Version.Major > 5); }
When the test is executed on an invalid platform, the test is skipped.
This post has summarised all of the interesting bits of the new Alpha release. In future releases, I expect to see some changes going forward before the final 2.5 release. It’s nice to see NUnit taking the different approaches from the different frameworks and incorporating them with their own approach, hopefully v3 will have some really interesting concepts. The main feature missing at the moment are data driven test attributes, such as pulling test cases from CSV or SQL Server, but a framework has an additional extension point to make this attribute easier to write. After this I think most of the missing features would be more suitable in NUnit 3.0.
During the development lifecycle, there are many different automated tests which should be wrote, each style of test has different priorities and different levels of maintenance required. For example, TDD helps with designing the code your just about to write, they are small and focused. As such, when your code changes, your tests change too. Where as acceptance tests have a much longer life-time, there role is to ensure the application works and nothing is regressed as developers continue to make changes. These tests need to be maintainable enough to cope with application changes, readable enough to identity the story feature they are testing with reusableflexible sections to help readability and maintainability.
In an attempt for my tests to meet these goals, recently I’ve been using delegates in certain scenarios to improve my test code. Delegates are great for reusing sections of code, it allows you to have static sections of code but be flexible to cope with minor changes and different scenarios the tests might cover.
For example, below is an acceptance test which must connect to a server based on a project file which has been saved to disk. Remember, acceptance tests should cover the system in an end-to-end fashion.
In order to test the application, the code needs to do a lot. It needs to create and configure a project, save it to disk, create the service and finally it gets to the point of what it is testing – connecting to the service. This code, while it is flexible it is not very maintainable. If we need to change something related to the project or how we connect to the service we would have to change a lot of code to take this into account.
public class Project_Execute_Tests_Standard { [Fact] public void Project_Can_Login_And_Can_Connect() { string path = System.IO.Path.GetRandomFileName();
Service service = null; try { Project project = new Project(); project.Server = “Test”; project.Username = “Admin”; project.Password = “Password”; project.Save(path);
The first logical step would be to use helper methods. We can extract the creation of the project and gaining access to the service into separate methods which we can reuse throughout our test code. However, these methods aren’t very flexible, if we need to add some more configuration to the project we would have to create a different method and as such losing some of our maintainability.
[Fact] public void Project_Can_Login_And_Can_Connect() { string path = string.Empty; Service service = null; try { path = CreateProject();
This is why I like delegates. You have the advantage of helper methods, but the flexibility of having the code inline. Below I’ve created a helper class, this abstracts away from my actual implementation and manages the state, such as the file path for the project. Within the delegate for the project, I’m setting all the details based on the requirements of the test and different configurations, however the rest is abstracted away.
public class Project_Execute_Tests_Delegate { [Fact] public void Project_Can_Login_And_Can_Connect() { ServiceTester tester = new ServiceTester(); tester.CreateProject(delegate(Project project) { project.Server = “Test”; project.Username = “Admin”; project.Password = “Password”; });
While I was writing this example, DevExpress popped up and told me it can shorten my delegate to a lambda expression. As a result, the delegate could be this.
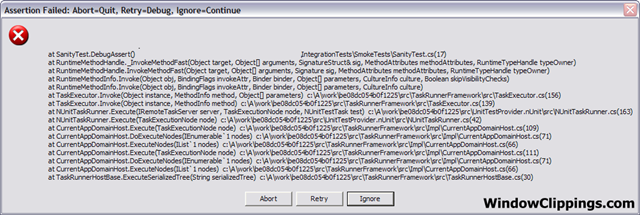
While executing my integration tests today, I was greeted with the excellent Assertion.Failed dialog which is displayed when using System.Diagnostics. This dialog caused a problem on the build server as it was waiting for someone to click Ignore – that someone never came!
If you haven’t saw the Debug.Assert code before, it basically looks like this:
[Test]
public void DebugAssert()
{
System.Diagnostics.Debug.Assert(false);
}
When the Assert fails, the dialog is displayed.
The solution, add an App.Config file to your test suite. Within the XML will clear the trace listeners, now when assert is called nothing happens because nothing is listening for it and the code continues. While executing unit tests this is fine – we just don’t want the dialog being displayed.
If you was interested in the debug.assert messages, you could have hooked up a different listener to write out the message to the console or a file. This is what TestDriven.NET does, if an assertion is hit it writes the message to the output window.
Recently, Ayende released Rhino Mocks 3.5 Beta which includes a new Arrange, Act and Assert syntax style. This is a new syntax for creating your stubs and mocks. To take a deeper look into this new syntax, I’m going to migrate an old example I created for my article Beginning to Mock with Rhino Mocks and MbUnit – Part 2 which is a good read if you are new to the world of mock objects. As a quick refresher, the test I created was ensuring that the PaymentProcessor correctly communicated with the PaymentProcessingObject (in the system, this actually talked to PayPal).
[Test] public void TakePaymentViaPaymentProcessorUsingMockService() { MockRepository mocks = new MockRepository(); IPaymentProcessing mockProxy = mocks.CreateMock();
using (mocks.Record()) { Expect.Call(mockProxy.TakePayment(1, 1, 10.0)).IgnoreArguments() .Return(true); }
using (mocks.Playback()) { PaymentProcessor pp = new PaymentProcessor(mockProxy); bool result = pp.TakePayment(1, 1, 10.0); Assert.IsTrue(result); } }
The code this tested was:
public interface IPaymentProcessing { bool TakePayment(int paymentId, int customerId, double amount); }
internal class PaymentProcessor { internal IPaymentProcessing wsProxy;
public PaymentProcessor(IPaymentProcessing proxy) { wsProxy = proxy; }
public bool TakePayment(int paymentId, int customerId, double amount) { return wsProxy.TakePayment(paymentId, customerId, amount); } }
This is a very generic example, but demonstrates Rhino Mocks using the Record (Setup the mock object) and Playback (Test and use) approach to creating mock objects. Now we have our classic test, let’s look at the changes for 3.5
CreateMock is Obsolete
The first change is that CreateMock has been marked as obsolete. Instead, we should be using StrictMock, this makes a lot more sense as it better defines the type of mock being created.
But this still uses the same RecordPlayback model.
AAA Syntax – Arrange, Act, Assert
This is where Rhino Mocks 3.5 is really interesting – for me at least. We can now express our mock object is a much cleaner fashion, taking advantage of .Net 3.5 extension methods and lambda questions. Below, is the same test as above but using the Mock object.
[Test] public void GenerateMock_TakePaymentViaPaymentProcessorUsingMockService() { IPaymentProcessing mockProxy = MockRepository.GenerateMock(); #1
PaymentProcessor pp = new PaymentProcessor(mockProxy); bool result = pp.TakePayment(1, 1, 10.0); Assert.IsTrue(result);
mockProxy.VerifyAllExpectations(); #3 }
#1 Here we tell Rhino Mocks to create us a mock object of type IPaymentProcessing. #2 Next we define our mock. Here, we are saying we expect TakePayment to be called, we then add some constraints about what the parameters passed in much be, finally defining that true be returned when this is called. #3 Finally, we verify the exceptions we set in #2 where correct.
I find this new approach to be much easier to read, explain and write. The first time I tried this, I actually mistaken Constraints for Return and as such the following exception was thrown.
mockProxy.Expect(x => x.TakePayment(1, 1, 10.0)).Constraints(Is.Equal(true)); = failed: System.InvalidOperationException : The number of constraints is not the same as the number of the method’s parameters!
Just be aware of these new constraints on the parameters.
But, not only can we use this for creating mocks, but we can also create Stubs.
#1 With stubs, we can also verify that the method was called. Notice this AssertWasCalled is an extension method Rhino Mocks has added to the interface. gain, this is helping with the readability and demonstrates an excellent use of Extension Methods.
If AssertWasCalled failed, then the following exception would be thrown and the test would fail.
Expected that IPaymentProcessing.TakePayment(1, 1, 10); would be called, but is was it was not found on the actual calls made on the mocked object
I think the new AAA syntax is really cool. I used it to explain mock objects for my NxtGenUG Coventry session and upgrading my mock objects was a simple task and made the tests much easier to read. Really looking forward to the final release.
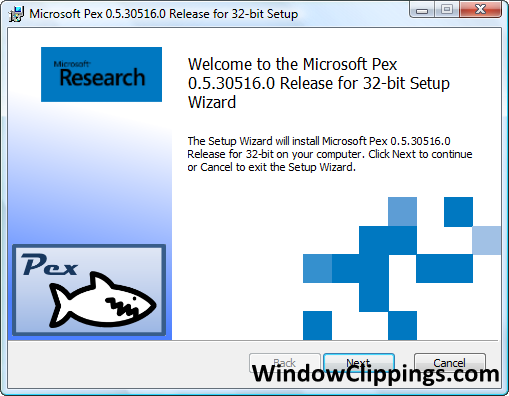
I’ve been waiting for today for too long! Peli has announced that Pex 0.5 has been released and is available to download today! In this post, I am just going to have a very quick look at the release. Expect a lot more posts around this framework, best subscribe now so you don’t miss any.
Pex is a Microsoft research project which generates tests that cover all possible inputs. It does this by a mixture of staticdynamic analysis while taking advantage of the CLR Profiler to analyse your .Net code to find all the possible paths. Pex can then creates a series of test inputs for a test YOU wrote, you write the test which Pex then uses to find all the possible routes. You can use these tests in order to find all the different possible combinations for your application, find the areas where their are problems and have Pex suggest possible fixes.
Copied from site:
Pex comes with a Visual Studio Add-in which only works with Visual Studio 2008 Professional (or higher). Pex also works from the command line without any Visual Studio on the machine.
The team has spent a long term putting together some documentation and samples on how to use Pex which is great (especially for a research project). The samples are installed as part of the main framework and are in a zip file linked off the Microsoft Pex start menu item. Within the zip there is a VS2008 solution, with a project Samples.Pex which appears to contain samples for a lot of the functionality (without researching more I can’t tell what).
Within the samples, the first test I picked at random is the LuhnAlgorithmTestClass. This was of interest because I had a similar test scenario for Red Gate SQL Data Generator as that has a Credit Card Number Generator for the Luhn Algorithm.
The test itself, based on MSTEST, looks very standard. At the class level, we add a PexClass attribute and give the type of class we are testing against. The MaxRuns defines how many runs will be tried during the exploration.
[TestClass] [PexClass(typeof(LuhnAlgorithm), MaxRuns = 100)] public partial class LuhnAlgorithmTestClass
The test itself, we add a PexMethod and most importantly a parameter for the input to use. Pex will then use this test to generate more exploratory tests and use the parameter to inject the value to test against.
[PexMethod] public void CharactersAreNotValid(string input) { string number = input + ‘a’; bool result = LuhnAlgorithm.Validate(number); Assert.IsFalse(result); }
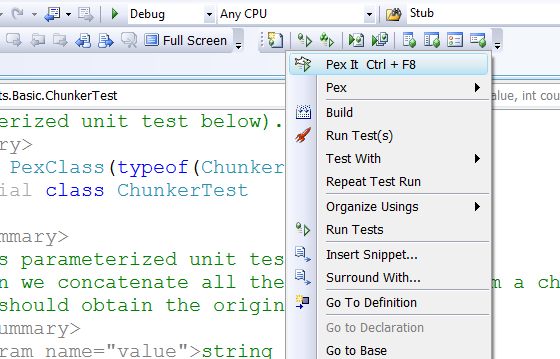
Pex includes a Visual Studio plugin, I can write click and go Pex It!
This should run all of my unit tests, but after executing Pex It! I got an error ClrMonitorFail (-667) – “Exit code returned when the ExtendedReflection profiler encountered a fatal error.” within the Pex Results dialog. I’ve logged this with the team, if I get a solution I will post it online.
Luckily, Pex comes with a console application so the post isn’t over! The command line is simple Pex with the assembly containing the Pex tests. The following command executes Pex for me:
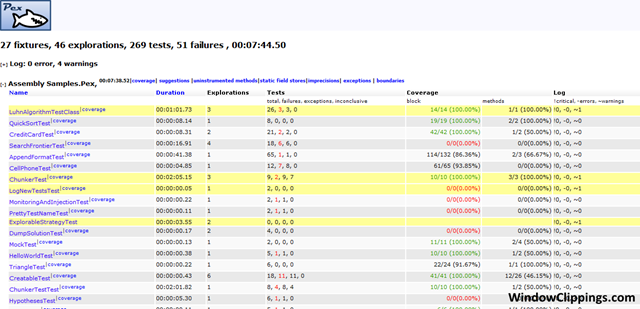
After executing this, we get a lot of information wrote to the console application and a nice HTML report outputted. The console information looks like this:
This is showing that Pex is working against the LuhnAlgorithmTestClass.CharactersAreNotValid(string input) test (as shown above), and is generating multiple different tests based on that initial test.
With the report looking like this:
The report contains a lot of information about the execution. Clicking the name of the test class takes you to some more information about what was executed.
Clicking the parameter values link will display all of the values used for the different tests. Each parameter sends the code down a different route.
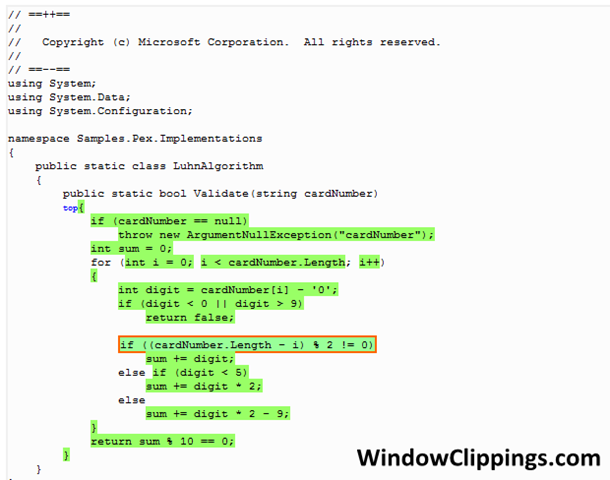
Another link which interested me is the Coverage link for the LuhnAlgorithmTestClass. Clicking on this, you get a really nice Code Coverage report page.
Putting this a different way, by writing a single test with a parameter, Pex can create us a series of different tests to execute all of the possible routes in the method. This is great! As a developer, I can focus on creating a test which can exercise the method, but don’t have to worry about all of those edge cases as Pex will help find those.
Hello World Pex’ed
Hopefully you are still with me, now I just wanted to create a very quick Hello World application. The class I have developed is this HelloWorld class, it has three different paths different different values for each.
public class HelloWorld { public string GetHelloWorld(int ID) { if (ID == 1) return “Hi”;
if (ID == 2) return “Hello”;
if ((ID != 1) || (ID != 2) && (ID % 2 == 0)) return “Hello World”;
return string.Empty; } }
The related test is this HelloWorld(int id). Pex will input the required parameters as a argument, and then execute the test. We want to ensure Hello World is returned.
[TestFixture] [PexClass(typeof(HelloWorld))] public class HelloWorldTests { [PexMethod] public void HelloWorld(int id) { HelloWorld h = new HelloWorld(); string helloWorld = h.GetHelloWorld(id); Assert.AreEqual(“Hello World”, helloWorld); } }
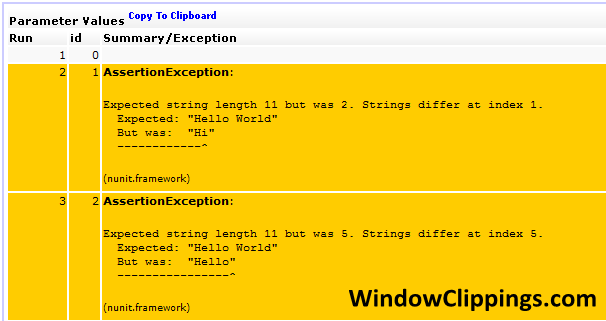
On the HTML report, it displays three different parameters which caused it to go down different routes. For 0, it worked as expected. For 1 and 2, the test failed.
To prove this, I wrote a classic test which worked successfully.
[Test] public void HelloWorld() { HelloWorld h = new HelloWorld(); string helloWorld = h.GetHelloWorld(0); Assert.AreEqual(“Hello World”, helloWorld); }
What has Pex done for us? Well, it has identified one working parameter and two parameters which will cause the test to fail.
Summary
This is a huge framework and I have only just scratched a very small surface area. I haven’t even touched the more advance parts (I will need to read the documentation for that). I will be posting more, writing more and generally seeing what this framework is actually all about. Still not 100% convinced about this framework, I’m saving that until I see more. Not being able to use it against a commercial application might limit my venture.
An article I have wrote about Extending NUnit has just been published on the Simple Talk website. In the article I discuss how to extend the framework to support your own custom attributes, the article includes sample code about how I built attributes such as SqlServerDataSource and ExecuteSql for use when writing your test code.
Simple-Talk is an online technical journal and community hub for working SQL Server and .NET developers and administrators, as well as enthusiasts and those taking their first steps with these Microsoft technologies. Simple-Talk is a growing site, currently with 150,000 subscribers, who each receive a twice-monthly newsletter providing highlights from the Simple-Talk website along with updates and announcements concerning Red Gate tools
I’ve been wanting to write about this for a while however haven’t really had the chance. While prepping for a NxtGenUG session I came across the TestSuite attribute. By using this, you can build up your tests to execute dynamically and provide the parameters when the tests are loaded into the runner and framework. This allows for some great flexibility and extendibility, especially if you don’t know all of the possible test values at design-time and want values to be easily added (adding a row to the database, or dropping another file into a directory).
To take advantage of this, you need to use the TestSuiteFixtureAttribute at the top of your class.
[TestSuiteFixture] public class TestSuiteTests
You can then create the test methods you want to be executed in order to test your system. Two important points, they must take a parameter of type Object and return an Object – the rest is up to you. In the first test, I just write out the ToString value to the console, in the second I check to see if the value is between 0 and 5.
public Object AnotherMethodUnderTest(object testData) { Console.WriteLine(“AnotherTest”); string testDataString = testData.ToString();
int testExecution = Convert.ToInt32(testDataString[testDataString.Length -1].ToString()); Assert.Between(testExecution, 0, 5);
return null; }
The final stage is to create the method which will programmatically create all of your tests and test parameters.
The method below is marked with the TestSuiteAttribute so the framework knows this can create tests. Inside the method, we create a new TestSuite object with a name to identify it, we can then add new items into the collection which are then returned to the framework and executed. The parameters to add are:
Name of test
Method to call (the test itself) as a TestDelegate object
Any parameters for the test
[TestSuite] public ITestSuite Suite() { TestSuite suite = new TestSuite(“NewSimpleSuite”);
for (int i = 0; i < 10; i++) { suite.Add(“MethodUnderTest” + i, new TestDelegate(this.MethodUnderTest), “Parameter” + i); suite.Add(“AnotherMethodUnderTest” + i, new TestDelegate(this.AnotherMethodUnderTest), “Parameter” + i); }
return suite; }
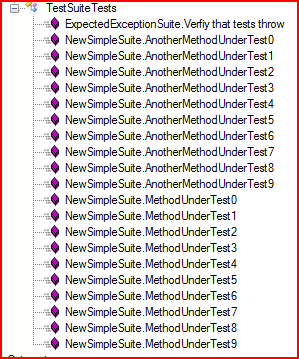
The above code creates 20 tests, 10 for each test method. In the UI, the tests are all loaded correctly, as you can see each one is named correctly based on our code.
Very powerful attribute! But use the power wisely…
After using WaTiN, I have been thinking about UI Testing for WinForms, if it’s possible and if it’s even worth it. On the MbUnit mailing list I posted some syntax for an approach to WinForms and I had some good ideas, I brought up the subject again at Alt.Net.UK and while people have had success using WaTiN, they didn’t seem that interested in WinForm testing. I know others had been talking about WPF Testing during the day and problems with it.
As it happens, I read on Jeremy Miller’s blog that Thoughtworks have released ‘Project White’ which is a UI Testing framework for WPF, WinForms, Win32 and SWT (Java) and works based on Microsoft’s UIAutomation library and windows messages. Sounds promising so I decided to take a closer look, this post just discusses me playing around with the framework and a simple form to get an understanding of how it works.
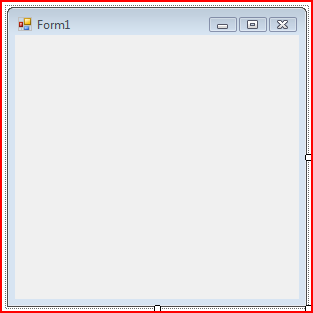
Firstly, I created a standard Windows Forms application with just a single form. First test – does it display?
#1 We need to define the path to our executable. This is fine if you know your always going to be building into the same folder (both test and live assemblies), bit difficult when you have separate output directories.
#2 I then use White to execute the exe
#3 Once the application has launched, we get the form displayed as an object. This works based on the form’s title – in this case, Form1
#4 I then check the Window state to see if it has been displayed
#5 Finally, I close the application.
That’s a very basic test. Let’s add some functionality and explore the framework in more depth. What happens if the framework cannot find the form?
White will attempt to find a window called Form2, if the timeout expires it throws the UIActionException. This is the same if it cannot find a control on the form.
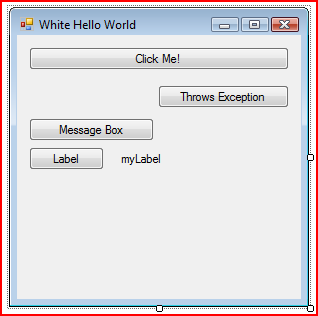
To make this more interesting, I created an additional form with some buttons and labels.
The first button has a simple action, when you click it the text of the button changes to be Hello World!!. We can then create a test for this as follows:
#1 Using the Get method, we can give it the type and name of the control we want to access.
#2 We can then call the Click method which will move the mouse cursor over to the button and click it.
#3 We can then verify that the action was correctly performed, in this case the Name has changed.
Sometimes, we want to be more flexible than referring to the object by it’s name. As such, we can use the SearchCriteria object which allows us to access the control in different ways, for example by it’s text:
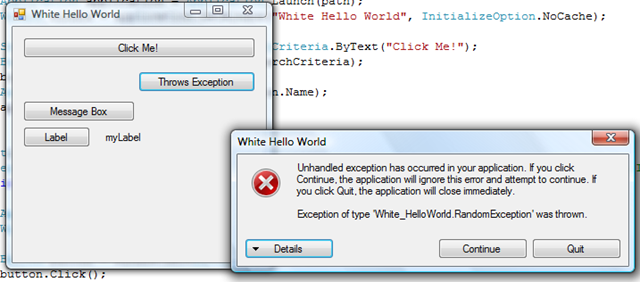
One problem I did encounter was with unhandled exceptions. With one of my buttons, when clicked it will cause an exception to be thrown.
The test looks like this:
[Test]
//Doesn’t work? No way to get the exception…I guess the test would fail so you would reproduce manually.
public void ClickButton_ThrowsException()
{
Application application = Application.Launch(path);
Window window = application.GetWindow(“White Hello World”, InitializeOption.NoCache);
Button button = window.Get
The test fails because of the assertion, sadly it doesn’t report back saying that an exception was thrown which I would have liked.
Another problem which I wanted to see if the framework would handle was with message boxes. When clicking btnMsg, a message box is displayed on screen. Using the framework, we can use the MessageBox() method, giving it the title of the message box in order to get a Window object (would have preferred this to be a MessageBox object). We can then treat it just like a normal window which is nice.
Button button = window.Get
One last simple test I wanted to perform was how to verify that when a button is pressed, that a label is updated correctly.
#1 We can access a label in the same way we access another other control, such as a button. No problems at all. There are other objects for difference controls available.
One thing about all of these tests is that they aren’t very readable, we have a lot of noise about getting access to the objects which is making it harder to read what the test is actually testing. One quick way to improve readability is to move the launch and kill calls into Setup and Teardown methods.
[TearDown]
public void Teardown()
{
_app.Kill();
}
But it can be cleaned up more, one technique I’ve discussed before with WaTiN is to create a wrapper around the UI and test against that to make our tests more readable and less fragile.
I’ve taken the code from the last test and refactored it into a wrapper. The wrapper looks like this:
public class Test2 #1
{
private Application _host = null;
private Window _main = null;
public Test2(Application host) #2
{
_host = host;
_main = _host.GetWindow(“White Hello World”, InitializeOption.NoCache);
}
public Window Main
{
get { return _main; }
}
public Button btnLabelText #3
{
get { return Main.Get
public Label lblText
{
get { return Main.Get
#1 This is the same name as the Form in the code under test for readability
#2 Pass in the application so we can gain access to the running exe
#3 This could be called anything for readability
#4 Use the same code to access the button and return it to the calling test.
Using this wrapper and the Setup/Teardown, the same test as before would be this:
[Test]
public void ClickButton_btnLabelText_ChangesLabel_ImprovedSyntax()
{
Test2 form = new Test2(_app);
form.btnLabelText.Click();
Assert.AreEqual(“Updated”, form.lblText);
}
This could be reduced more by moving the form creation into Setup as well. By using this simply step, we have made the tests more much readable. The other advantage is that if the name of a button changes, we only have to change the wrapper and not all of the dependent tests.
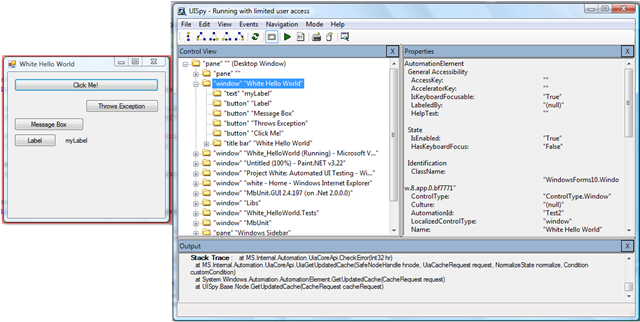
One final problem you might encounter is finding out what each control on the form is actually called. The .Net 3.0Windows SDK includes a tool called UISpy. This allows you to see all the properties on a running application, as such all the information required for use with White.
In summary, I’m really impressed with the framework. There are a few missing features, but hopefully they can be added over time, the fact that the framework does multiple different UI technologies is great, means you don’t have to worry about what to use to write your UI tests or if your UI deals with the different technologies. Can’t wait to use it on a real project…
Keep an eye out for a post how to use this with WPF and more advanced scenarios.