I’ve been wanting to write about this for a while however haven’t really had the chance. While prepping for a NxtGenUG session I came across the TestSuite attribute. By using this, you can build up your tests to execute dynamically and provide the parameters when the tests are loaded into the runner and framework. This allows for some great flexibility and extendibility, especially if you don’t know all of the possible test values at design-time and want values to be easily added (adding a row to the database, or dropping another file into a directory).
To take advantage of this, you need to use the TestSuiteFixtureAttribute at the top of your class.
[TestSuiteFixture] public class TestSuiteTests
You can then create the test methods you want to be executed in order to test your system. Two important points, they must take a parameter of type Object and return an Object – the rest is up to you. In the first test, I just write out the ToString value to the console, in the second I check to see if the value is between 0 and 5.
public Object AnotherMethodUnderTest(object testData) { Console.WriteLine(“AnotherTest”); string testDataString = testData.ToString();
int testExecution = Convert.ToInt32(testDataString[testDataString.Length -1].ToString()); Assert.Between(testExecution, 0, 5);
return null; }
The final stage is to create the method which will programmatically create all of your tests and test parameters.
The method below is marked with the TestSuiteAttribute so the framework knows this can create tests. Inside the method, we create a new TestSuite object with a name to identify it, we can then add new items into the collection which are then returned to the framework and executed. The parameters to add are:
Name of test
Method to call (the test itself) as a TestDelegate object
Any parameters for the test
[TestSuite] public ITestSuite Suite() { TestSuite suite = new TestSuite(“NewSimpleSuite”);
for (int i = 0; i < 10; i++) { suite.Add(“MethodUnderTest” + i, new TestDelegate(this.MethodUnderTest), “Parameter” + i); suite.Add(“AnotherMethodUnderTest” + i, new TestDelegate(this.AnotherMethodUnderTest), “Parameter” + i); }
return suite; }
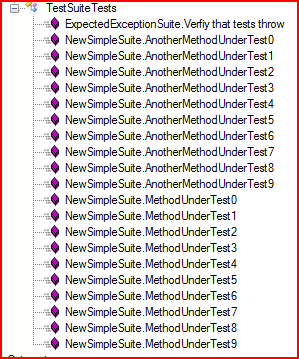
The above code creates 20 tests, 10 for each test method. In the UI, the tests are all loaded correctly, as you can see each one is named correctly based on our code.
Very powerful attribute! But use the power wisely…
Just an early heads up, I will be doing a Test Driven Development talk at NxtGenUG Coventry on Monday May 19th.
My plan for the talk is to start with nothing, and build up a application using a test driven development approach. Unlikely it will be a feature complete SubText level application, but my aim is to demonstrate how to get started with TDD with some real application features, how to take advantage of mocking and of course some of the excellent MbUnit features…
Talk Abstract
Red, Green, Refactor!
Starting to unit test your first project is difficult, where to start? What to test? How do you even get started? In this session, Ben starts from scratch and implements an ASP.net 2.0 application using test driven development techniques. The application will have to deal with real world situations such as databases, web services and even some users! Ben will demonstrate how to design the application for testability and how unit testing and mock frameworks can make your life easier and your tests less fragile. At the end, will the tests go green?
Continuing in my writing about MbUnit, this post will focus on the TypeFixtureAttribute. The TypeFixture allows a set of tests to focus on testing a certain type of class (generally an interface) and to provide objects of that type to be tested against.
This method is really useful if you have a collection of objects which all have similar behaviour which requires testing. Instead of having to duplicate your test code, you can define the types to be tested with instances of the tests being passed into the test being executed.
In my fake system being tested, I have a collection of objects which all implement a INotNull interface. I need to test to make sure that the implementation of INotNull works correctly, that not nulls are returned when GetNotNullValues() is called. My ‘Production’ code is this:
public interface INotNull
{
IEnumerable GetNotNullValues();
}
public class TypeA : INotNull
{
public override string ToString()
{
return “TypeA”;
}
public IEnumerable GetNotNullValues()
{
yield return “TypeA”;
}
}
public class TypeB : INotNull
{
public override string ToString()
{
return “TypeB”;
}
public class TypeC : INotNull
{
public override string ToString()
{
return “TypeC”;
}
public IEnumerable GetNotNullValues()
{
yield return new object();
yield return null;
yield return new object();
}
}
The code looks fine, apart from TypeC which returns a null. In a standard unit testing framework, I would have to create multiple test fixtures for each type in the system and duplicate all of the tests. TypeFixture makes our life easier by allowing us to define a single fixture and test all the objects we want. Let’s have a look at the test code.
[TypeFixture(typeof(INotNull), “Tests the INotNull interface.”)] #1
public class INotNullTests
Instead of defining a TestFixture at the top of our class, we define a TypeFixture and give it the typeof object we will be testing. We then need to tell it all the objects to use.
[Provider(typeof(TypeA))] #1
public TypeA ProvideTypeA()
{
return new TypeA(); #2
}
#1 We use the ProviderAttribute and provide the type of object we are returning as a parameter.
#2 We then create a new instance of the object and return it to the caller.
We can use the Provider attribute on as many methods as required to cover all of our objects being tested. The other two objects being tested are TypeB and TypeC.
[Provider(typeof(TypeB))]
public TypeB ProvideTypeB()
{
return new TypeB();
}
[Provider(typeof(TypeC))]
public TypeC ProvideTypeC()
{
return new TypeC();
}
Now we have that in place, we need to write out tests. The test is a standard test, however accepts the type (as defined in the TypeFixture) as a parameter.
[Test]
public void TestINotNullValuesNotNull(INotNull instance)
{
Console.WriteLine(instance.ToString());
foreach (object o in instance.GetNotNullValues())
{
Assert.IsNotNull(o, “Instance: {0}. Object was null: {1}”, instance, o);
}
}
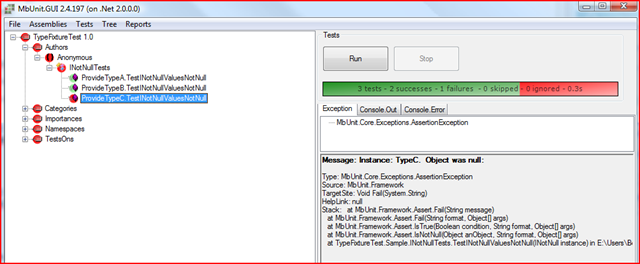
We can then use that object within our test to verify it works correctly. This test method will be called once per object defined by a provider attribute. In this case, three tests are executed with TypeC test failing.
Adding more tests to the fixture is very quick and easy and with the TypeFixture will result in it being used to test multiple objects. Adding another implementation of the interface is easy as we define another method allowing it to be picked up by all the existing tests.
In this post, I want to talk about a little know feature of MbUnit which is the CombinationalTestAttribute. This was originally described on Peli’s blog, but I thought I would revisit the subject.
The combinational test attribute allows us to do pair-wise testing. This is where we take two inputs (A and B) and test them against each other ({A1, B1}, {A1, B2}, {A1, B3}).
When implementing this system, the OUT (Object Under Test) needs to implement an interface. In this case a ICount
public interface ICount { int Count(string s); }
We then implement a X counter which will the number of X’s which appear in a string.
public class XCounter : ICount { public int Count(string s) { int count = 0; foreach (char c in s) if (c == ‘x’) count++; return count; } }
For the purposes of demo’ing, a BadCounter is also implemented.
public class BadCounter : ICount { public int Count(string s) { return 2; } }
So that would be our production code which we want to test. Using just standard TestFixture and Test attributes, our tests would have to look something like this:
[TestFixture] public class ICountTests_Orginal { [Test] public void BadCounter_Count_NoX() { ICount counter = new BadCounter(); int result = counter.Count(“”); Assert.AreEqual(0, result); }
[Test] public void BadCounter_Count_TwoX() { ICount counter = new BadCounter(); int result = counter.Count(“XX”); Assert.AreEqual(2, result); }
[Test] public void BadCounter_Count_XSpaceYSpaceZ() { ICount counter = new BadCounter(); int result = counter.Count(“X Y Z”); Assert.AreEqual(1, result); }
[Test] public void XCounter_Count_NoX() { ICount counter = new XCounter(); int result = counter.Count(“”); Assert.AreEqual(0, result); }
[Test] public void XCounter_Count_TwoX() { ICount counter = new XCounter(); int result = counter.Count(“XX”); Assert.AreEqual(2, result); }
[Test] public void XCounter_Count_XSpaceYSpaceZ() { ICount counter = new XCounter(); int result = counter.Count(“X Y Z”); Assert.AreEqual(1, result); } }
This is only testing the two objects (imagine 100s) with three test cases (imagine 1000s). This would very quickly become unmanageable and a maintenance nightmare. We can make this much more effective using Combinational.
First part of configuring this is to setup a Factory for the interface. This will produce all the objects we want to be tested.
[Factory(typeof(ICount))] public IEnumerable Counters() { yield return new BadCounter(); yield return new XCounter(); }
Next, we create a factory of test cases.
[Factory(typeof(CombinationTestItem))] public IEnumerable Strings() { yield return new CombinationTestItem(“”, 0); yield return new CombinationTestItem(“aaa”, 0); yield return new CombinationTestItem(“x”, 1); yield return new CombinationTestItem(“xa”, 1); yield return new CombinationTestItem(“xax”, 2); yield return new CombinationTestItem(“X x”, 2); yield return new CombinationTestItem(“X X”, 2); }
I’ve created a helper class within my code called CombinationTestItem. This is used just to store the input and expected output so I can access them within my test. This could store as much or as little as you want, only restriction is that the Factory must return IEnumerable.
public class CombinationTestItem { public CombinationTestItem(string value, int xcount) { Input = value; ExpectedOutput = xcount; } public string Input; public int ExpectedOutput; }
#1 Instead of using [Test] we use [CombinatorialTest]
#2 The first parameter of the test is the Factory of Counters we created. We use the [UsingFactories] attribute to help the framework understand which factory to pull the data from
#3 Like with #2, we do the same for the test data factory.
#4 Finally, we call the count method on the counter object passed into the test with the value we set on our CombinationTestItem object. We then verify that it matches the related ExpectedOutput.
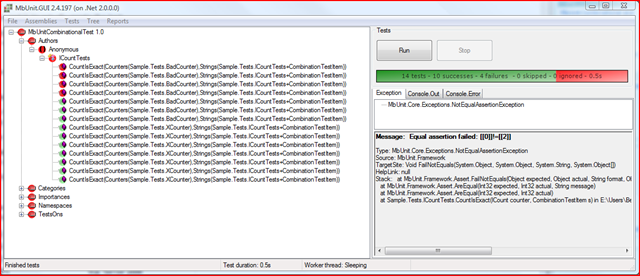
When it comes to executing the test cases the framework creates a test for each ICount with each CombinationTestItem test case. The result is 14 test cases (Two ICount objects * 7 CombinationTestItem test cases).
Adding additional objects or test cases is simply a case of adding an additional line of code.
My own point about this attribute is that I have never found a real world situation where I have required this. In theory (like above) it sounds great, but I’m but sure if it would actually solve any of my integration testing problems – I can’t imagine it would solve any unit testing problems. If this does solve a problem for you, it would be great to hear about it.
Yesterday I received feedback from my DDD6 talk on Testing applications with MbUnit. Attendees are asked to leave feedback on the sessions they attended and rate the speaker in four categories; overall, knowledge, presentation and content. My averages for these where:
Overall
Knowledge
Presentation
Content
4.44
4.77
4.33
4.44
Some of the comments where:
“Was expecting more Gallio stuff, even just more of an introduction to the concepts.. As it was I already knew a lot of”
Fully agree that this was a problem, it’s a shame more of Gallio wasn’t ready at that point. You can read more about it here and here.
“This guys did a great job. Well-prepared, well-executed and full of useful information.”
“Voice projection was an issue at the start, I think this got better as it went on. Some of the content was rushed through, this was probably due to a large subject being tackled in depth in only an hour.”
“The speaker clearly knew his stuff. As a result I will be taking a look at MbUnit. A first time presenter, and I’m sure there were a few nerves – did well. “
On a personal note, I think it went OK – but there was/is definitely room for improvement. Thanks for all the feedback, I will take it into account when doing future talks.
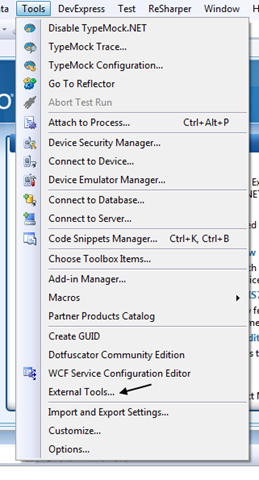
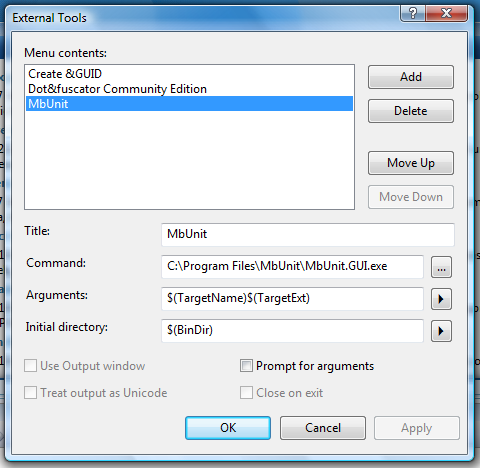
Personally, I use TestDriven.NET to launch the MbUnit GUI to execute my tests. However, not everyone has that installed. One alterative approach is to use the External Tools option within Visual Studio.
To create this setting, select the Tools option and select External Tools.
You can then Add a new tool and point it at either the GUI or Cons application.
The most important settings are the variables to use. First, you need to set the Initial Directory to be the $(BinDir), this will be where your built assemblies end up and generally is debugbin. Next, you need to set what arguments to pass into the MbUnit GUI. $(TargetName)$(TargetExt) will provide you with the assembly name with its extension on the end. This allows MbUnit to find it in the bin directory and load it successfully.
Just make sure you have your test project selected before selecting the MbUnit option from the menu.
You should find this also works with NUnit and XUnit runners.
One of the interesting features of MbUnit 2.4 is the Rollback attribute. I’ve spoke about this in passing in some of my previous posts, but I thought I would drive a little deep into what is going on.
The Rollback attribute can be added to any test method, when the test has finished (either passed or failed) any changes made to the database is rolled back – even if it has transactions inside. This means that your tests are more isolated
Rollback uses Enterprise services and COM+ and is based on the .Net 1.1 implementation. Rollback2 uses TransactionScope from System.Transactions which was included in .Net 2.0. If your project is using .Net 2.0, Rollback2 would be the preferred attribute to use. An example of how this could be used is:
[Test] [RollBack] public void GetCategoryByName_NameOfValidCategory_ReturnCategoryObject() { InsertCategory();
Category c = ProductController.GetCategory(“Microsoft Software”);
Assert.AreEqual(“Microsoft Software”, c.Title); Assert.AreEqual(“All the latest Microsoft releases.”, c.Description); }
One question I was asked at DDD was if Rollback supports other databases or if its just SQL Server. The answer is, I still haven’t been able to find a definitive answer. In theory it should work, but I have read some forum comments about errors when using TransactionScope. If I can get everything setup, I’ll write another post with my findings.
While looking around about this feature I came across a RestoreDatabase attribute. Had to have a play!
Turns out, it allows a backup to be restored before the test is executed (if you didn’t get it from the name). It gets all the information based on the SqlRestoreInfo attribute at the test fixture level and uses that to store the database before the test is executed.
[TestFixture] [SqlRestoreInfo(“Data Source=BIGBLUE;Initial Catalog=Master;Integrated Security=True”, “Northwind”, “E:Northwind.bak”)] public class Class1 { string connectionString = “Data Source=BIGBLUE;Initial Catalog=Northwind;Integrated Security=True”;
[Test] [RestoreDatabaseFirst] public void GetOrders() { //string queryString = “DELETE FROM dbo.[Order Details];”; If we execute this in the first run the table is empty. string queryString = “SELECT * FROM dbo.[Order Details];”; If we execute this in the second run, the data is restored. string queryString2 = “SELECT * FROM dbo.[Order Details];”; using (SqlConnection connection = new SqlConnection(connectionString)) { SqlCommand command = new SqlCommand(queryString, connection); SqlCommand command2 = new SqlCommand(queryString2, connection); connection.Open(); command.ExecuteNonQuery(); SqlDataReader reader = command.ExecuteReader(); try { while (reader.Read()) { Console.WriteLine(String.Format(“{0}, {1}”, reader[0], reader[1])); } } finally { // Always call Close when done reading. reader.Close(); } } }
It’s a neat idea and good for integration testing, but I wouldn’t recommend it for unit testing as the additional time to restore the database would soon mount up, expect improvements to testing with databases in MbUnit v3.
Last weekend I decided it would be great fun to do a simple screencast about getting started with MbUnit. It’s just a very quick, create project, add reference, execute screencast but hopefully it will be useful if this is your first time to a unit testing framework and you want to get started. It also gave me chance to play around with Camtasia.
Well, it wasn’t as much fun as I first thought. I had a number of attempts to find out how to actually create a screencast and I think I fall into most pitfalls along the way (but its all experience right?), that can be another post.
The outcome was that I managed to created a screencast on Getting Started with MbUnit.
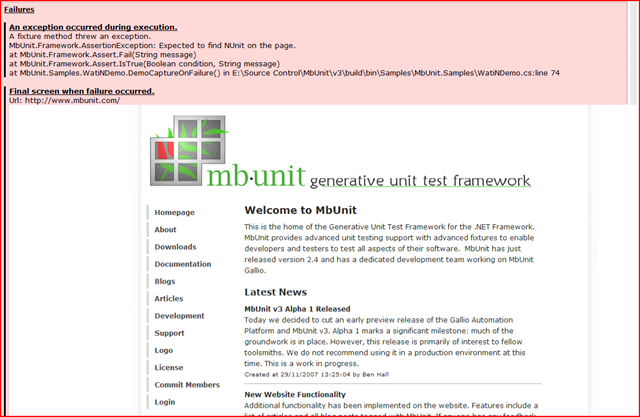
One of the cool items I didn’t mentioned in my announcement post is that we now have the ability to integrate screenshots from a WatiN test into the reports.
Here we have a simple test which searches for MbUnit on Google and then asserts to check that NUnit is mentioned on the page (this fails).
[Test] public void DemoCaptureOnFailure() { using (Log.BeginSection(“Go to Google, enter MbUnit as a search term and click I’m Feeling Lucky”)) { ie.GoTo(“http://www.google.com”);
// Of course this is ridiculous, we’ll be on the MbUnit homepage… Assert.IsTrue(ie.ContainsText(“NUnit”), “Expected to find NUnit on the page.”); }
Normally, it would be hard to find out what was actually on the webpage at that point to see why the test decided to fail. In the tear down method, there is a check if the test passed or failed, if it failed then it takes a snapshot and includes it in the report.
[TearDown] public void DisposeBrowser() { if (Context.CurrentContext.Outcome == TestOutcome.Failed) Snapshot(“Final screen when failure occurred.”, LogStreamNames.Failures);
if (ie != null) ie.Dispose(); }
When you view the report, on the test that failed you can see that the screenshot of the webpage has been included. This will make debugging the error a lot easier, making the tests more useful.
I think this is a great feature, well done to Jeff and the team for implementing this.
Today, I am going to be looking at WatiN, which stands for Web Application Testing in .Net, and seeing how well it actually works with an ASP.net web application.
WatiN is a type of record and playback framework to allow for automating the UI testing for web applications. It uses IE and allows you to interact with the page, for example clicking buttons and typing in text.
A simple example from their documentation shows how to search for WatiN on google and assert you got the correct results back.
[Test] public void SearchForWatiNOnGoogle() { using (IE ie = new IE(“http://www.google.com”)) { ie.TextField(Find.ByName(“q”)).TypeText(“WatiN”); ie.Button(Find.ByName(“btnG”)).Click(); Assert.IsTrue(ie.ContainsText(“WatiN”)); } }
You can use any test framework to get started, with MbUnit you simply write the tests as normal, but in your test fixture attribute you need to set the ApartmentState to STA. ApartmentState is part of .Net which states how the thread should execute. STA means that the thread will create and enter a single threaded apartment, everything will just be kept on the single thread.
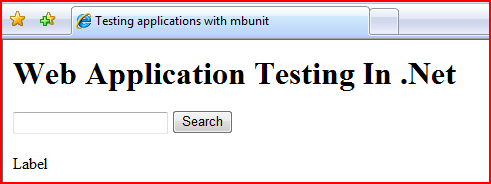
Now we have running tests, we can start to look at testing a ‘real’ application. Below is the screenshot of the application under test (AUT).
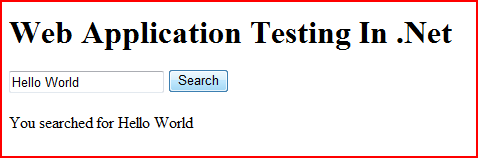
Entering information would cause the page to look like this:
Very simple. To test this worked correctly, we would want to simulate what the user is doing and to verify it worked the same way a person would, in this case that it displayed the search term typed into the text box.
First we need to find the text box (called searchText) by it’s name and enter a string. We then find the button (by its value – the text displayed to the user and not the ID, the button ID is in fact Button1) and click it. We then verify the response.
// Find the search text field and type Watin in it. ie.TextField(Find.ByName(“searchText”)).TypeText(“WatiN”);
// Click the search button. ie.Button(Find.ByValue(“Search”)).Click();
//Verify it contains search term. bool result = ie.Text.Contains(“WatiN”); Assert.IsTrue(result); }
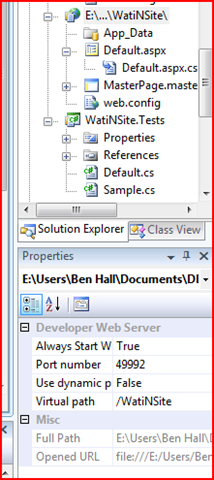
The URL points to the ASP.net development server for the solution, with a static port set.
That works with simply html, but what happens when ASP.net is pain with the naming. When using a master page with ASP.net, you place all of the pages content within a ContentPlaceHolder. When ASP.net renders this, to ensure naming of elements does not clash it prefixes the IDs.
Without using the placeholder, the textbox html is:
However, after using master pages it becomes:
Not great! All the elements are referred as strings, by moving to master pages all of our tests would break. WatiN will report this as:
Message: Could not find a ‘INPUT (text password textarea hidden) or TEXTAREA’ tag containing attribute name with value ‘searchText’
One solution has been provided by James Avery in his WatiN Test Pattern post. Here, he basically says that each page in the website should have a adapter in the test code which we code against which in turn calls the page (this is not mocking the page). It means that changes to the website, such as naming, requires only changing the adapter class to match. Following his pattern, the test would be:
bool result = page.Text.Contains(“WatiN”); Assert.IsTrue(result); }
This does solve some of the problems as it makes the tests less dependent on the application code. However, the ASP.net naming is still getting in the way. If we add another container or the element is inside a custom control we are still going to have a problem. The answer is RegEx!
In our adapter, I change the way we find the element to use a method RegExName. Now its Find – ByName – RegExName – ElementName.
public TextField SearchText { get { return TextField(Find.ByName(RegExName(“searchText”))); } }
Our RegExName method just takes in the elementname and return a regex which will ignore all of the ASP.net prefixes.
By using an adapter and RegEx we can abstract away from the real implementation and make our tests a lot more beneficial. The tests are quite easy to write as long as you keep things focused. By arranging your tests as above, you should have a lot more long term success.
But having an automated test run for the UI will never replace a human tester as there are other scenarios to test for, cross browser, usability, wording which a test framework cannot test.