Interactive Git Tutorials on Scrapbook

Git is now a key component of building software. While the basics are relatively simple to learn, the more advanced aspects can be difficult to pickup. The problem with learning Git, as with many technologies, is configuring a realistic scenario in order to start learning. If you’re using Git by yourself then it’s difficult to understand how to handle merge conflicts. Areas like Rebase and Cherry Picking are useful but just reading the man page doesn’t express why or when you would use them.

Many great resources already exist to help you learn Git but I find the best way for me to learn is to be hands-on and with examples to guide me. This is where Scrapbook comes in.

Scrapbook is a new interactive learning platform for developers. While many platforms aim to teach people the foundations of programming, very few support existing developers in keeping them up-to-date with the latest technologies and boost their experience.

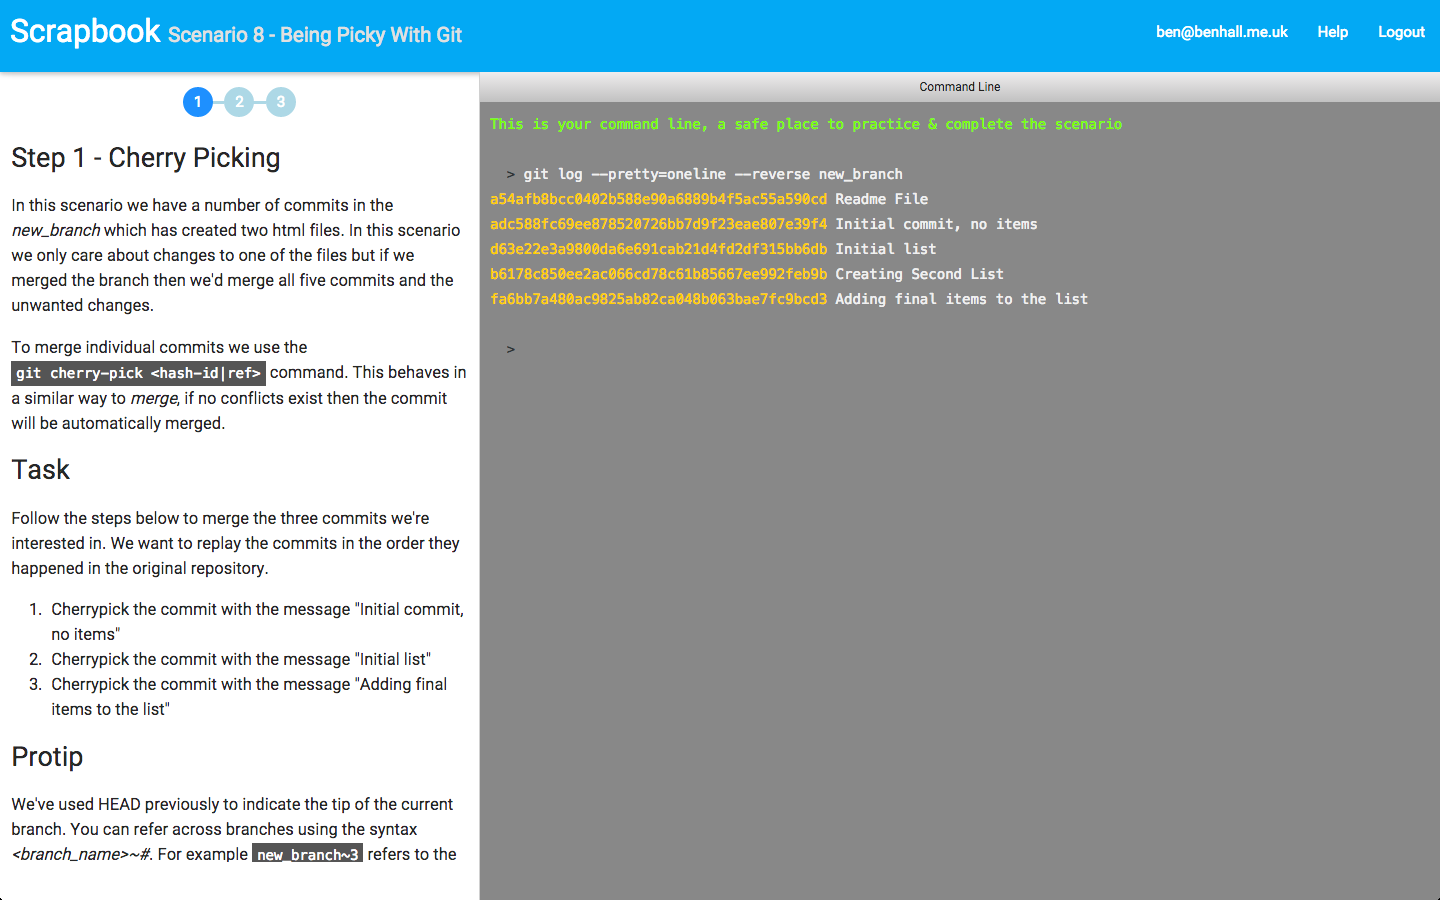
The first course on Scrapbook focuses on Git and covers the common scenarios encountered. By combining a step-by-step tutorial explaining what’s happening along with a configured environment you can start learning instantly without having to download or config anything.

Git Course on Scrapbook

Currently in beta and for a limited time the course is available for free. Sign up at http://app.joinscrapbook.com/courses/git/

We’d love you’re feedback on the course, the platform and the topics you would like to see in future. You can reach us via [email protected]

Git file permissions and bash scripts

This took me a very long time to figure out.

When committing files to git, the file permissions are also committed. https://github.com/BenHall/heroku-buildpack-mono/commit/cb85e7fbc6e3f9cc646e7e3394d67419d1dbdfe4#bin/detect

What this means is that when you clone the git repository, it has the nessary file permissions required to be executed. What it also means is if you don’t commit the files with the correct permissions, nothing works.

Quick screencast: Installing Git

I have spoken to a number of people who have been put-off by installing Git as it seems difficult. To prove that it’s not, I decided to put together a very quick screencast to highlight the main points. As I wanted it to be quick and to the point I decided not to add voice-over and instead use call-outs where required.

If you want to know more, then I really recommend you check out TekPub as they have done a great series on how to take full advantage of Git.

Migrating from CodePlex to GitHub

While I have a lot of respect for the work Microsoft have done with CodePlex, personally I think GitHub is fundamentally a much better platform for open source projects. The main reason being is that it is just so easy to get access to the code, make changes and do whatever you want while utilising the power of Git. I have a couple of projects on CodePlex, so I wondered how easy it would be to port them over to GitHub.

After creating a new repository on GitHub, you are given the option to import from a Subversion Repository. All you need to do is enter the public Subversion URL for your repository.

image

Thankfully, CodePlex allows you to access your source code via TFS and Subversion. To find the URL, simply go to the Source Code tab and click Connection Instructions. This will give you the project’s SVN URL to enter into Github.

image

After clicking next the experience isn’t great – there is no real feedback about what is going on which is unfortunate.  However, after a while I received an email saying the Import had been completed successfully. If it fails, it also will send you an email to let you know.

image

My GitHub repository now has all the source code from my CodePlex project.

image

Along with the code, it also has all the commits and history associated with the project which is pretty awesome!

image

In just a few clicks I was able to migrate from CodePlex and SVN to GitHub and Git.

If you didn’t want to use the UI, or it failed for some reason, GitHub have a great guide about how you can do this import manually.

Welcome to GitHub – Your first git repository

I’ve been using GitHub for a while now as it’s a great way to share ideas and code in the public domain. Recently, I’ve had a number of people ask me how they can get started using GitHub. Thankfully, GitHub is an extremely simple service to use!!

Firstly, GitHub is a social coding repository, building on top of git (a source control system) to encourage collaboration on code and open source projects. By having this aim, the site is organised in such a way to make it very simple to upload code, as well as add additional contributors to the project. GitHub also has paid for accounts offering private repositories and additional features.

First, to use GitHub you need a git client installed. If you are on OSX, I recommend using the git-osx-installer while if you are on windows I suggest the MSysGit project. From my experience, I’ve found these to be the most effective way to start using git.

After signing up for a free account on GitHub, you need to create a public key. The next stage is to create a public repository to store code.

All you need to do is enter a name for a new repository, a description and click Create. Each project has it’s own repository, unlike with other source control systems such as SVN.

GitHub_Create.png

After clicking create, you have your repository. GitHub provides you with the next steps about how you can add code in your public repository. A great way to learn the fundamentals of git at the same time.

GitHub_ReproCreated.png

The first command you will need is ‘git init’, this creates your local repository to store your project. Once you have a local repository, you can do all the standard commands you would expect such as git add, git commit, branch etc.

After you push your code to github, everyone will be able to view, clone, fork your repository. A great way to allow others to collaborate on your project. In my case, the repository I created was http://github.com/BenHall/SimplyRubyServer/.

As you start using GitHub and Git more and more, you will really understand how powerful they are.