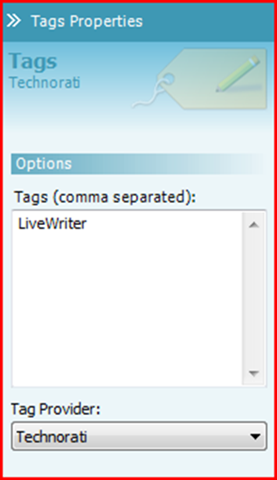
 Following on in my series of blog posts, tonight I talk about how to create a custom Properties Panel for your plugin. The screenshot on the right shows what I’m talking about, this is the properties for the Technorati tags which are inserted in the posts. This plugin will simply insert some default text, it will then display a textbox in the properties panel, which when saved will update the text in the blog post.
If you haven’t read my first post, then that would be a good place to start.
To start with, you need to create the standard C# class library, reference the API and System.Windows.Forms, finally creating the attribute.
However, usually we just inherit from ContentSource however, in order to be able to access the properties panel we need to inherit from SmartContentSource. This class gives us access to more advanced parts of Live Writer.
SmartContentSource works sightly differently, instead of overriding CreateContent, we override CreateEditor and GeneratePublishHtml. GeneratePublishHtml is the html that is inserted into the blog post when the plugin is selected. CreateEditor is the method which returns a SmartContentEditor.
A SmartContentEditor is the properties form itself. To create a editor form, create a new window form and instead of having it inherit from Form, inherit from SmartContentEditor. By doing this, the form automatically changes from being a Windows Form to be the correct size and colour for the properties sidebar panel. We can now drag on any WinForm controls to use.
So now lets just have a quick review of the code.
[WriterPlugin
(“1b4dfa52-ba55-47b1-b795-f4a66af4e834”, “Properties Panel”,
PublisherUrl = “http://blog.benhall.me.uk”,
Description = “Properties Panel Test”)]
[InsertableContentSource(“Properties”)]
public class PropertiesPanelPlugin : SmartContentSource
{
public override DialogResult CreateContent(IWin32Window dialogOwner, ISmartContent newContent)
{
return DialogResult.OK;
}
public override SmartContentEditor CreateEditor(ISmartContentEditorSite editorSite)
{
return new PropertiesPanelEditor();
}
public override string GeneratePublishHtml(ISmartContent content, IPublishingContext publishingContext)
{
return “GeneratePublishHtml”;
}
}
Then the editor panel looks like this
public partial class PropertiesPanelEditor : SmartContentEditor
{
public PropertiesPanelEditor()
{
InitializeComponent();
}
}
The rest simply depends on what you want to achieve. In this example, the editor is going to have a text box and save the user’s text in the blog post.
First, the SmartContentEditor allows access to a variable SelectedContent, from here we can set properties which can be accessed from other parts of the plugin. First, in PropertiesPanelEditor, drag on a textbox and a button. On the button clicked event, we want to set a property on the SelectedContent variable. We then raise the OnContentEdited event to alert to the fact that the user has changed the content.
private void button1_Click(object sender, EventArgs e)
{
SelectedContent.Properties.SetString(“FirstProperty”, textBox1.Text);
OnContentEdited();
}
Now, within our PropertiesPanelPlugin we need to handle the ContentEdited event and update the blog post text. First, within the CreateEditor method, we hook up the event before returning the object.
public override SmartContentEditor CreateEditor(ISmartContentEditorSite editorSite)
{
PropertiesPanelEditor editor = new PropertiesPanelEditor();
editor.ContentEdited += new System.EventHandler(editor_ContentEdited);
return editor;
}
Next, we code how to handle the event. All we want to do it call GeneratePublishHtml method which will handle all the outputting to the post.
void editor_ContentEdited(object sender, System.EventArgs e)
{
GeneratePublishHtml(pcontent, ppublishingContext);
}
This method is first called when the user first clicks the plugin, at this point we take a internal copy of the content + publishingContext (i’ll talk about this in a later post) so we can reuse it when calling the event.
We then try to get the string from the properties which we set in the editor. If the default value is returned, we output our default text, otherwise we return the string.
private ISmartContent pcontent = null;
private IPublishingContext ppublishingContext = null;
public override string GeneratePublishHtml(ISmartContent content, IPublishingContext publishingContext)
{
pcontent = content;
ppublishingContext = publishingContext;
string str = content.Properties.GetString(“FirstProperty”, “default”);
if (str.Equals(“default”))
return “GeneratePublishHtml”;
else
return str;
}
At this point, the string is returned and the text in the blog post is updated. This is similar to how the Insert Tags… plugin works.
Hope that all makes sense, the main problem I had was realising the link between the ContentEdit event and ISmartContent. Just remember to save all the data in the Properties collection and raise the event when things are changed.
Download Sample – LiveWriterPropertiesPanel.zip
Excellent! Just what I needed to get me over the last hump. Thanks for the straightforward explanation/post.