Yesterday I tried to purchase a book from Amazon UK on my iPhone and was given this error message:
It had all my information, everything looked correct but unbeknown to everyone, including Amazon, it was game over.
Any time my hands are not on my keyboard my productivity is being harmed. Visual Studio + ReSharper has some really nice keyboard shortcuts which means I don’t need to use my mouse. However, one shortcut which just feels to me plain forgotten is being able to close a file using the keyboard. I can open, switch between but cannot close! Thankfully you can bind your own shortcuts, as such I bound to Ctrl+Q. Having this simply makes everything a little bit easier. But please, Visual Studio or ReSharper – auto-bind this command.
Note: Visual Studio 2010 Beta 2 is a bit buggy when it comes to keyboard shortcut. I had to un-assign anything bound to the key and restart the app before it took effect.
While I have a lot of respect for the work Microsoft have done with CodePlex, personally I think GitHub is fundamentally a much better platform for open source projects. The main reason being is that it is just so easy to get access to the code, make changes and do whatever you want while utilising the power of Git. I have a couple of projects on CodePlex, so I wondered how easy it would be to port them over to GitHub.
After creating a new repository on GitHub, you are given the option to import from a Subversion Repository. All you need to do is enter the public Subversion URL for your repository.
Thankfully, CodePlex allows you to access your source code via TFS and Subversion. To find the URL, simply go to the Source Code tab and click Connection Instructions. This will give you the project’s SVN URL to enter into Github.
After clicking next the experience isn’t great – there is no real feedback about what is going on which is unfortunate. However, after a while I received an email saying the Import had been completed successfully. If it fails, it also will send you an email to let you know.
My GitHub repository now has all the source code from my CodePlex project.
Along with the code, it also has all the commits and history associated with the project which is pretty awesome!
In just a few clicks I was able to migrate from CodePlex and SVN to GitHub and Git.
If you didn’t want to use the UI, or it failed for some reason, GitHub have a great guide about how you can do this import manually.
Today I installed RubyMine 2.0 which is a great IDE from JetBrains. However, I was confused as all the keystrokes referred to ‘Meta’, for example ‘Meta+C’ for copying. Being on Windows 7, this wasn’t a valid keystroke.
After a bit of search around, it turns out RubyMine has keystrokes targeted for different environments, in my case it was targeted to be the same as TextMate. Awesome when I’m on my Mac, not so good on Windows.
To change the keymapping, select File > Settings. Pick the keymap option, and in the dropdown change it to Visual Studio.
Everything will then feel right at home.
If you have been following me on twitter then this will be old news however I realised I never announced it on my blog.
Well, here is it! I have written a book on Testing ASP.net Web Applications! The website for which can be found at http://www.testingaspnet.com/

I agreed to co-author the book with Jeff McWherter at PDC08 almost a year ago. Now, after a long hard year of constant work on both of our parts, I’m pleased to say that the book is now available on both Amazon.com and Amazon.co.uk.
The book provides the reader with an introduction into the main issues faced when testing ASP.net web applications, both WebForms and MVC. We wanted to provide a guide covering the various different issues you will face during the development and testing lifecycle.
The chapters are:
Chapter 1: Preliminary Concerns
Chapter 2: Design and Testability
Chapter 3: Unit Testing and Test Driven Development
Chapter 4: Integration Testing
Chapter 5: Automated UI Testing
Chapter 6: Acceptance Testing
Chapter 7: Manual Testing
Chapter 8: Performance Testing
Chapter 9: Accessibility Testing
Chapter 10: Security Testing
As proof that the book does actually exist, the amazing Betsy Weber spotted the book on the Wiley stand at PDC09.
If you happen to spot the book anywhere, or if you have read a copy and have feedback then please do let us know! We would love to hear from you!
Since completing the book, I’ve taken a break, joined 7Digital.com and started working on a number of other projects. Exciting times!
I’ve been using GitHub for a while now as it’s a great way to share ideas and code in the public domain. Recently, I’ve had a number of people ask me how they can get started using GitHub. Thankfully, GitHub is an extremely simple service to use!!
Firstly, GitHub is a social coding repository, building on top of git (a source control system) to encourage collaboration on code and open source projects. By having this aim, the site is organised in such a way to make it very simple to upload code, as well as add additional contributors to the project. GitHub also has paid for accounts offering private repositories and additional features.
First, to use GitHub you need a git client installed. If you are on OSX, I recommend using the git-osx-installer while if you are on windows I suggest the MSysGit project. From my experience, I’ve found these to be the most effective way to start using git.
After signing up for a free account on GitHub, you need to create a public key. The next stage is to create a public repository to store code.
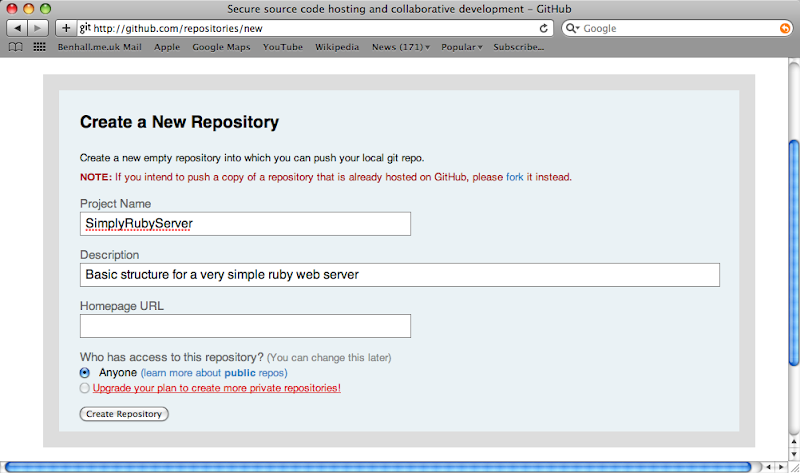
All you need to do is enter a name for a new repository, a description and click Create. Each project has it’s own repository, unlike with other source control systems such as SVN.

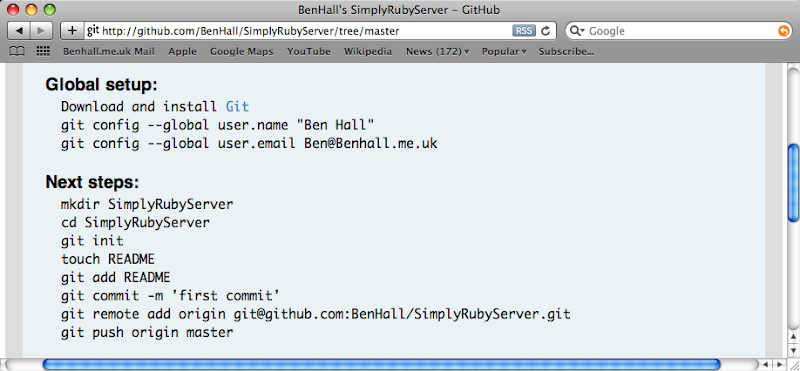
After clicking create, you have your repository. GitHub provides you with the next steps about how you can add code in your public repository. A great way to learn the fundamentals of git at the same time.

The first command you will need is ‘git init’, this creates your local repository to store your project. Once you have a local repository, you can do all the standard commands you would expect such as git add, git commit, branch etc.
After you push your code to github, everyone will be able to view, clone, fork your repository. A great way to allow others to collaborate on your project. In my case, the repository I created was http://github.com/BenHall/SimplyRubyServer/.
As you start using GitHub and Git more and more, you will really understand how powerful they are.
This weekend I attended an awesome event called Launch48 at the PayPaleBay offices in Richmond (London). The concept is simple, anyone is allowed to pitch an idea in 1 minute on the Friday evening, this event had around 30 pitches. After this, people vote on which ideas they like. Next the top 12 teams give a 2 minute pitch and Q&A. After a second vote, the 6 top teams start work. Everyone who attended selects a team to help with the aim of having a demoable product and business by 4pm on Sunday. Our team created Given.org, video explaining the idea can be found below.
GIVEN helps companies find and support people’s causes on Facebook.
30 Seconds about Given.org from Given dot Org on Vimeo.
It gives companies the ability to publicly sponsor fundraising initiatives – whether they are being led by employees, fans or customers. This offers companies a new way to engage with people on Facebook and support worthwhile causes.
For fundraisers GIVEN offers a whole new world of potential sponsors beyond their existing network of family and friends. GIVEN helps people raise money from over 20,000 companies that currently have a presence on Facebook. Luckily, the team had some amazing designers from Evisua.com who created the website below:
While the designers did their thing, the developers, which I was one of, worked on the facebook application. Creating facebook applications has a small learning curve, but actually pretty straight forward to create once you get started. Our application looked like this after the end of the weekend:
Hopefully you will be hearing more about this in the future, but wanted to give people a heads up into what is happening in and around London. If you want to know about the other five teams, check out the TechCrunch article.
Tonight I gave another run out of my MEF session at NxtGenUG Coventry. Thank you to everyone who attended, I had a great time. Below are my slides and code samples. Any questions, just let me know.
Download code: Code.zip
Today I was attempting to install a package on my ubuntu machine and I received the following error:
extconf.rb:1in 'require': no such file to load -- mkmf (LoadError)
To solve the problem, I simply installed the ruby1.8-dev package, this was done by the command:
sudo apt-get install ruby1.8-dev
I could then happily install the package I wanted.
Following on in the series of how I have improved my blog, its time to address the issue of syntax highlighting. I admit, this is something which I think has really let me down and something which is long overdue.
There are a number of difference approaches available to solve this problem, however the best approach I came across is from http://alexgorbatchev.com/wiki/SyntaxHighlighter. This is a javascript+css library which can be installed on your blog, which thankfully is a very simply task. The CSS you need to reference are the following:
The javascript I have referenced in shown below.
In my posts, I can then simply wrap the snippet in a pre block and assign the appropriate brush class to highlight the syntax.
public string test()
{
return "abc";
}
The following are a list of brushes for the different languages I have referenced.
C# – c-sharp
CSS – css
JavaScript – js
Java – java
Ruby – ruby
Python – python
Scala – scala
SQL – sql
Xml – xml
For those who are using Windows Live Writer, there is a plugin to make syntax highlighting even easier! This is available to download from http://www.codeplex.com/precode
Hopefully this should make code much easier to read in the future. Another approach I was tempted by is using GitHub Gists. Gists are snippets of code hosted on github which you can then embed into your posts, as shown below.
The reason I didn’t go down this route is that it makes it difficult to insert code when writing a blog ‘offline’ and when GitHub is down. As a result, I decided to stick with the classic approach for now. But what do you think?