Windows Live Writer Plugin – Properties Panel

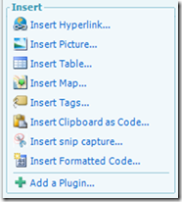
imageFollowing on in my series of blog posts, tonight I talk about how to create a custom Properties Panel for your plugin.  The screenshot on the right shows what I’m talking about, this is the properties for the Technorati tags which are inserted in the posts.  This plugin will simply insert some default text, it will then display a textbox in the properties panel, which when saved will update the text in the blog post.

If you haven’t read my first post, then that would be a good place to start.

To start with, you need to create the standard C# class library, reference the API and System.Windows.Forms, finally creating the attribute.

However, usually we just inherit from ContentSource however, in order to be able to access the properties panel we need to inherit from SmartContentSource.  This class gives us access to more advanced parts of Live Writer.

SmartContentSource works sightly differently, instead of overriding CreateContent, we override CreateEditor and GeneratePublishHtml.  GeneratePublishHtml is the html that is inserted into the blog post when the plugin is selected. CreateEditor is the method which returns a SmartContentEditor.

A SmartContentEditor is the properties form itself. To create a editor form, create a new window form and instead of having it inherit from Form, inherit from SmartContentEditor. By doing this, the form automatically changes from being a Windows Form to be the correct size and colour for the properties sidebar panel.  We can now drag on any WinForm controls to use.

So now lets just have a quick review of the code.

[WriterPlugin
      (“1b4dfa52-ba55-47b1-b795-f4a66af4e834”, “Properties Panel”,
        PublisherUrl = “
http://blog.benhall.me.uk”,
        Description = “Properties Panel Test”)]
    [InsertableContentSource(“Properties”)]

public class PropertiesPanelPlugin : SmartContentSource
{
    public override DialogResult CreateContent(IWin32Window dialogOwner, ISmartContent newContent)
    {
        return DialogResult.OK;
    }

    public override SmartContentEditor CreateEditor(ISmartContentEditorSite editorSite)
    {
        return new PropertiesPanelEditor();
    }

    public override string GeneratePublishHtml(ISmartContent content, IPublishingContext publishingContext)
    {
        return “GeneratePublishHtml”;
    }
}

Then the editor panel looks like this

public partial class PropertiesPanelEditor : SmartContentEditor
    {
        public PropertiesPanelEditor()
        {
            InitializeComponent();
        }
    }

The rest simply depends on what you want to achieve.  In this example, the editor is going to have a text box and save the user’s text in the blog post.

First, the SmartContentEditor allows access to a variable SelectedContent, from here we can set properties which can be accessed from other parts of the plugin. First, in PropertiesPanelEditor, drag on a textbox and a button.  On the button clicked event, we want to set a property on the SelectedContent variable.  We then raise the OnContentEdited event to alert to the fact that the user has changed the content.

private void button1_Click(object sender, EventArgs e)
{
    SelectedContent.Properties.SetString(“FirstProperty”, textBox1.Text);
    OnContentEdited();
}

Now, within our PropertiesPanelPlugin we need to handle the ContentEdited event and update the blog post text.  First, within the CreateEditor method, we hook up the event before returning the object.

public override SmartContentEditor CreateEditor(ISmartContentEditorSite editorSite)
{
    PropertiesPanelEditor editor = new PropertiesPanelEditor();
    editor.ContentEdited += new System.EventHandler(editor_ContentEdited);
    return editor;
}

Next, we code how to handle the event.  All we want to do it call GeneratePublishHtml method which will handle all the outputting to the post.

void editor_ContentEdited(object sender, System.EventArgs e)
{
    GeneratePublishHtml(pcontent, ppublishingContext);
}

This method is first called when the user first clicks the plugin, at this point we take a internal copy of the content + publishingContext (i’ll talk about this in a later post) so we can reuse it when calling the event.

We then try to get the string from the properties which we set in the editor. If the default value is returned, we output our default text, otherwise we return the string.

private ISmartContent pcontent = null;
private IPublishingContext ppublishingContext = null;

public override string GeneratePublishHtml(ISmartContent content, IPublishingContext publishingContext)
{
    pcontent = content;
    ppublishingContext = publishingContext;

    string str = content.Properties.GetString(“FirstProperty”, “default”);
    if (str.Equals(“default”))
        return “GeneratePublishHtml”;
    else
        return str;
}

At this point, the string is returned and the text in the blog post is updated.  This is similar to how the Insert Tags… plugin works.

Hope that all makes sense, the main problem I had was realising the link between the ContentEdit event and ISmartContent. Just remember to save all the data in the Properties collection and raise the event when things are changed.

Download Sample – LiveWriterPropertiesPanel.zip

Technorati tags:

Windows Live Writer Plugin – Display a form / OpenFileDialog

Following on from my previous post I thought I would briefly post about how easy it is to display a form or dialog to have more interaction with the user.

In this post, I will create a simple live writer plugin which will display an OpenFileDialog, then based on the file the user selects, the plugin will copy all the lines of text into the blog post. The OpenFileDialog could be replaced by a standard WinForm.  If you didn’t read my previous post, then that would be a good place to start.

1) Like before, we need to create a C# class library and add references to the Live Writer API and System.Windows.Forms.

2) Add a WriterPluginAttribute and InsertableContentSourceAttribute to the class.

3) Inherit from ContentSource and override the CreateContent method.

4) Next, we implement the code.  It’s very simple, first we create a OpenFileDialog.  We then display the dialog saving the response in a DialogResult variable.

OpenFileDialog ofd = new OpenFileDialog();

DialogResult result = ofd.ShowDialog();

Depending on the result, if its not OK then we just return want to return the result to Live Writer.  If its OK then it means that the user selected a file correctly to open.  I then create a StreamReader to read all the lines of text into a string variable, then set the content out parameter so it can be inserted into the blog post.

if(result == DialogResult.OK)
{
    StreamReader sr = new StreamReader(ofd.FileName);
    string text = sr.ReadToEnd();
    sr.Close();

    content = text;
}

return result;

5) Start Live Writer and you will see the plugin listed.

6) If you use the plugin, then all the line breaks will disappear because we are converting a file into HTML for the blog post.  In order to fix this, we need to replace the line breaks with HTML line breaks.

text = text.Replace(“rn”, “
“);

7) That solves the problem with line breaks, but we still lose white space.  I’ll leave that for you to fix if you really want to – just need to place ‘ ‘ with ‘&nsbp’

If you select a file (text file) then the contents will be copied into the blog post.

I just wanted to demonstrate you have a lot of flexibly while creating the plugin’s so be creative!

Download code – InsertTextFromFilePlugin.cs.txt

Technorati tags:

Windows Live Writer Plugin – Hello World!

Tonight, I started looking at how to create a windows live writer plugin. Live writer has really made my blogging life easier and every release adds excellent features. In this post, I will discuss how to start a simple plugin which will put “Hello World” inside of your blog post html. In later posts I will discuss how to implement other features, finally releasing my planned plugin – but more on that at a later date.

1) The first task is to create a C# Class Library. We use a class library so the assembly created is a dll instead of an exe.

2) Windows Live Writer comes with an API to allow us to hook into the application. We need to reference this API, which can be found at C:Program FilesWindows Live WriterWindowsLive.Writer.Api.dll.

3) Now we have correctly referenced the assembly, we can reference it within our class

using WindowsLive.Writer.Api;

4) We then need to provide Windows Live Writer with some information about the plugin. We include a WriterPluginAttibute to the top of the class

using WindowsLive.Writer.Api;

namespace LiveWriterHelloWorld
{
[WriterPluginAttribute
(“be03e3b4-9adb-4b54-a201-81f043bad8b4”, “Hello World!”,
PublisherUrl = “
http://blog.benhall.me.uk”,
Description = “Insert Hello World! into the blog post”)]

public class Class1
{
}
}

The first two parameters are mandatory, one is the ID which is the GUID for the assembly. You can find the guid by going into the properties of the project, assembly information (see below). The second parameter is the name of the plugin. There are other parameters you can set to give more information about the plugin. In this case, I just set PublisherUrl and give it a description.

image

4) Next, we need to set the InsertableContentSourceAttribute to the class. This sets the text in the Menu (Insert > Hello World) and the sidebar section.

image image

The code required is this

[InsertableContentSourceAttribute (“Hello World!”, SidebarText = “Hello World!”)]

5) We need to inherit from the ContentSource class

public class HelloWorldPlugin : ContentSource

6) Next, we need to override the CreateContent method in the ContentSource class. This is what will be called from Windows Live Writer when the plugin is selected.

However, this class uses both DialogResult and IWin32Window so you will need to reference the System.Windows.Forms assembly.

public override DialogResult CreateContent(IWin32Window dialogOwner, ref string content)
{
content = “”;
return DialogResult.OK;
}

This code simple sets the content out parameter to nothing, and returns a OK DialogResult message.

7) Lets populated it with some real content. We simple set the content variable for this example.

content = “Hello World“;

8) That’s it! Done. However, we need to test it. We could have wrote unit tests for this which references the assembly to test our code works without loading Writer, however we still need to test the actual integration into Live Writer. To do this, we need to copy the LiveWriterHelloWorld.dll assembly in the debug folder to “C:Program FilesWindows Live WriterPlugins”.

But copying the file manually every time you build is boring! So we can edit the post build events in the project property to do this manually. Note, if your on Vista your build (or VS) will need to be running as Administrator in order for it to access the C partition.

image

The code is XCOPY “$(TargetPath)” “C:Program FilesWindows Live WriterPlugins”

9) Close down all instances of Live writer and reopen and your new plugin will be loaded. We could have added a icon by setting the value in the plugin attribute.

image image

When you select the item, a bold Hello World will be inserted.

image

This is great as the content is actually inserted into the html so we have a lot more control over what we can insert.

I hope you have found this useful, its just a very quick overview of how to get started creating the plugin’s.

Download code: HelloWorldPlugin.cs.txt

Technorati tags: