xUnit TeamCity Integration

Last night I was doing some experiments with xUnit and TeamCity. TeamCity has a nice UI for reporting tests, however by default it only supports NUnit. Luckily, extending this to support other tests is easy as it just listens for MSBuild outputs in the right format (##teamcity[testStarted name=’Test1′]).

This worked and my tests where appearing in the report.

My TeamCity Runner

On the other side of the ocean, Brad was actually working on extending the existing xUnit MSBuild runner for TeamCity integration.

The advantage of Brad’s runner is that you don’t need to edit your MSBuild script, as long as your using the xunit msbuild task it will know when TeamCity executed the build and log to the correct place. Otherwise, it will log to the standard MSBuild output – very cool!

image

If you want to use this today, download the source code from CodePlex and build it yourself (Get3rdParty.cmd is a great script to run before you build), but I suggest you wait for the next release (1.0.0.4), where support will be included.

Documentation on how to use the MSBuild task can be found here, as I mentioned, using it via TeamCity is no difference.

Technorati Tags: ,

Continuous Integration Builds for CodePlex Projects

As many of you might be aware, I maintain the IronEditor project on CodePlex.  I like CodePlex, I find the wiki and issue tracking to be useful, but I find the directory structure and searchablity of projects on the site to be most useful. However, the one thing which I wish it could offer, and this goes for Google Project Hosting as well, is a continuous integration server. I would like to know that after I have pushed my changes to CodePlex, that it does actually compile.

As I’ve posted before, I run TeamCity on my home machine as it is free and easy to configure. As TeamCity can connect to Team Foundation Server (what CodePlex runs under the covers), I decided I would just be able to connect to the CodePlex servers and threat it like any normal source control system.

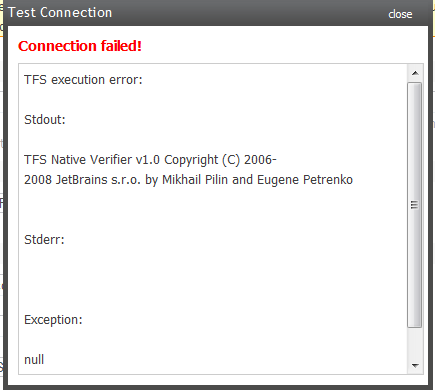
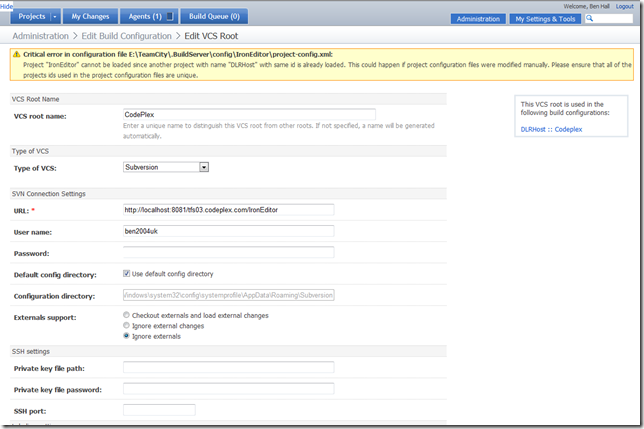
Sadly, I was wrong. When I tried to connect, I found the following (extremely helpful) error:

image

If anyone knows the reason why this failed, please leave a comment.

However, all is not lost! CodePlex have created the SVNBridge, a small application which runs on your local machine, or in this case your CC server. This translates all SVN commands into TFS commands, the result is that you can connect to CodePlex using SVN clients, one of which is TeamCity!

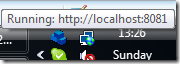
Connecting TeamCity via SVNBridge to CodePlex

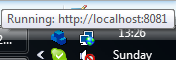
SVNBridge is a single executable. It lives in the system tray and listens for communications on a particular port, in my case 8081.

image

In order to connect to SVNBridge, and as such your CodePlex project you must use a particular URL.  The URL is your SVNBridgeAddress/YourCodePlexServer/YourProject

For example, IronEditor lives on tfs03.codeplex.com and in order for me to connect via the bridge my URL would be:

http://localhost:8081/tfs03.codeplex.com/IronEditor

With my setup, I simple wanted to be able to click run and TeamCity go off, download the latest code from TFS, build my solution and execute my unit tests again just to be sure I haven’t broken anything (or in my case simply forgot to upload the latest code changes).

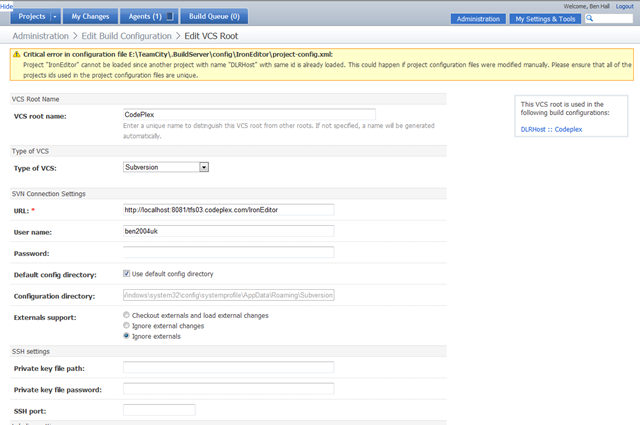
In order to connect TeamCity to CodePlex, you simply need to use the Subversion VCS settings and point it at your SVNBridge. Below, are my settings for IronEditor. The username and password you need to use to connect are your website login details.

image

On TeamCity’s dashboard, I now have my new CodePlex build along with my local IronEditor build, both run the IronEditor.build MSBuild script, they just pull the sources from different locations. After I have pushed my changes to CodePlex, I manually click run, and off it goes. The reason I don’t have it manually checking is because it’s rare I push changes to codeplex and as such I’m happy to be in control of when it happens.

image

TeamCity is now happily talking to my CodePlex repository, building as and when asked. If you happen to have a spare server, or a windows home server, then you could run this setup from there, have it automatically check for modifications with all the developers on your project benefiting.

Technorati Tags: , , ,

MSBuild – Build Visual Studio 2008 solution and execute Unit Tests

Previously, I have spoke about how you can update your AssemblyInfo file using MSBuild. However, I haven’t spoken about the very basics – how to build a Visual Studio solution and execute your unit tests.

MSBuild is a very interesting build scripting language, out of the box it includes a set of standard tasks which you can use based on your requirements, such as creating a directory or copying a file in order to correctly build your project. I also take advantage of the MSBuild community task project, while it hasn’t been updated in a while, the tasks work perfectly.

Below is the basic MSBuild script.


DefaultTargets=”Test” xmlns=”
http://schemas.microsoft.com/developer/msbuild/2003″>


        <MSBuild Projects=”TeamCityBlogExample.sln” Properties=”Configuration=Release” />
   

    DependsOnTargets=”Build”>
       
        <NUnit Assemblies=”TeamCityBlogExample.TestsbinReleaseTeamCityBlogExample.Tests.dll”
               ContinueOnError=”false”
               ToolPath=”C:Program FilesTestDriven.NET 2.0NUnit2.4″ 
               OutputXmlFile=”NUnitResults.xml” />
   

Within the project section at the top, I set the default target to Test. This is the target which will be executed first, the Test target then has a DependsOnTarget attribute which enforces that the build must be done before we test.

On line 3, I import a reference to the MSBuild community tasks so I can access all of the custom tasks included – such as NUnit.  Next I define my build target, within this I define the solution I want to build and the configuration. To execute my unit tests, I use the NUnit task from the community task project, this takes a list of all the assemblies which we need to run, define if a test fails wether it should fail the build and finally tell it where NUnit lives on the local machine.

Now, the script can be executed by a build system, such as CCNet or TeamCity, or from the command line using the msbuild.exe