Twitter cards are everywhere but I realised I hadn’t added them to either of my blogs, Ben Hall and Missing Unicorns. There are two main categories of twitter cards, one is free and based on metadata to provide context to a link while the others can be classed as lead generation cards that allow you to collect email addresses and twitter handles when the user submits a button. The metadata card is free, the lead generation card are paid ad campaigns. In this post I’m just focusing on the free version.
The documentation for the cards can be found at https://dev.twitter.com/docs/cards and works in a very similar way to Facebook’s Open Graph. Twitter tells us “Simply add a few lines of HTML to your webpages, and users who Tweet links to your content will have a “card” added to the Tweet that’s visible to all of their followers.” Sounds sensible, let’s do that.
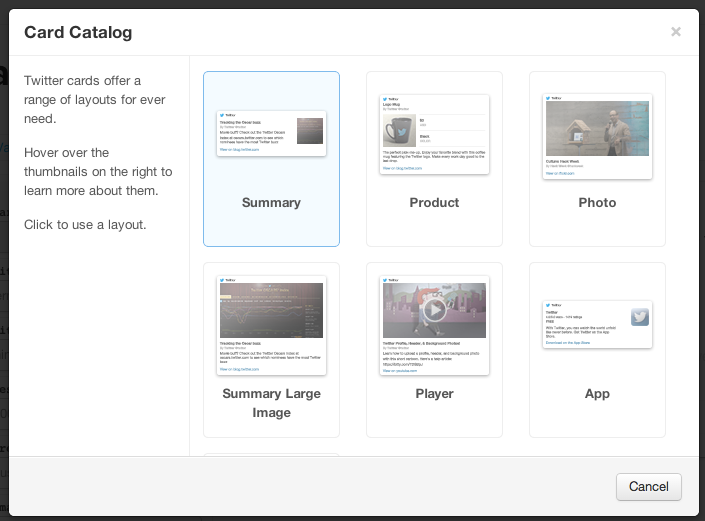
Twitter offers 7 different styles of layout depending on the contents requirements, in the case of a blog the summary style fits most requirements.
The Data Attributes
For the summary card there are only three required attributes:
The card type <meta name=”twitter:card” content=”summary”>
The card title <meta name=”twitter:title” content=”Did you miss my recent announcement? Missing Unicorns didn’t.”>
The card description <meta name=”twitter:description” content=”Recently I mentioned I was “between startups”, a situation that lasted five days. From my experience of hiring this is an all too common occurrence. By the time you hear that someone is looking for work they’re already gone – the situation is almost as bad as flat hunting in London.”>
The other parameters are optional, but the chances are you would want to include as they help the card feel more complete and polished.
Site’s twitter handle <meta name=”twitter:site” content=”@missingunicorns”>
Author’s twitter handle <meta name=”twitter:creator” content=”@ben_hall”>
The domain name of the site <meta name=”twitter:domain” content=”MissingUnicorns.com”>
An image for the blog post <meta name=”twitter:image:src” content=”http://placekitten.com/250/250″>
Adding Card to WordPress
To include the metatags on a WordPress blog you can either include the attributes manually or use the plugin http://wordpress.org/plugins/twitter-cards/. When I attempted to use the plugin it required FTP functionality which was more effort than I wanted so was dropped.
If you manually edit the theme by going to the theme editor in the admin console then you can start tweaking the raw PHP. The file header.php contains the all important <head> block where to include the above tags.
In order to render content related to the page in question we need to understand a little more about WordPress’s API. If we take this blog post as an example:
http://blog.benhall.me.uk/2014/03/job-boards-are-the-past-its-time-to-rethink-recruitment/
The ideal meta data would look something like this
<meta name=”twitter:card” content=”summary”>
<meta name=”twitter:title” content=”Ben Hall's blog – I don't know darling, I'm doing my work”>
<meta name=”twitter:description” content=”Job Boards Are The Past! It’s Time To Rethink Recruitment”>
Thankfully, there is already existing tags containing that data so it would just a simple case of copying the php code
<meta name=”twitter:card” content=”summary”>
<meta name=”twitter:title” content=”<?php bloginfo(‘name’); echo ” – “; bloginfo(‘description’); ?>”>
<meta name=”twitter:description” content=”<?php single_post_title(”, true); ?>”>
After saving the page all blog posts on WordPress will have the correct metatags for twitter cards.
Adding Card to Ghost
At the time of writing Ghost doesn’t have any plugin support meaning the only option is to manually modify the theme.
The file you’re interested in is default.hbs which lives within content/themes/casper of the deployment.
In a similar way to WordPress, we need to add the tags that will display the correct information for each individual post.
<meta name=”twitter:card” content=”summary”>
<meta name=”twitter:title” content=”{{@blog.title}}”>
<meta name=”twitter:description” content=”{{meta_title}}”>
<meta name=”twitter:domain” content=”http://missingunicorns.com/blog”>
<meta name=”twitter:site” content=”@missingunicorns”>
<meta name=”twitter:creator” content=”@ben_hall”>
This would produce the following
<meta name=”twitter:card” content=”summary”>
<meta name=”twitter:title” content=”Missing Unicorns Blog”>
<meta name=”twitter:description” content=”When was the last time you asked ‘Why wouldn’t I use my product’?”>
<meta name=”twitter:domain” content=”http://missingunicorns.com/blog”>
<meta name=”twitter:site” content=”@missingunicorns”>
<meta name=”twitter:creator” content=”@ben_hall”>
Now, we just need to tweet and link and it should all work nicely.
It’s broken! Nothing shows up when I tweet a link
Yep, I thought I had done something wrong. In fact, all cards need to be approved by twitter via the Card Validator. Turns out this is also a great way to test your meta tags without needing to tweet links to your site.
Approving Cards
The validator is very simple. Given a link to a tag with the tags, it will parse and render the card as if it was in the twitter timeline. Once you’re happy, you submit it for approval.
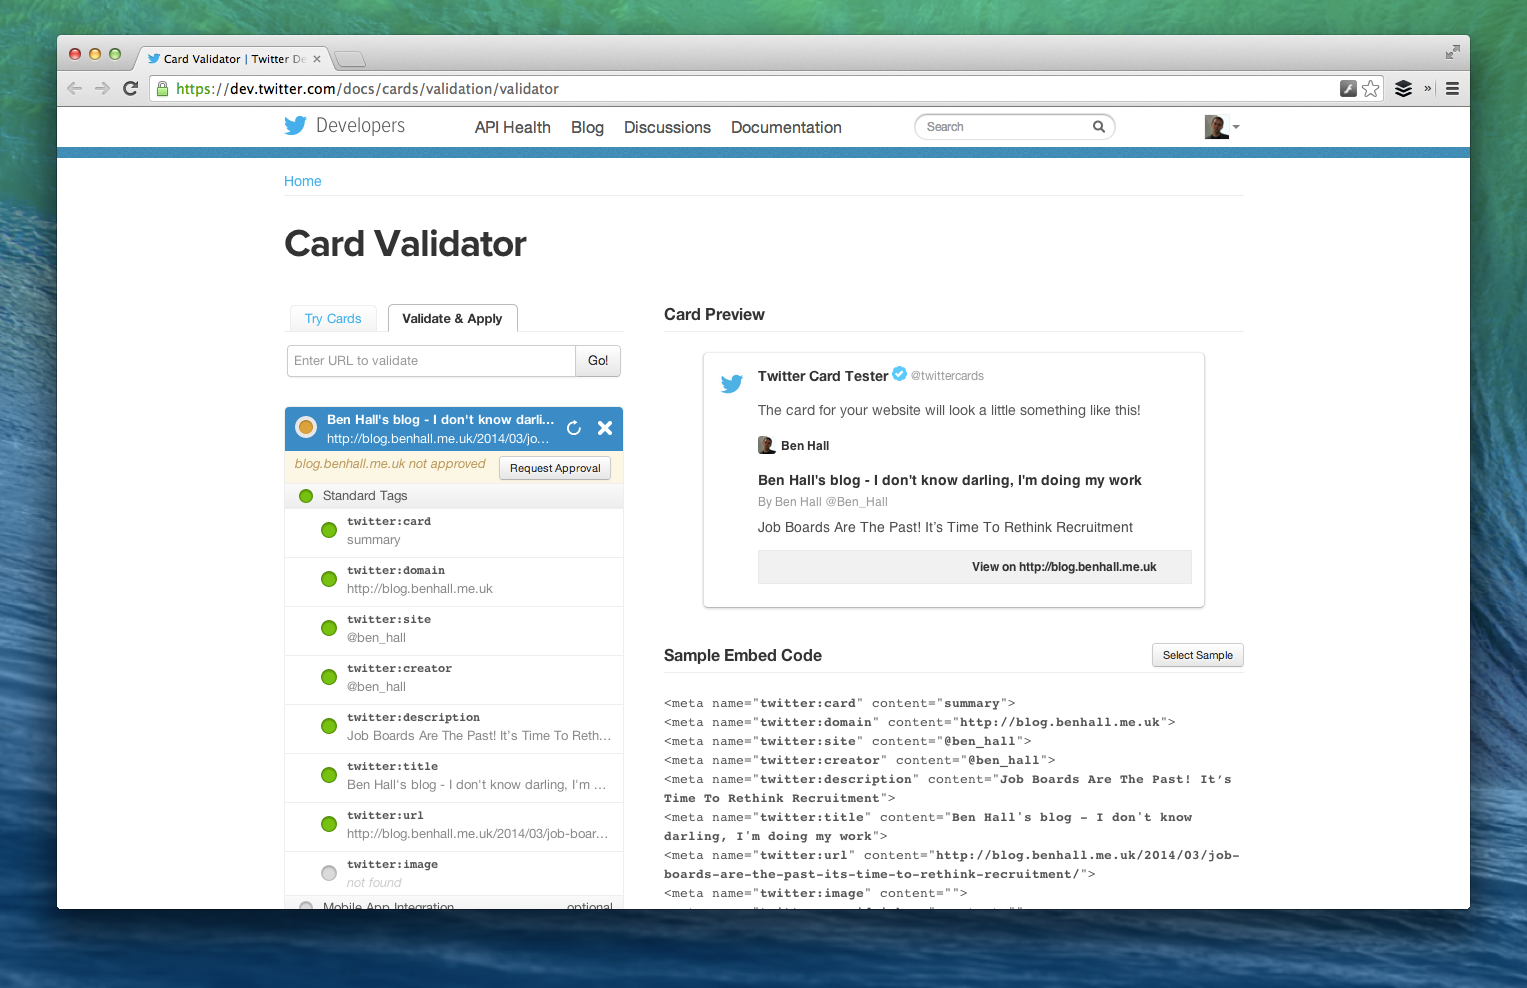
Once you’re happy, submit the example URL and your twitter details for approval. The confirmation says Twitter’s turnaround time is a few weeks for approval but both of mine were done within a matter of minutes and how showing in a twitter stream near you at @Ben_Hall and @MissingUnicorns