Creating your own XUnit Extension

So far, I have discussed XUnit and the XUnit Extensions but in this post I wanted to discuss how to create your own extensions.  Building your own custom extensions is a very useful as it can make your tests much more readable and maintainable. Especially if you have a lot of tasks which need to be performed before or after your tests are executed.

XUnit provides five main base classes which you can build your extensions upon. 

FactAttribute

The Fact attribute is the main attribute used in XUnit to identify a method to execute and return the result of.  By creating a subclass of FactAttribute we can modify how the test runner should treat the method and allow for customisation. For example, the Theory attribute, which allows for data driven tests, is based on this attribute. The theory attribute customizes how the framework should execute the tests as it creates a separate test to execute based on each DataAttribute added to the test method – this is how TD.net can identify separate passing/failing tests.

If you want to create your own subclass of FactAttribute then the most common scenario will be to subclass from the FactAttribute class, and then override the EnumerateTestCommands method.  This is used to enumerate over the test commands system the test object and it returns an instance of ITestCommand per execution of a test method. By overriding this method, you take control of the test methods to be executed.

ITestCommand is the interface of test execution to be returned, which will be executed by the runner.  The interface has three items, a name property for the name of the test, a parameters property for all the properties of the test and a Execute method which accepts a testClass object.  The Execute method is called in order for the method to be executed. If you just want the standard test execution, then the base concrete class is TestCommand.

Let’s have a look at a real example.  Within the Samples project (downloadable from codeplex site) there is a RepeatAttribute class.  The attribute on a method would look like this:

[RepeatTest(5)]
public void RepeatingTestMethod()

The implementation of the attribute overrides the EnumerableTestCommands method, and for the repeatCount (set in constructor) it returns a new TestCommand object to be executed.

protected override IEnumerable EnumerateTestCommands(MethodInfo method)
{
    for (int index = 0; index < repeatCount; index++)
        yield return new TestCommand(method);
}

In summary, EnumerateTestCommands defines what tests to execute. ITestCommand allows you to define what happens then they are executed.

BeforeAfterTestAttribute

The BeforeAfterTestAttribute is a very interesting attribute which allows for a lot of interesting attributes.  This attribute allows us to hook into the execution of the tests before and after they have been executed.  Its very simply to implement aswell, BeforeAfterTestAttribute is an abstract class with two virtual methods – before and after.  Implement either or both in your attribute, add it to your test/fact and it will be executed.

Again, in the samples solution there is an example of how to use this. It includes a TracingSplicerAttribute which outputs the name.  The test looks like this:

[Fact, TracingSplicer]
public void TestThis()
{
    Console.WriteLine(“I’m inside the test!”);
}

The attribute code is this:

public class TracingSplicerAttribute : BeforeAfterTestAttribute
{
    public override void Before(MethodInfo methodUnderTest)
    {
        Console.WriteLine(“Before : {0}.{1}”, methodUnderTest.DeclaringType.FullName, methodUnderTest.Name);
    }

    public override void After(MethodInfo methodUnderTest)
    {
        Console.WriteLine(“After : {0}.{1}”, methodUnderTest.DeclaringType.FullName, methodUnderTest.Name);
    }
}

When executing the test, the output is:

Before : Example.TestThis
I’m inside the test!
After : Example.TestThis

This method allows for implementation of Rollback and RestoreDatabase (MbUnit) as they are required to be executed before and after the test but don’t interact with the actual execution.

DataAttribute

The DataAttribute allows us to set data providers for use with the Theory attribute. DataAttribute is an abstract class which has a single method, IEnumerable GetData(MethodInfo methodUnderTest);.  This means that any data you want to use within your tests has to be returned as an object[] containing your different test values. The best implementation of this to look at is the OleDbDataAttribute.

public override IEnumerable< object[] > GetData(MethodInfo methodUnderTest)
{
    DataTable table = new DataTable();

    using (OleDbDataAdapter adapter = new OleDbDataAdapter(selectStatement, connectionString))
        adapter.Fill(table);

    foreach (DataRow row in table.Rows)
        yield return row.ItemArray;
}

This executes the database query and pulls everything into a DataTable in memory.  It then uses the ItemArray method which returns a object[] containing all the columns.  This together with the yield statement means every row is a separate test data set.  Remember the TheoryAttribute then takes each object[] returned and creates a TestCommand object which is a separate test execution.  The end result is a test execution object for each data item which the runner can then execute independently.

If you have a special testing scenario which requires data from a certain source then using this attribute could make your tests more streamlined and a lot easier to maintain without much effort in implementing the attribute.

TraitAttribute

This attribute allows us to decorate the test method with name/value pairs.  Within the EnumerateTestCommands method, you can access these attributes on the MethodInfo by using the GetCustomAttributes() method.  The samples provide us with a CategoryTraitAttribute

[Fact, Category(“Slow Test”)]
public void LongTest()

With the implementation just looking like this, where it hard codes the key “Category” as we know what the key will be. 

public class CategoryAttribute : TraitAttribute
{
    public CategoryAttribute(string category)
        : base(“Category”, category) {}
}

We can then use GetCustomAttributes to get type of CategoryAttribute attributes.

RunWithAttribute

This attribute enables you to specify a different framework to execute the tests against, this is the base attribute for the RunWithNUnitAttribute.  If you are interested in this I recommend you download the xunitext source code (available from CodePlex) and look how the NUnit Attribute was implemented.

However, if you are really interested in creating an custom extension, I really recommend you download the source code to XUnit and XUnit Extensions to see how the existing attributes have been created.

Technorati Tags: , ,

MbUnit TypeFixture and Providers

Continuing in my writing about MbUnit, this post will focus on the TypeFixtureAttribute. The TypeFixture allows a set of tests to focus on testing a certain type of class (generally an interface) and to provide objects of that type to be tested against.

This method is really useful if you have a collection of objects which all have similar behaviour which requires testing. Instead of having to duplicate your test code, you can define the types to be tested with instances of the tests being passed into the test being executed.

In my fake system being tested, I have a collection of objects which all implement a INotNull interface. I need to test to make sure that the implementation of INotNull works correctly, that not nulls are returned when GetNotNullValues() is called. My ‘Production’ code is this:

public interface INotNull
{
IEnumerable GetNotNullValues();
}

public class TypeA : INotNull
{
public override string ToString()
{
return “TypeA”;
}

public IEnumerable GetNotNullValues()
{
yield return “TypeA”;
}
}

public class TypeB : INotNull
{
public override string ToString()
{
return “TypeB”;
}

public IEnumerable GetNotNullValues()
{
yield return 1;
yield return 2;
yield return 3;
yield return 4;
}
}

public class TypeC : INotNull
{
public override string ToString()
{
return “TypeC”;
}

public IEnumerable GetNotNullValues()
{
yield return new object();
yield return null;
yield return new object();
}
}

The code looks fine, apart from TypeC which returns a null. In a standard unit testing framework, I would have to create multiple test fixtures for each type in the system and duplicate all of the tests. TypeFixture makes our life easier by allowing us to define a single fixture and test all the objects we want. Let’s have a look at the test code.

[TypeFixture(typeof(INotNull), “Tests the INotNull interface.”)] #1
public class INotNullTests

Instead of defining a TestFixture at the top of our class, we define a TypeFixture and give it the typeof object we will be testing. We then need to tell it all the objects to use.

[Provider(typeof(TypeA))] #1
public TypeA ProvideTypeA()
{
return new TypeA(); #2
}

#1 We use the ProviderAttribute and provide the type of object we are returning as a parameter.

#2 We then create a new instance of the object and return it to the caller.

We can use the Provider attribute on as many methods as required to cover all of our objects being tested. The other two objects being tested are TypeB and TypeC.

[Provider(typeof(TypeB))]
public TypeB ProvideTypeB()
{
return new TypeB();
}

[Provider(typeof(TypeC))]
public TypeC ProvideTypeC()
{
return new TypeC();
}

Now we have that in place, we need to write out tests. The test is a standard test, however accepts the type (as defined in the TypeFixture) as a parameter.

[Test]
public void TestINotNullValuesNotNull(INotNull instance)
{
Console.WriteLine(instance.ToString());

foreach (object o in instance.GetNotNullValues())
{
Assert.IsNotNull(o, “Instance: {0}. Object was null: {1}”, instance, o);
}
}

We can then use that object within our test to verify it works correctly. This test method will be called once per object defined by a provider attribute. In this case, three tests are executed with TypeC test failing.

image

Adding more tests to the fixture is very quick and easy and with the TypeFixture will result in it being used to test multiple objects. Adding another implementation of the interface is easy as we define another method allowing it to be picked up by all the existing tests.

Technorati Tags: , ,

MbUnit Combinational and Factory fixtures

In this post, I want to talk about a little know feature of MbUnit which is the CombinationalTestAttribute.  This was originally described on Peli’s blog, but I thought I would revisit the subject.

The combinational test attribute allows us to do pair-wise testing.  This is where we take two inputs (A and B) and test them against each other ({A1, B1}, {A1, B2}, {A1, B3}).

When implementing this system, the OUT (Object Under Test) needs to implement an interface.  In this case a ICount

public interface ICount
{
    int Count(string s);
}

We then implement a X counter which will the number of X’s which appear in a string.

public class XCounter : ICount
{
    public int Count(string s)
    {
        int count = 0;
        foreach (char c in s)
            if (c == ‘x’)
                count++;
        return count;
    }
}

For the purposes of demo’ing, a BadCounter is also implemented.

public class BadCounter : ICount
{
    public int Count(string s)
    {
        return 2;
    }
}

So that would be our production code which we want to test.  Using just standard TestFixture and Test attributes, our tests would have to look something like this:

[TestFixture]
public class ICountTests_Orginal
{
    [Test]
    public void BadCounter_Count_NoX()
    {
        ICount counter = new BadCounter();
        int result = counter.Count(“”);
        Assert.AreEqual(0, result);
    }

    [Test]
    public void BadCounter_Count_TwoX()
    {
        ICount counter = new BadCounter();
        int result = counter.Count(“XX”);
        Assert.AreEqual(2, result);
    }

    [Test]
    public void BadCounter_Count_XSpaceYSpaceZ()
    {
        ICount counter = new BadCounter();
        int result = counter.Count(“X Y Z”);
        Assert.AreEqual(1, result);
    }

    [Test]
    public void XCounter_Count_NoX()
    {
        ICount counter = new XCounter();
        int result = counter.Count(“”);
        Assert.AreEqual(0, result);
    }

    [Test]
    public void XCounter_Count_TwoX()
    {
        ICount counter = new XCounter();
        int result = counter.Count(“XX”);
        Assert.AreEqual(2, result);
    }

    [Test]
    public void XCounter_Count_XSpaceYSpaceZ()
    {
        ICount counter = new XCounter();
        int result = counter.Count(“X Y Z”);
        Assert.AreEqual(1, result);
    }
}

This is only testing the two objects (imagine 100s) with three test cases (imagine 1000s).  This would very quickly become unmanageable and a maintenance nightmare. We can make this much more effective using Combinational.

First part of configuring this is to setup a Factory for the interface.  This will produce all the objects we want to be tested.

[Factory(typeof(ICount))]
public IEnumerable Counters()
{
    yield return new BadCounter();
    yield return new XCounter();
}

Next, we create a factory of test cases.

[Factory(typeof(CombinationTestItem))]
public IEnumerable Strings()
{
    yield return new CombinationTestItem(“”, 0);
    yield return new CombinationTestItem(“aaa”, 0);
    yield return new CombinationTestItem(“x”, 1);
    yield return new CombinationTestItem(“xa”, 1);
    yield return new CombinationTestItem(“xax”, 2);
    yield return new CombinationTestItem(“X x”, 2);
    yield return new CombinationTestItem(“X X”, 2);
}

I’ve created a helper class within my code called CombinationTestItem.  This is used just to store the input and expected output so I can access them within my test. This could store as much or as little as you want, only restriction is that the Factory must return IEnumerable.

public class CombinationTestItem
{
    public CombinationTestItem(string value, int xcount) { Input = value; ExpectedOutput = xcount; }
    public string Input;
    public int ExpectedOutput;
}

The last part is to actually create the test.

[CombinatorialTest]                       #1
public void CountIsExact([UsingFactories(“Counters”)] ICount counter,       #2
                         [UsingFactories(“Strings”)] CombinationTestItem test)            #3
{
    Assert.AreEqual(test.ExpectedOutput, counter.Count(test.Input));            #4
}

#1 Instead of using [Test] we use [CombinatorialTest]

#2 The first parameter of the test is the Factory of Counters we created.  We use the [UsingFactories] attribute to help the framework understand which factory to pull the data from

#3 Like with #2, we do the same for the test data factory.

#4  Finally, we call the count method on the counter object passed into the test with the value we set on our CombinationTestItem object.  We then verify that it matches the related ExpectedOutput.

When it comes to executing the test cases the framework creates a test for each ICount with each CombinationTestItem test case. The result is 14 test cases (Two ICount objects * 7 CombinationTestItem test cases).

image

Adding additional objects or test cases is simply a case of adding an additional line of code.

My own point about this attribute is that I have never found a real world situation where I have required this.  In theory (like above) it sounds great, but I’m but sure if it would actually solve any of my integration testing problems – I can’t imagine it would solve any unit testing problems. If this does solve a problem for you, it would be great to hear about it.

Technorati Tags: , ,

Introduction to XUnit.net Extensions

Following on from my previous post on XUnit I decided to look at the Extensions library associated with the XUnit.net framework.  The XUnit Extensions project is available from http://www.codeplex.com/xunitext and is a separate assembly containing additional attributes (and I guess additional assertions later) and contains some really cool features.

To use the extensions, you need to reference both xunit.dll and xunitext.dll. Currently, there are six main extension attributes included within the assembly.

Theory – Support for Data Driven Tests

The first extensions I am going to look at are a set of extensions categorised as Theories. These theories allow external data to be used as the test data when executing. The extensions assembly has support for the following data providers:

  1. ExcelData
  2. InlineData
  3. OleDbData
  4. PropertyData
  5. SqlServerData

To start with, I will look at the most basic – InlineData.  The InlineDataAttribute allows us to specify data to use within the test, executing the test each time for each attribute – similar to MbUnit’s RowTest.  Below is a test which verifies that the length of a string is as expected.

[Theory]
[InlineData(“hello”, 5)]
[InlineData(“hello world”, 11)]
[InlineData(“failing”, 0)]
public void Theory_InLine(string value, int expectedLength)
{
    Console.WriteLine(“String:” + value + ” With expected length of ” + expectedLength);
    Assert.Equal(expectedLength, value.Length);
}

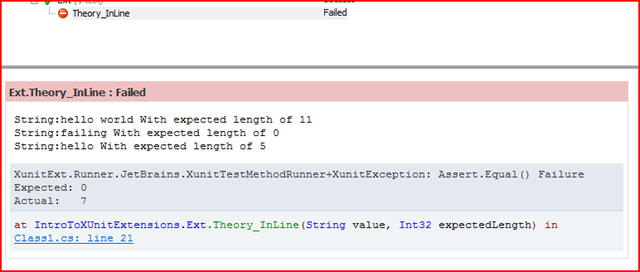
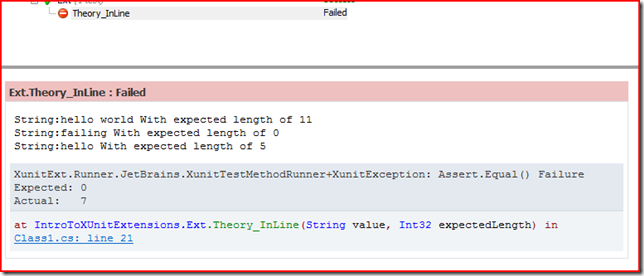
Using TestDriven.NET, each attribute causes a separate test to be executed with the output shown below.

String:hello With expected length of 5
String:hello world With expected length of 11
String:failing With expected length of 0
TestCase ‘IntroToXUnitExtensions.Ext.Theory_InLine(“failing”, 0)’
failed: Assert.Equal() Failure
Expected: 0
Actual:   7
    E:UsersBen HallDocumentsVisual Studio 2008ProjectsIntroToXUnitIntroToXUnitExtensionsClass1.cs(20,0): at IntroToXUnitExtensions.Ext.Theory_InLine(String value, Int32 expectedLength)

2 passed, 1 failed, 0 skipped, took 1.96 seconds

This is great for reducing the amount of duplicate test code and really helps readability as if you want to add additional test cases you just include another attribute.  Sadly, the ReSharper plugin just thinks this is a single test – instead of three separate tests like TD.net does.  Having it just as a single test makes it difficult to identify the failing test.

image

Moving on, next is the PropertyData attribute.  Property Data allows you to specify a property which returns an IEnumerable.  Below is my property which returns the same data as in the above test. I’ve hard coded the values, but this could some from another source to meet your own requirements.

public static IEnumerable MyTestData
{
  get
  {
       yield return new object[] { “hello”, 5 };
       yield return new object[] { “hello world”, 11 };
       yield return new object[] { “failing”, 0 };
  }
}

With the test, you define a PropertyDataAttribute passing in the name of the Property as a string argument.  The test itself then should accept the same parameters as being returned within the object array (in this case, a string and int).  The code to implement this is as below.

[Theory]
[PropertyData(“MyTestData”)]
public static void Theory_Property(string value, int expectedLength)
{
    Console.WriteLine(“String:” + value + ” With expected length of ” + expectedLength);
    Assert.Equal(expectedLength, value.Length);
}

When it hits the failing test, TD.net outputs the following.  I think this might be a bug as the output isn’t as clean as Inline. ReSharper still threats this as a single test.

String:hello With expected length of 5
String:hello world With expected length of 11
String:failing With expected length of 0
TestCase ‘M:IntroToXUnitExtensions.Ext.Theory_Property(System.String,System.Int32)’
failed: Exception has been thrown by the target of an invocation.
    System.Reflection.TargetInvocationException: Exception has been thrown by the target of an invocation. —> Xunit.EqualException: Assert.Equal() Failure
    Expected: 0
    Actual:   7
    E:UsersBen HallDocumentsVisual Studio 2008ProjectsIntroToXUnitIntroToXUnitExtensionsClass1.cs(39,0): at IntroToXUnitExtensions.Ext.Theory_Property(String value, Int32 expectedLength)
       — End of inner exception stack trace —
…….

Some ‘limitations’, not sure if limitations is the right word – more rules of usage.  The property must be within the same class as the test being executed and the property must return IEnumerable>.  However the advantage of this is what we can reuse the property in multiple different tests instead of redefining the test cases for each test like with Inline.

The next set of attributes pull data from an external location.  The first is ExcelData, this allows us to use a Excel spreadsheet as the source of the data for the tests. By using an excel spreadsheet, we can easily edit and maintain the test data separate to the actual code but it also removes any dependency on having a database setup to hold out test data.  The test with the attribute would look something like below.  You specify the Excel file to use and then a query which will be used to pull the data, the TestData name is actually a Named Range in Excel so the test knows what data to use.

[Theory, ExcelData(@”ExcelTestData.xls”, “select * from TestData”)]
public void Theory_Excel(string value, int expectedLength)
{
    Console.WriteLine(“String:” + value + ” With expected length of ” + expectedLength);
    Assert.Equal(expectedLength, value.Length);
}

However, the first time I executed this test I got an exception which was something like:

“The Microsoft Jet database engine could not find the object…”

The reason for this was because I hadn’t included the ExcelTestData.xls file into the project and set Copy to Output to Copy always.

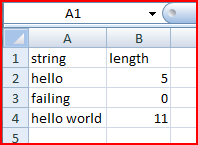
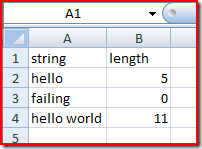
The file ExcelTestData contains the following, note you must include a header (otherwise your first test case is ignored):

image

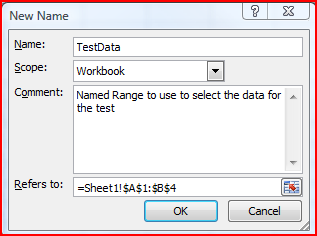
To set the data as a named range, right the block of data (including header), right click and select Name a range

image

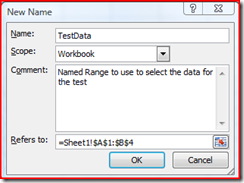
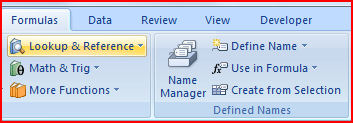
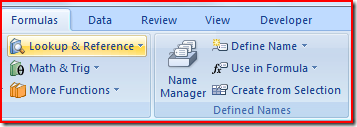
If you want to edit or delete an existing name, then you need to use the Name Manager under the Formulas tab

image

Important note – it must be a Excel 2003 format – not the 2007 format.

Next is the SqlServerDataAttribute. This allows us to use data within a Sql Server Database and use a SELECT statement to return the test data we want to use within our test code.  This is great when combined with a tool such as Red Gate’s SQL Data Generator.

The SqlServerDataAttribute accepts either Server, Database, SelectStatement or Server,Database,Username,Password,SelectStatement.

[Theory]
[SqlServerData(“(local)”, “IntroToXUnit”, “SELECT teststring, expectedLength FROM TestDataTable”)]
public void Theory_SqlServer(string value, int expectedLength)
{
    Console.WriteLine(“String:” + value + ” With expected length of ” + expectedLength);
    Assert.Equal(expectedLength, value.Length);
}

One important note, the amount of columns returned from the select statement must match the parameters of the test.

Finally, OleDBDataAttribute works in a similar fashion to SqlServerDataAttribute however allows you to connect to other data sources apart from SqlServer.  The attribute is:

[OleDbDataAttribute(string connectionString, string SelectStatement);

AutoRollback

Similar to MbUnit’s Rollback feature, the extensions library has an AutoRollback attribute. By adding this attribute to your test, the entire test will be wrapped within a transaction so once the test has finished (passed or failed) the transaction will be rolled back meaning any changes will be undone.  For example, if we delete the entire customers table, once the test has finished the changes will be rolled back – leaving the database in the same state as before the test.  This is very important for test isolation as we want each test to be independent of any other tests, when it comes to interacting with the database we especially don’t want any tests making permanent changes to the database which is used by other tests.

[Fact]
[AutoRollback]
public void AutoRollback()
{
    string connectionString = “Data Source=BIGBLUE;Initial Catalog=Northwind;Integrated Security=True”;

    using (SqlConnection connection = new SqlConnection(connectionString))
    {
        connection.Open();
        //SqlCommand command = new SqlCommand(“DELETE FROM Customers”, connection);
        //command.ExecuteNonQuery();

        SqlCommand command2 = new SqlCommand(“SELECT CustomerID FROM Customers”, connection);
        SqlDataReader reader = command2.ExecuteReader();
        try
        {
            while (reader.Read())
            {
                Console.WriteLine(String.Format(“{0}”, reader[0]));
            }
        }
        finally
        {
            // Always call Close when done reading.
            reader.Close();
        }
    }
}

The Rollback attribute also includes additional properties, IsolationLevel, TransactionScopeOption and a Timeout. 

FreezeClock

Unit testing anything to do with the system clock is always difficult!  The problem is that you don’t know what time your tests will be executed, and you definitely don’t want to limit them to only running at one extract moment.  In my article Beginning to Mock with Rhino Mocks and MbUnit – Part 1: ASP Alliance I spoke about mocking the date time to get around this.

When I first heard about this I was intrigued how they managed to freeze the clock, turns out it wasn’t so special – but still useful.  What the extensions framework provides is a Clock class which is a wrapper around the .Net DateTime class.  It properties three properties to access the current DateTime – Now, Today, UtcNow.

In your production code, you use this Clock class instead of DateTime to offer all of your date functionality. When dealing with dates, you would do something like below (of course, instead of outputting to the console you would do something real like query the database).

public class ProductionCode
{
    public void ProcessSomethingInvolvingTime()
    {
        Thread.Sleep(1500);
        Console.WriteLine(Clock.Now);
    }
}

To test this we would then add the FreezeClock attribute, which automatically freezes the Clock object for us. We then use the same Clock.Now method to access the now frozen time.

[Fact, FreezeClock]
public void FrozenProductionCode()
{
    DateTime expected = Clock.Now;
    Console.WriteLine(expected);

    ProductionCode pc = new ProductionCode();
    pc.ProcessSomethingInvolvingTime();
}

Outputting both to the console, we verify that the two dates are actually the same – impossible with the standard DateTime.

07/01/2008 00:48:26
07/01/2008 00:48:26

1 passed, 0 failed, 0 skipped, took 3.56 seconds.

However, I really really don’t like the fact that I would have to use the Clock class and reference xunitext within my production code.  Just gives me a nasty feeling and I can’t imagine this is how Brad and James wanted it to be used.  Instead, I would prefer to use a type of Dependency Injection (well Date Injection), passing in a DateTime object into the method under test.

public void ProcessSomethingInvolvingTimeDI(DateTime now)
{
    Thread.Sleep(1500);
    Console.WriteLine(now);
}

Our test now looks like this.  Instead of letting the method obtain the time itself we give it the DateTime object (which we got from Clock.Now) to use.

[Fact, FreezeClock]
public void FrozenProductionCodeDI()
{
    DateTime expected = Clock.Now;
    Console.WriteLine(expected);

    ProductionCode pc = new ProductionCode();
    pc.ProcessSomethingInvolvingTimeDI(expected);
}

When we run the test, the date time is still the same and still frozen. However, if we are doing this why not just use the DateTime object itself?

[Fact]
public void DateTimeProductionCodeDI()
{
    DateTime expected = DateTime.Now;
    Console.WriteLine(expected);

    ProductionCode pc = new ProductionCode();
    pc.ProcessSomethingInvolvingTimeDI(expected);
}

I think its something useful, but not sure if I like it.

AssumeIdentity

Assume Identify allows us to change the Current Principal (the user currently executing the assembly).  This is used for various things such as Role management and within CAS (Code Access Security).

[Fact]
public void AssumeIdentityWithoutAttribute()
{
    Console.WriteLine(“Username of Thread:” + Thread.CurrentPrincipal.Identity.Name);
}

What is outputted is nothing.

“Username of Thread: “

If we use the AssumeIdentityAttribute, we can pass in a RoleName for which the user executing the test will be a remember of.

[Fact, AssumeIdentity(“RoleName”)]
public void AssumeIdentityWithAttribute()
{
    Console.WriteLine(“Username of Thread:” + Thread.CurrentPrincipal.Identity.Name);
    Assert.True(Thread.CurrentPrincipal.IsInRole(“RoleName”));
}

If we run this test, what is outputted is the name of XUnit and IsInRole returns true.

“Username of Thread:xUnit”

If a method we was testing involved CAS as below, the user exectuing the test would have to be a remember of that role – not always the case for build servers.

[PrincipalPermission(SecurityAction.Demand, Role = “Administrators”)]
public void AdminOnly()
{
    Console.WriteLine(“Executing….”);
}

With AssumeIdentity, the test can correctly execute the method.

[Fact, AssumeIdentity(“Administrators”)]
public void AssumeIdentityCAS()
{
    ProductionCode p =new ProductionCode();
    p.AdminOnly();
}

Trace

Adding Trace attribute to your tests causes the test name to be wrote out to the Trace listener before and after the test is being executed. Useful for debugging if your tests have a habit of stopped mid-execution.

RunWithNUnit

Finally, the RunWithNUnit attribute. This method actually lives in the xunitext.nunit.dll assembly.  To check that I wasn’t going made, I created a separate project referencing NUnit 2.4, XUnit and XUnitExt.NUnit.  I then use the XUnit console to make sure I’m executing under XUnit.

The code should look something like this:

[XunitExt.NUnit.RunWithNUnit]
[NUnit.Framework.TestFixture]
public class OldNUnitTests
{
     [NUnit.Framework.Test]
     public void RunWithNUnit()
     {
          NUnit.Framework.Assert.AreEqual(“Running with NUnit”, “Running with NUnit”);
     }
}

However, I couldn’t get this to work correctly as I kept receiving an “error: Exception has been thrown by the target of an invocation. in TargetInvocationException” exception.  I posted on the forum, but at the time of posting no reply.

RunWithNUnit throws exception

In summary, I hope you have found this post useful when getting started using XUnit.net and their extensions. Any feedback/comments then please leave a comment on the post.

Technorati Tags: , ,

Introduction to XUnit

While MbUnit is my unit testing framework of choice, I’ve heard some good reports about XUnit so I decided to take a closer look.  XUnit is a unit testing framework for the .Net platform, created by Brad Wilson and James Newkirk (One of the original developers of NUnit, both currently working for Microsoft) and is available to download from http://www.codeplex.com/xunit.  The framework itself is built using .Net Framework 2.0, doesn’t require any installation (XCopy) which makes it great for storing in source control and includes a TestDriven.NET runner, ReSharper runner and a console runner for executing the tests.

This framework takes a major departure from the other frameworks currently around. The major change is the naming of the attributes which you add to your test methods. Using MbUnitNUnit, your test fixture would look something like:

[TestFixture]
public class MbUnitAccountTests
{
    [TestFixtureSetUp]
    public void TestFixtureSetup()
    {
        Console.WriteLine(“We are currently in the constructor”);
    }

    [Test]
    public void MyFirstTest()
    {
        Console.WriteLine(“We are currently in my first test – well done!”);
        Assert.IsTrue(true);
    }

    [Test]
    public void MyFirstFailingTest()
    {
        Console.WriteLine(“We are currently in my first failing test – not so well done!”);
        Assert.IsTrue(false);
    }

    [TestFixtureTearDown]
    public void TestFixtureTeardown()
    {
        Console.WriteLine(“We are currently disposing.”);
    }
}

However, using XUnit your tests would look something like this:

public class AccountTests : IDisposable   #1
{
    public AccountTests()                          #2
    {
        Console.WriteLine(“We are currently in the constructor”);
    }

    [Fact]                                                   #3
    public void MyFirstTest()
    {
        Console.WriteLine(“We are currently in my first test – well done!”);
        Assert.True(true);
    }

    [Fact]
    public void MyFirstFailingTest()
    {
        Console.WriteLine(“We are currently in my first failing test – not so well done!”);
        Assert.True(false);
    }

    public void Dispose()                           #4
    {
        Console.WriteLine(“We are currently disposing.”);
    }
}

#1 – The first change is that we don’t need to add a TestFixture attribute to our class. Also, XUnit doesn’t have any Test or TestFixture Setup and Teardown attributes, however it does allow you to take advantage of the constructor and the Dispose method (if it implements IDisposable) so you can configure anything before the tests start executing.  You can’t have methods executing before and after each test separately.  The aim of this is to improve test isolation and to make the tests more readable.

#2 – As mentioned above, we use the constructor for the test class to setup anything

#3 – Before, we would say that a method would be a Test.  With XUnit they have taken a different approach and says that TDD is about example driven development and not actually testing (which I agree with to a point) as we use the methods to express intent of the class. By using FactAttribute, we are saying that this is true for this example.

#4 – As mentioned, we use Dispose to clean up anything once the tests have executed.

If we execute the above test cases using the ReSharper plugin, the output would be like below. If you look closely at the output, you can see we are constructing and disposing the test object for EACH TEST. MbUnitNUnit creates the object once and calls the test methods on the same object. Having an object per test improves the test isolation.

image

XUnit does however support a type of Test Setup – just not as we know it. In the code below, we create SomeFixture with a method.  We then use the IUseFixture interface to inject the fixture into the test class. Within the SetFixture method (which is on the interface), we can call any method on the SomeFixture object.

public class SomeFixture
{
    public void SomeMethod()
    {
        Console.WriteLine(“SomeFixture.SomeMethod()”);
    }
}

public class AccountTests : IUseFixture, IDisposable
{
    public void SetFixture(SomeFixture data)
    {
        Console.Write(“SetFixture? t “);
        data.SomeMethod();
    }
//…Your Tests
}

Now if we execute the tests, you can see the method is being called and outputted without us writing any additional code.

image

Moving on, the framework comes a good selection of assertions.  The assertions included are:

  • Contains and Contains
  • DoesNotContain and DoesNotContain
  • Empty
  • Equal
  • False
  • InRange
  • IsNotType and IsNotType
  • IsType
  • NotEmpty
  • NotEqual
  • NotInRange
  • NotNull
  • NotSame
  • Null
  • Same
  • Throws and Throws
  • True

The framework takes full advantage of generics.  Most of them are pretty standard, but two I want to pay special attention to is InRange and Throws.

Firstly, InRange is an interesting method and something which I have really wanted in the past.  The method takes three arguments, the actual value being tested and then the min/max value which the value should be in.  This checks that the actual value is between the two values.  This is useful when you know it should be in an range but you don’t care what the value actually is.

The first is a very simply test which tests to see if myValue is inbetween the min and max values.

[Fact]
public void InRangeInt()
{
    int myValue = 100;
    int min = 1;
    int max = 10;
    Assert.InRange(myValue, min, max);
}

This fails (of course…). The output from TD.net is as follows:

TestCase ‘IntroToXUnit.Tests.AccountTests.InRangeInt’ failed: Assert.InRange() Failure
Range:  (1 – 10)
Actual: 100
    E:UsersBen HallDocumentsVisual Studio 2008ProjectsIntroToXUnitIntroToXUnitClass1.cs(49,0): at IntroToXUnit.Tests.AccountTests.InRangeInt()

This also works with other objects, for example, below does the same thing but with dates.

[Fact]
public void InRangeDateTime()
{
    Assert.InRange(new DateTime(2009, 1, 1), new DateTime(2000, 1, 1), new DateTime(2008, 1, 6));
}

As such, the failing message is this:

TestCase ‘IntroToXUnit.Tests.AccountTests.InRangeDateTime’
failed: Assert.InRange() Failure
Range:  (01/01/2000 00:00:00 – 06/01/2008 00:00:00)
Actual: 01/01/2009 00:00:00
    E:UsersBen HallDocumentsVisual Studio 2008ProjectsIntroToXUnitIntroToXUnitClass1.cs(55,0): at IntroToXUnit.Tests.AccountTests.InRangeDateTime()

The method also has a parameter which accepts a IComparer so you can customize how the checking is done.

The Throws is another departure from traditional unit testing frameworks.  Instead of saying you expect a particular exception to be thrown from somewhere in the test case, you actually define the line of code that you expect to throw the exception – again, improving readability as we know the exact call to expect the exception to be raised from.  As an example, we are testing the following method. 

public void Withdraw(decimal amount)
{
    if(amount <= 0)
        throw new ArgumentException();

    Balance += amount;
}

Using XUnit, the test we would write would look something like below.  When we call a.Withdraw(0), we wrap the call inside a delegate and pass it as a parameter to the Assert.Throws class.  We then define the type of exception we expect to be thrown as the type for the method, in this case ArgumentException.

[Fact]
public void Withdraw_Amount0_ThrowsArgumentException()
{
    Account a = new Account();
    a.Balance = 1000;

    Assert.Throws(delegate { a.Withdraw(0);});
}

This passes successfully.  If we call a different method (one which doesn’t throw the exception).

[Fact]
public void Withdraw_Amount0_ThrowsArgumentException_Fails()
{
    Account a = new Account();
    a.Balance = 1000;

    Assert.Throws(delegate { a.WithdrawWithOutException(0); });
}

Then the test fails with the following error:

TestCase ‘IntroToXUnit.Tests.AccountTests.Withdraw_Amount0_ThrowsArgumentException_Fails’
failed: Assert.Throws() Failure
Expected: System.ArgumentException
Actual:   (No exception was thrown)
    E:UsersBen HallDocumentsVisual Studio 2008ProjectsIntroToXUnitIntroToXUnitClass1.cs(76,0): at IntroToXUnit.Tests.AccountTests.Withdraw_Amount0_ThrowsArgumentException_Fails()

The final thing I want to talk about is other common scenarios, such as Ignore and Timeout for tests.  Both Skip and Timeout are parameters on the Fact attribute. If you want a test to be skipped, then you set the Skip attribute and give a reason.

[Fact(Skip = “Takes too long”)]
public void SkippedTest()
{
    //Never executed.
}

When the test is executed, the following will be outputted.

TestCase ‘IntroToXUnit.Tests.AccountTests.SkippedTest’ not executed: Takes too long

0 passed, 0 failed, 1 skipped, took 2.18 seconds.

Timeout is set in a similar fashion, but you give it the timeout in milliseconds.  Below, we want the test to timeout after 1 seconds.

[Fact(Timeout = 1000)]
public void TimeoutTest()
{
    Thread.Sleep(5000);
}

Once the timeout is reached, it fails and the output is as follows.

TestCase ‘IntroToXUnit.Tests.AccountTests.TimeoutTest’ failed: Test execution time exceeded: 1000ms

0 passed, 1 failed, 0 skipped, took 4.15 seconds.

In summary, that has been a quick summary of XUnit and what it can offer. The framework has some really interesting concepts, but I don’t know if its ready for a full production test suite just yet.  It will be interesting to see what Brad and James does once 1.0 is released.

Technorati Tags: , ,

Screencast: Getting started with MbUnit

Last weekend I decided it would be great fun to do a simple screencast about getting started with MbUnit.  It’s just a very quick, create project, add reference, execute screencast but hopefully it will be useful if this is your first time to a unit testing framework and you want to get started. It also gave me chance to play around with Camtasia.

Well, it wasn’t as much fun as I first thought. I had a number of attempts to find out how to actually create a screencast and I think I fall into most pitfalls along the way (but its all experience right?), that can be another post.

The outcome was that I managed to created a screencast on Getting Started with MbUnit.

Download: Screencast_GettingStartedWithMbUnit.wmv

Length: 8 Mins 56 seconds

Size: 8.71MB

Now I have a better understanding of what to do, I might create a few more! Next ones will be better…

Technorati Tags: , ,

How to Unit Test – WatiN, MbUnit and ASP.net

Today, I am going to be looking at WatiN, which stands for Web Application Testing in .Net, and seeing how well it actually works with an ASP.net web application.

WatiN is a type of record and playback framework to allow for automating the UI testing for web applications.  It uses IE and allows you to interact with the page, for example clicking buttons and typing in text.

A simple example from their documentation shows how to search for WatiN on google and assert you got the correct results back.

[Test]
public void SearchForWatiNOnGoogle()
{
using (IE ie = new IE(“http://www.google.com”))
{
  ie.TextField(Find.ByName(“q”)).TypeText(“WatiN”);
  ie.Button(Find.ByName(“btnG”)).Click();
  Assert.IsTrue(ie.ContainsText(“WatiN”));
}
}

You can use any test framework to get started, with MbUnit you simply write the tests as normal, but in your test fixture attribute you need to set the ApartmentState to STA. ApartmentState is part of .Net which states how the thread should execute. STA means that the thread will create and enter a single threaded apartment, everything will just be kept on the single thread. 

[TestFixture(ApartmentState = ApartmentState.STA)]

If you don’t have this set, when you run your tests you will receive the following exception:

Message: The CurrentThread needs to have it’s ApartmentState set to ApartmentState.STA to be able to automate Internet Explorer.

Type: System.Threading.ThreadStateException
Source: WatiN.Core
TargetSite: Void CheckThreadApartmentStateIsSTA()

Now we have running tests, we can start to look at testing a ‘real’ application. Below is the screenshot of the application under test (AUT).

image

Entering information would cause the page to look like this:

image

Very simple.  To test this worked correctly, we would want to simulate what the user is doing and to verify it worked the same way a person would, in this case that it displayed the search term typed into the text box.

First we need to find the text box (called searchText) by it’s name and enter a string.  We then find the button (by its value – the text displayed to the user and not the ID, the button ID is in fact Button1) and click it.  We then verify the response.

[Test]
public void WatiNSearchText_SearchWatiN_TextDisplayedOnScreen()
{
    IE ie = new IE(“
http://localhost:49992/WatiNSite/”);

    // Find the search text field and type Watin in it.
    ie.TextField(Find.ByName(“searchText”)).TypeText(“WatiN”);

    // Click the search button.
    ie.Button(Find.ByValue(“Search”)).Click();

    //Verify it contains search term.
    bool result = ie.Text.Contains(“WatiN”);
    Assert.IsTrue(result);
}

The URL points to the ASP.net development server for the solution, with a static port set.

image

That works with simply html, but what happens when ASP.net is pain with the naming. When using a master page with ASP.net, you place all of the pages content within a ContentPlaceHolder. When ASP.net renders this, to ensure naming of elements does not clash it prefixes the IDs.

Without using the placeholder, the textbox html is:

However, after using master pages it becomes:

Not great! All the elements are referred as strings, by moving to master pages all of our tests would break. WatiN will report this as:

Message: Could not find a ‘INPUT (text password textarea hidden) or TEXTAREA’ tag containing attribute name with value ‘searchText’

One solution has been provided by James Avery in his WatiN Test Pattern post.  Here, he basically says that each page in the website should have a adapter in the test code which we code against which in turn calls the page (this is not mocking the page).  It means that changes to the website, such as naming, requires only changing the adapter class to match.  Following his pattern, the test would be:

[Test]
public void WatiNSearchText_SearchWatiN_TextDisplayedOnScreen2()
{
    Default page = new Default(“
http://localhost:49992/WatiNSite/”);

    page.SearchText.TypeText(“WatiN”);

    page.SearchButton.Click();

    bool result = page.Text.Contains(“WatiN”);
    Assert.IsTrue(result);
}

Its a lot easier to read as everything is referred to as the page and you can easily imagine what is happening.  The adapter looking like this:

public class Default : IE
{
    public TextField SearchText
    {
        get { return TextField(Find.ByName(“searchText”)); }
    }

    public Button SearchButton
    {
        get { return Button(Find.ByValue(“Search”)); }
    }

    public Default(string url) : base(url)
    {

    }
}

We could even take this a step on and abstract the searching into its own method which we call in the test.

    public void SearchFor(string term)
    {
        SearchText.TypeText(term);
        SearchButton.Click();
    }

The test would then be:

[Test]
public void WatiNSearchText_SearchWatiN_TextDisplayedOnScreen3()
{
    Default page = new Default(“
http://localhost:49992/WatiNSite/”);

    page.SearchFor(“WatiN”);

    bool result = page.Text.Contains(“WatiN”);
    Assert.IsTrue(result);
}

This does solve some of the problems as it makes the tests less dependent on the application code.  However, the ASP.net naming is still getting in the way. If we add another container or the element is inside a custom control we are still going to have a problem.  The answer is RegEx!

In our adapter, I change the way we find the element to use a method RegExName. Now its Find – ByName – RegExName – ElementName.

public TextField SearchText
{
    get { return TextField(Find.ByName(RegExName(“searchText”))); }
}

Our RegExName method just takes in the elementname and return a regex which will ignore all of the ASP.net prefixes.

private Regex RegExName(string elementName)
{
    return new Regex(“.*” + elementName + “$”);
}

By using an adapter and RegEx we can abstract away from the real implementation and make our tests a lot more beneficial.  The tests are quite easy to write as long as you keep things focused. By arranging your tests as above, you should have a lot more long term success.

But having an automated test run for the UI will never replace a human tester as there are other scenarios to test for, cross browser, usability, wording which a test framework cannot test.

Technorati Tags: , , ,

WatiN and Vista

Been meaning to post this for a while now but haven’t found the time.  When trying out WatiN on my Vista machine I kept receiving the following error message:

WatiN.Core.Exceptions.TimeoutException: Timeout while ‘waiting for main document becoming available’

Turns out that WatiN and Vista don’t play nicely together and on Vista you will need to disable UAC in order for WatiN to execute correctly.

It kept me guessing for an hour so I thought I would post regarding this matter. Expect more posts on WatiN soon…

UPDATE: Or, if you don’t want to disable UAC, make sure your test runner is running as Administrator

Technorati Tags: ,,

How To Unit Test – Linq to SQL and Mocking

All problems in computer science can be solved by another level of indirection Butler Lampson (Or Abstraction as some people refer to it as)

Over the last few posts, I have been covering how to unit test various topics, in this post I will cover Linq to SQL. I’ve been thinking about this for a while, but never had chance to post about it. Various people have spoken about this before, but I thought I would give my view.  I’m going to discuss how to unit test systems involving Linq to SQL, how to mock Linq to SQL, how this will come into play with the new ASP.net MVC Framework and how TypeMock might have the answer.

Scenario

For this post, I decided to implement a small part of a shopping cart.  You can return a list of categories, a list of products for each category and the product itself.

Unit Testing Linq to SQL

In my previous post, I discussed how to unit test Linq to XML and mentioned how it really isn’t that different to any other system.  Linq to SQL is similar in the fact that you can easily ignore the underneath implementation (Linq) when unit testing, however I’m going to focus more on how to decide the system and how it all should hang together.

Like in any Linq to SQL implementation you will need a data context.  While you could unit test this implementation, I always prefer to test it as part of a higher layer as its generated code to give the tests more context and more meaningful for the system. The most important part of the system will be how we actually access the DataContext, retrieve the data and make sure that it can be effectively unit tested.

In my system I will have my HowToUnitTestDataContext generated by the Linq to SQL Designer.  I will then have a ProductController which will talk to my DataContext and return the generated object. Unlike with SubSonic, we can return the designer generated objects as they are just POCO (Plain Old C# Objects).  I will then have a set of unit tests targeting the ProductController.  We are not doing any mocking at this point and all of our unit tests will hit the database.

First test, create a data context and ensure it has a connection string.  This ensures everything is setup correctly.

[Test]
public void CreateDataContext_ConnectionString_ReturnsDataContextObject()
{
    HowToUnitTestDataContext db = ProductController.CreateDataContext();
    Assert.IsNotNull(db);
    Assert.IsNotNull(db.Connection);
}

All the method does is initialise a data context and return it to the caller. The next test requests a list of all the categories from the database.  However, because we haven’t populated anything yet it should just return an empty list.

[Test]
public void GetCategories_NoContent_ReturnEmptyList()
{
    List categories = ProductController.GetCategories();
    Assert.IsNotNull(categories);
    Assert.AreEqual(0, categories.Count);
}

We now have a base structure in place and can start filling in the details. The following test first inserts a category into the database (code is in the solution which you can download at the bottom of the post).  It then requests all the categories from the database and ensures that what we returned was correct. We then use the MbUnit RollBack feature to ensure the database is left in the same state as it was before the test. The rollback works perfectly with Linq to SQL!

[Test]
[RollBack]
public void GetCategories_SimpleContent_ReturnPopulatedList()
{
    InsertCategory();

    List categories = ProductController.GetCategories();
    Assert.IsNotNull(categories);
    Assert.AreEqual(1, categories.Count);
    Assert.AreEqual(“Microsoft Software”, categories[0].Title);
}

The code for GetCategories() is a simply Linq to SQL statement which returns a generic list.

public static List GetCategories()
{
    HowToUnitTestDataContext db = CreateDataContext();
    var query = from c in db.Categories
                       select c;
    return query.ToList();
}

The next important test is the one which returns product information.  Here, we use a tested GetCategory method to return a particular category. We then insert a temp product into the database for that category, meaning that we now have a known database state to work with. The test then simply verifies that when given a category we can return all the products in the database for it.

[Test]
[RollBack]
public void GetProductsForCateogry_ValidCategoryWithProduct_PopulatedList()
{
    InsertCategory();

    Category c = ProductController.GetCategory(“Microsoft Software”);
    InsertProduct(c);

    List products = ProductController.GetProductsForCategory(c);
    Assert.AreEqual(1, products.Count);
    Assert.AreEqual(“Visual Studio 2008”, products[0].Title);
}

The implementation of this method is a little bit more complex as it joins a ProductCategories table to return the products within the particular category.

public static List GetProductsForCategory(Category c)
{
    HowToUnitTestDataContext db = CreateDataContext();
    var query = from p in db.Products
                       join pc in db.ProductCategories on p.id equals pc.ProductID
                       where pc.CategoryID == c.id
                       select p;

    return query.ToList();
}

The final method is to return a particular product based on its ID.  It works in a similar fashion to the previous methods.

[Test]
[RollBack]
public void GetProductByID_ValidProductID_ReturnProductID()
{
    InsertCategory();

    Category c = ProductController.GetCategory(“Microsoft Software”);
    InsertProduct(c);

    List products = ProductController.GetProductsForCategory(c);
    Assert.AreEqual(1, products.Count);

    Product p = ProductController.GetProduct(products[0].id);
    Assert.AreEqual(p.Title, products[0].Title);
}

In the implementation we then just return a single product using a lambda expression.

public static Product GetProduct(int productID)
{
    HowToUnitTestDataContext db = CreateDataContext();

    Product product = db.Products.Single(p => p.id == productID);
    return product;
}

That pretty much covers unit testing basic Linq to SQL. Other parts of the system, such as the business layer or UI layer, can then talk directly to the ProductController to return all the information. However, this doesn’t offer anything if you want to mock out Linq to SQL.

Mocking Linq to SQL

Unit testing Linq to SQL isn’t very difficult, however mocking Linq to SQL is a different beast. As with SubSonic, the best approach to take is to abstract away from your database. In this case, I am going to add an additional layer in between my ProductController and my DataContext called LinqProductRepository which can then be mocked. 

My first set of tests are focused on testing the LinqProductRepository which talks to my DataContext and as such my database. The tests are very similar to the above tests for ProductController. I always test this against the database to ensure that it will work effectively when its in production/live, with mock objects you can never have the same level of confidence.

LinqProductRepository m_ProductRepository = new LinqProductRepository();
[Test]
[RollBack]
public void GetCategoryByName_NameOfValidCategory_ReturnCategoryObject()
{
    InsertCategory();

    Category c = m_ProductRepository.GetCategory(“Microsoft Software”);

    Assert.AreEqual(“Microsoft Software”, c.Title);
    Assert.AreEqual(“All the latest Microsoft releases.”, c.Description);
}

To give you an idea of the implementation, the GetCategory method looks like this:

public Category GetCategory(string categoryTitle)
{
    using (HowToUnitTestDataContext db = CreateDataContext())
    {
        Category category = db.Categories.Single(c => c.Title == categoryTitle);
        return category;
    }
}

In order to make the ProductRepository mockable it is required to implement an interface.  The interface is very simply, as shown:

public interface IProductRepository
{
    List GetCategories();
    Category GetCategory(string categoryTitle);
    List GetProductsForCategory(Category c);
    Product GetProduct(int productID);
}

We now have a fully implemented and tested ProductRepository so we can create the ProductController. To start with, in my ProductControllerTests I setup the variables and the [Setup] method for each test.  This ensures that we have our MockRepository (via RhinoMocks) to hand, a copy of our mocked IProductRepository together with our stub category and product.  These two objects are simple well known objects (for the system) which we will return from our mocked methods.  I’m using parameter injection to set the mocked repository on the ProductController which will be used during the tests. By using a parameter we can have a default implementation for our production code but a way for our test code to injection the mock object.

MockRepository m_Mocks;
IProductRepository m_ProductRepos;
Category m_MockedCategory;
Product m_MockedProduct;

[SetUp]
public void Setup()
{
    m_Mocks = new MockRepository();
    m_ProductRepos = m_Mocks.CreateMock();
    ProductController.ProductRepository = m_ProductRepos;

    m_MockedCategory = MockCategory();
    m_MockedProduct = MockProduct();
}

We can then write our unit tests based on this information which will be similar to our previous units tests as they are implementing the same requirements. Within this test, we setup our expected return for the method GetCategories on our ProductRepository, this simply uses C# 3.0 Collection Initialises to create a list with one item, the stub category. We can then execute our test/asserts against the ProductController to view it is all linked correctly and working as expected.

[Test]
public void GetCategories_SimpleContent_ReturnPopulatedList()
{
    using (m_Mocks.Record())
    {
        Expect.Call(m_ProductRepos.GetCategories()).Return(new List { m_MockedCategory });
    }

    using (m_Mocks.Playback())
    {
        List categories = ProductController.GetCategories();
        Assert.IsNotNull(categories);
        Assert.AreEqual(1, categories.Count);
        Assert.AreEqual(“Microsoft Software”, categories[0].Title);
    }
}

The ProductController simply passes the call onto our ProductRepository, which is set using a parameter in our test Setup.

private static IProductRepository m_ProductRep = new LinqProductRepository();

public static IProductRepository ProductRepository
{
    get { return m_ProductRep; }
    set { m_ProductRep = value; }
}

public static List GetCategories()
{
    return ProductRepository.GetCategories();
}

This allows us to use the ProductController with a mock object. ProductController could be/do anything and by going via the LinqProductRepository we can use mock objects to save us accessing the database.  In our real system, we would use the real tested LinqProductRepository object.

ASP.net MVC and Linq to SQL

Recently there has been a lot of buzz around the new ASP.net MVC framework the ASP.net team are releasing (CTP soon).  If you haven’t read about this, Scott Guthrie has done a great post on the subject.

However, Scott Hanselman did a demo of the MVC framework at DevConnections and has posted the source code online here – DevConnections And PNPSummit MVC Demos Source Code. Demo 3 and 4 is about TDD and uses mock objects and Linq to SQL.

The layout is as follows:

ASP.net MVC

The BlogController talks to a IPostRepository object which is either LinqPostRepository or TestPostRepository. They use a Stub object instead of a mock object, but the architecture is the same as my system. I would just like to say I didn’t just copy them 🙂

From this demo code, it looks like the way to mock your data access layer will be to use this approach.

Mocking the DataContext

The thing which first struck me about this was why couldn’t we just mock the DataContext itself instead of messing around with Repositories and Controllers. The first answer was that it didn’t implement an interface, but that’s a simple fix.  The second problem is that the data context returns everything as System.Data.Linq.Table<>, and this cannot be mocked. It does implement an ITable interface, however you cannot cast another object implementing ITable to Table.

Ayende, creator of Rhino Mocks, wrote a post called Awkward Testability for Linq for SQL which covers why it cannot be mocked.  Its a shame the Linq team didn’t think about TDD and Mocking the repository as it would have made a big difference to the system design. Maybe this is a lesson for anyone creating an API at the moment – think about testability! I think the ASP.net team have realised this.

Mocking with TypeMock

That all said, it looks like TypeMock might be able to provide an answer.  TypeMock is a mocking framework, however is extremely powerful as it can mock any object within your system, it doesn’t care about the implementation or if there is an interface available. It can simply mock anything.  I will be looking at TypeMock more over the next few weeks, but before then visit their site. It’s not free (30 day trail available), but if you need to do this type of mocking then it really is your only solution and it can greatly increase your test coverage and your test suite as a whole.

You can read the initial ideas over on their blog – Eli Lopian’s Blog (TypeMock) » Blog Archive » Mocking Linq – Preview.  Going in depth on TypeMock and Linq deserves its own post, however I couldn’t resist posting some code now.

Below, we have a test which mocks out querying a simple list.  Here, we have a list of customers and a dummydata collection. Our actual Linq query is against the m_CustomerList, however TypeMock does some ‘magic’ under the covers and tells the CLR that the query should just return the dummyData. As such, instead of just returning the one customer record, we are returning the two dummy data records. How cool!!!

public class Customer
{
    public int Id { get; set; }
    public string Name { get; set; }
    public string City { get; set; }
}

[Test]
[VerifyMocks]
public void MockList()
{
    List m_CustomerList = new List {
        new Customer{ Id = 1, Name=”Dave”, City=”Sarasota” },
        new Customer{ Id = 2, Name=”John”, City=”Tampa” },
        new Customer{ Id = 3, Name=”Abe”, City=”Miami” }
    };

    var dummyData = new[] {new {Name=”fake”,City=”typemock”},
               new {Name=”another”,City=”typemock”}};
    using (RecordExpectations recorder = RecorderManager.StartRecording())
    {
        // Mock Linq
        var queryResult = from c in m_CustomerList
                          where c.City == “Sarasota”
                          select new { c.Name, c.City };
        // return fake results
        recorder.Return(dummyData);
    }

    var actual =  from c in m_CustomerList
                  where c.City == “Sarasota”
                  select new { c.Name, c.City };
    Assert.AreEqual(2, actual.Count());
}

But it gets better!  Given our original ProductController (no repositories, mocks, fakes, stubs) we can tell TypeMock that for this statement, always return the dummyData. As such, the ProductController never hits the database.

[Test]
[VerifyMocks]
public void MockDataContext()
{
    Category category = new Category();
    category.id = 1;
    category.Title = “Test”;
    category.Description = “Testing”;

    List dummyData = new List { category };
    using (RecordExpectations r = RecorderManager.StartRecording())
    {
        // Mock Linq
        List mocked = ProductController.GetCategories();
        // return fake results
        r.Return(dummyData);
    }

    List categories = ProductController.GetCategories();
    Assert.AreEqual(1, categories.Count);
    Assert.AreEqual(“Test”, categories[0].Title);
    Assert.AreEqual(“Testing”, categories[0].Description);
}

Feel free to download the solution and debug the methods to see it for yourself, I think its cool.

Summary

In summary, I hope you have found this post useful and interesting. I’ve covered how to unit test your Linq to SQL code and how you go about mocking Linq to SQL. I then finished by giving you a quick look at what TypeMock can offer. It is possible to mock Linq to SQL, however it’s not as simple as it could be. If you have any questions, please feel free to contact me.

Download Solutions – TestingLinqToSQL.zip | TestingLinqToSQLMock.zip | TestingLinqToSQLTypeMock

How To Unit Test – Linq To XML

Now that I’m back from TechEd, it’s time to continue my series of “How To Unit Test” posts.  In this post, I’ve decided to have a quick look into Linq to XML and how that could be unit tested.  I’ve decided to pick the nice standard sample for Linq to XML – A Rss Reader :).  This also follows on nicely from my previous post on How To Unit Test Using SubSonic and Rhino Mocks

Unit testing Linq to Xml is no great big secret. The fact that you are performing Linq queries under the covers doesn’t really affect your unit tests, but it’s still quite interesting.

To start with, I’m going to be using the BBC News feed as my sample xml feed to query. My first test is to return an RssChannel object which had a url and title.  Note, I’m not implementing all the properties as that would get very boring very quickly.

[Test]
public void GetRssChannel_StandardRss_ReturnDataRssChannel()
{
    RssProcessor rss = new RssProcessor();
    RssChannel chan = rss.GetRssChannel(TestHelper.url);
    Assert.AreEqual(TestHelper.url, chan.Url);
    Assert.Contains(chan.Title, “BBC”);
}

The implement on the method then simple queries a XDocument, creates my RssChannel object and returns it to the caller.

public RssChannel GetRssChannel(string url)
{
    XDocument x_Feed = XDocument.Load(url);
    var feeds = from f in m_Feed.Elements(“rss”).Elements(“channel”).Take(1)
                       select new RssChannel
                       {
                           Title = f.Element(“title”).Value,
                           Url = m_Url
                       };

    return feeds.First();
}

The next method does a similar function but returns a RSSItem for the position in the document (Linq to XML is great for doing queries like this).

[Test]
public void GetRssItem_RssFeed_ReturnsASingleRSSItem()
{
    RssProcessor rss = new RssProcessor();
    RssItem item = rss.GetRssItem(TestHelper.url, 1);
    Assert.IsNotNull(item);
    Assert.IsNotNull(item.Title);
}

The query would be:

var feeds = from f in m_Feed.Elements(“rss”).Elements(“channel”).Elements(“item”).Skip(itemPosition – 1).Take(1)
            select new RssItem
            {
                Title = f.Element(“title”).Value
            };

Instantly we can see from the tests that we can do a bit of refactoring.  Firstly, we can move the creation of the RssProcessor into a [Setup] method.  We can also give the Url for the feed as a parameter in the constructor.  This makes our test code cleaner as there is less duplication, but also more readable as we are focusing more on the intent of the tests.

The complete solution can be downloaded at the end of the post, however there is one more test which I want to refer to.

The following returns an RssFeed object which has a reference to the RssChannel and a List.

[Test]
public void GetRssFeed_EntireFeed_ReturnsChannelAndItems()
{
    RssFeed feed = m_Rss.GetFeed();
    Assert.IsNotNull(feed.Channel);
    Assert.Contains(feed.Channel.Title, “BBC”);
    Assert.GreaterThan(feed.Items.Count,0);
}

The test works fine, however based on the implementation on the existing tests, each method loads their own Rss feed/XDocument. This is great for isolation, but doesn’t work well when you put it all together as loading a single feed will cause it to actually be loaded three times – that simply doesn’t scale.

The solution was to have a LoadFeed method on the RssProcessor which would be called before GetFeed().  This could also allow for a single object to be used for returning multiple feeds.  Note for future: My first test should really have been for this method to make sure I can actually receive an object to work with before querying it.

m_Rss.LoadFeed(TestHelper.url);

Having this single method as the way to load and return the Xml makes mocking very easy. Following the approaches in previous posts, I created myself an IFeedGetter object, with a property to injection a mock if required on my RssProcessor.  The load method then simply passes it’s call onto the IFeedGetter object.

public XDocument LoadFeed(string url)
{
    m_Url = url;
    m_Feed = m_FeedGetter.GetXDocument(url);
    return m_Feed;
}

I can then create a stub feed getter to be used during unit testing.

public class StubFeedGetter : IFeedGetter
{
    public System.Xml.Linq.XDocument GetXDocument(string url)
    {
        return XDocument.Load(System.Xml.XmlReader.Create(new System.IO.StringReader(GetFakeXml())));
    }
}

So that’s it,  we have now unit tested our complete Rss implementation using mocks and Linq to XML!  If you need support in getting this to work, please give me a shout.

Download Solution: HowToUnitTest_MockLinq-ToXml.zip

Technorati Tags: , , ,